
20 Linux Tricks That Worth To Try, These Tricks And Tricks Are Shared By Our Readers
These Tricks Are Shared By Our Readers. You Can Also Be A Part Of This By Sharing Your Trick, Which We Share With Other Readers.
Want to play with your favorite open-source operating system? Well, we’ll help you do that better. By keeping the Linux sharing philosophy intact, we offer 20 tricks worth trying.
These tricks and tricks are shared by our readers. You can also share some of these tricks, which we share with other readers.
Increase or decrease the number shown in the Vim editor.
This trick adds or subtracts a number in the Vim editor. Use Ctrl + A to increase and Ctrl + X to decrease.
The following example further illustrates how this works.
Suppose a number, 5, is currently being edited in Vim Editor. Now, if you want to increase or decrease the number to 1, place the mouse cursor on the number and then press Ctrl + A to increase the number (for example, that number becomes 6); If you press Ctrl + A again, it becomes 6 to 7, and so on. In the same way, if you press Ctrl + X, the number drops to 1.
If you hit 8 and then press Ctrl + X, the number decreases to 8. Similarly, if you press 12 and then press Ctrl + A, the number increases to 12.
—AdithyaKiranGangu,
Search and delete files from a folder
If you want to delete all .lock files from a folder, use the following command:
find -name * .lock | xargsrm – rf
This will find and delete all files with the .lock attachment. You can use this method for all the files you want to delete.
—Bridal,
Easy to get the right information
Beginners working in the GNU / Linux ecosystem sometimes have trouble getting the right information from a piece that is not working properly. While this information is required to start the device. This is a command that lets you know the details of all the PCI devices and Kernel drivers associated with them.
Run the terminal and log in as root user. Run the following command now:
lspci – k
Ispci gives you information about PCI jacks as well as the devices connected to them, and -k switches the display where the kernel module is running the device. So if this file does not exist on a device, you need to install the driver for that device.
—Pankaj Tanwar,
Converting numbers in Vim editor
With this trick, you will be able to convert Vim editor numbers that are based on 16 to decimal numbers and vice versa. To convert numbers from base 16 to decimal numbers, type the following text in the Vim editor grammar:
echo 0x111
Then press Enter to get the result:
273
You can also use the following command to convert a number:
: echoprintf (‘% d’, 0x111)
273
Now to convert decimal numbers to 16 …
: echoprintf (‘% x’, 273)
111
You can also run a simple account from the Vim grammar section, for example:
: echoprintf (‘% x’, 273-173)
64
: echo 0x111-0x10
257
—AdithyaKiranGangu,
Using vi commands on the terminal
When working on the terminal, using vi commands makes your job much easier. To set the terminal to vi modes you must use the following command:
set -o vi
You can now use the command (command and insert) modes and the vi extension in the terminal.
—Dipjyoti Ghosh,
Obtaining an IP Address
Here is a one-line command that fetches all your computer’s IP addresses except localhost:
# ifconfig | grep “inetaddr:” | awk ‘{print $ 2}’ | grep -v ‘127.0.0.1’ | cut -f2 -d:
Note: Use the above command called root user.
—BalkaranBrar,
Get your system to talk to you!
Using the Speech Synthesizer command, commonly found on Ubuntu and other versions of Linux, you will be able to get your system to talk.
To do this, use the following command:
# espeak “hello how are you”
You will hear the voice talking to you.
You can use the following command in the format shown to change the pitch:
# espeak -p 80 “hello how are you”
… (Default is 50)
Using the following grammatical form will control the speaking speed in “word count per minute” mode:
# espeak -s 80 “hello how are you”
—Sanjay Goswami,
Measuring network output power between two
Iperf Linux systems is a tool that measures bandwidth and network connection quality. This tool can be easily installed on any Linux operating system. One host should be the client and the other the server.
Make sure Iperf is installed on both operating systems. If it is not installed, use your package manager to install it, then use the following trick.
Now run Iperf on one of the operating systems called a server, as shown below:
Linux-erv3: / home / test / Desktop # iperf -s
————————————————– ———-
Server listening on TCP port 5001
TCP window size: 85.3 KByte (default)
—————————————– ——————-
Now go to the next system and run Iperf-c as client:
Linux-6bg3: ~ # iperf -c 192.168.1.100
————————————————– ———-
Client connecting to 192.168.1.100, TCP port 5001
TCP window size: 16.0 KByte (default)
——————— ————————————–
[3] local 192.168.1.109 port 39572 connected with 192.168.1.100 port 5001
^ C [ID] Interval Transfer Bandwidth
[3] 0.0- 6.3 sec 6.38 MBytes 8.51 Mbits / sec
By default, the Iperf client connects to the Iperf server on the TCP 5001 port, and the bandwidth indicated by Iperf is the bandwidth from client to server. In the example above, the two Linux test systems were connected at 8.51 Mbits / sec via a Wifi wireless network.
—Prasanna,
Record everything you do in the terminal.
Have you ever felt that you have to save everything you do in the terminal to a file? Use the following trick. There is a command called script that can be used with the -a option to save the output of a job in a file.
The following example illustrates how it works:
Mandriva ~: $ script -a lfy
Script started, the file is lfy
Mandriva ~: $ uname -a
Linux localhost.localdomain 2.6.33.5-desktop-2mnb # 1 SMP Thu Jun 17 21:30:10 UTC 2010 i686 i686 i386 GNU / Linux
Mandriva ~: $ uname
Linux
Mandriva ~: $ exit
exit
Script done, file is lfy
Here is the name of the fly file. You can later use the following code to make sure it is correct:
Mandriva ~: $ cat lfy
Script started on Mon 16 May 2011 02:09:47 AM EDT
Mandriva ~: $ uname -a
Linux localhost.localdomain 2.6.33.5-desktop-2mnb # 1 SMP Thu Jun 17 21:30:10 UTC 2010 i686 i686 i386 GNU / Linux
Mandriva ~: $ uname
Linux
Mandriva ~: $ exit
exit
Script done on Mon 16 May 2011 02:10:32 AM EDT
—Sibi,
Wonders of VIM
VIM has widely used command codes. Here are some tips to help you increase your productivity.
VIM as a job comparator:
Use the ‘-d’ button to compare two files in VIM. This command halves the VIM screen vertically and shows the differences.
vim -d file1 file2
Upload new files in separate windows
If you have a pre-loaded file called first.txt in VIM, use ‘: split second.txt’ to create another file called ‘second.txt’ in a single window. Load separately – IM halves the page horizontally and loads the second file. You can use ‘: vsplit’ to halve the page vertically. You can use Ctrl + w to switch between windows.
VIM as a command
Usually, we use VIM as an editor; However, it can also be used as a command. For example, pressing the ‘-c’ button allows the execution of VIM commands. This command replaces all ‘>’ characters with ‘>>’ characters in a FILE.TXT file without running VIM.
vim -c “: s /> / >> / g” -c “: wq” FILE.TXT
To open a file in read-only mode:
Use the ‘-R’ button to open a file in read-only mode; Later, using ‘!’ You can write to the file.
—Satya Prakash,
Check the processor and the architecture of your operating system.
You may want to install a 64-bit operating system on your device, but the processor may only be 32-bit compatible. Sometimes the opposite is also true when you want to install a 32-bit operating system on a device with a 64-bit processor.
With this method, you can know the type of operating system and even the processor, whether it is 32-bit or 64-bit.
Execute the following command to get details of the type of operating system that is installed:
uname – m $
If the operating system is 64-bit then the result (for x86_64 architecture):
x86_64
If the operating system is not 64-bit then the result (for i686 architecture):
i686
To get information about the processor, run the following command:
lshw -class processor | grep width $
The result shown below is 64-bit:
width: 64 bits
If it is a 32-bit type, then the result:
width: 32 bits
Note: Please install lshw if it is not installed on your system.
—SrikanthVittal
Sudoing with Fedora
Have you ever felt tired of entering the password several times after typing ‘su -c’? Type ‘su -c visudo’ once and remove the following line:
#% wheel ALL = (ALL) ALL
Replace the ‘wheel’ with your Sudo password. So if your password is egghead, this is how the line looks.
% egghead ALL = (ALL) ALL
Save and then leave. You did a good job choosing egghead as a sudo user.
—A. Datta,
Let your Linux system welcome you.
Write the following line and name it welcome. sh
echo “Hi zades you are welcome today is“ | festival –tts
date | cut -d ”“ -f 1-3 | festival –tts
Now put the command sh welcome. sh in a start-up. This will give the script the execution components with each login. Once done, restart your system to hear the message written in the Echo command.
The festival command is used to change the text to sound. You can use this command in several ways depending on your creativity. Remember to make sure the festival is installed before performing this trick.
—Vinay Jhedu,
Ignoring letters during tab-completion (TAB-completion)
By default, tab completion (TAB completion) will not be useful when the file name or file location starts with a capital letter. You can make Shell ignore uppercase or lowercase letters by adding the following input in / etc / inputrc:
set completion-ignore-case on
Then restart the shell. From now on, TAB-completion will complete the files and address names by completely ignoring the letters.
Remember to apply changes to inputrc only as a root user.
manreadline
—Sachin P,
Operating System Detection and Distribution Name
Here is a trick that allows you to know your operating system name along with other details:
# lsb_release -a
LSB Version:: core-3.1-ia32: core-3.1-noarch: graphics-3.1-ia32: graphics-3.1-noarch
Distributor ID: CentOS
Description: CentOS release 5.5 (Final)
Release: 5.5
Codename: Final
—Narendra Kangralkar,
View tar contents and rpm files
Here are two simple commands that will show you tar contents and rpm files:
#tar -tvf /path/to/file.tar
Use the following command to view the contents of an rpm file:
#rpm -qlp /path/to/file.rpm
—Giriraj G Rajasekharan,
Play MP3 files
With this trick, you can cut, separate, merge and merge MP3 files on Ubuntu, which improves the output quality.
To cut an MP3 file, you need to install the POC-streamer program as follows:
$ sudo apt-get install POC-streamer Here’s
how to cut an MP3:
mp3cut [-o outputfile] [-T title] [-A artist] [-N album-name] [-t [hh:] mm: ss [+ ms] – [hh:] mm: ss [+ ms]] mp3 [-t …] mp3 -o output: Output file, default mp3file.out.mp3
For example, if you want to cut a minute from an MP3 clip called input.mp3 to a .wave file called output.wav, use the following command:
$ mp3cut -o output.wav -t 00:00 (+0) -01: 00 (+0) input.mp3
If you want to connect two MP3 files, you need to install the mp3wrap program as follows:
$ sudo apt-get install mp3wrap
How to arrange mp3wrap is shown below:
$ mp3wrap merged_filename.mp3 filename1.mp3 filename2.mp3
… When filename1.mp3 and filename2.mp3 are my input files to merge.
Finally, you can convert a large MP3 file to a small file by installing the Mp3split app:
$ sudo apt-get install mp3splt
Now, to fragment the file, run the following command:
$ mp3splt filename.mp3 00.00 01.23 03.20
Filename.mp3 is my input file, which can be split into two MP3 files. One starts from zero to 01:23 and the other starts from one and twenty-three until 03:20. Mp3split can create smaller files even without file decryption.
—RajasekharChintalpudi,
GRUB 2 Recovery
We sometimes encounter a situation where our boot loader crashes. Here are some steps to help you recover your GRUB 2 boot loader.
Boot from a live CD or DVD that supports GRUB 2. (Ubuntu 9.10 or higher CD. DVD takes longer than CD, so I recommend booting from CD).
Open the terminal and run fdisk – l to select the partition you want to recover GRUB 2 from.
Here we assume that you want to recover it from / dev / sda1.
Then run the following commands:
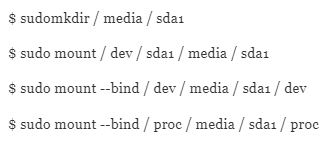
Now chroot the partition by executing the following command:
$ sudochroot / media / sda1
Then reinstall GRUB as follows:
# grub-install / dev / sda
The output should look something like this:
Installation finished. No error was reported.
If you get an error message, try the following command:
# grub-install –recheck / dev / sda
After successful installation, exit chroot and unmount the file systems mounted for GRUB recovery. Reboot now.
#exit

You have completed your GRUB boot loader recovery.
—KousikMaiti,