What Is WinSCP and How to Connect to Your Linux Server With It
If you use Windows on your local computer, as you work with remote Linux servers, you occasionally need to transfer files between these two points. Fortunately, all popular Linux distributions come pre-configured on Alibaba Cloud Elastic Compute Service (ECS) instances with an SSH daemon, which includes support for secure file transfers through SFTP. SFTP is an acronym for SSH (or Secure) File Transfer Protocol. Since the ECS instance already includes an SFTP server, we need an SFTP client to connect to it. In this tutorial, we will learn how to use WinSCP, a client application that supports various transfer protocols such as FTP, SFTP, WebDAV, S3, etc.
What is WinSCP?
WinSCP (Windows Secure Copy) is an open-source GUI tool for securely transferring/editing files from MS Windows to a remote computer, typically a Linux computer. The destination computer must be running an FTP or SFTP server.
This quick guide will teach us how to connect it to a remote Ubuntu 16.04 server.
How to Install WinSCP
Click on the following link to visit WinSCP’s download page. Scroll down until you find the link to the executable for setup. After the download has finished, run the installer.
We will do a typical installation here since we want all the many small files and support for selectively reading file blocks in an interface style. Two panels, side by side, allow a faster and more efficient workflow than the “Explorer” style
Click on Next > until the setup is complete. Instead of the name interface, the install wizard explains each step well.
Set Up Connection to SFTP Server
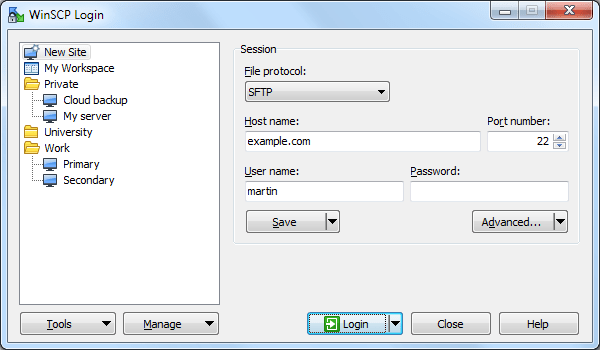
When you first open WinSCP, the login manager will appear, where you can fill in the connection details to your Alibaba Cloud ECS instance(s).
Depending on how you’ve set up your instance, the login method will be identical to the one you’re currently using to connect with your SSH client (such as PuTTY), either with a username and Password or a username and private key.
In the next section, you’ll learn that usernames are in the input fields to log in with a username and a Password. If you log in with a private key, you must fill in all the details below except for the Password field.
Log In with Username and Password
File protocol: we’ll use SFTP since it’s available out of the box on the server. SFTP is good enough for most purposes, but if you often need to download/upload hundreds or thousands of files at a time, you might want to configure a WebDAV server in the future and connect through that protocol. WebDAV works faster when dealing with lots of small files, and it also supports reading file blocks selectively. This allows you to read something in the middle of a 10GB file, without downloading the whole file to your computer.
Hostname: This can be misleading since, instead of names, you can also enter numbers. In most cases, you will fill in the external (Internet) IP address of your instance here (such as “203.0.113.0”). If you’ve already set up a domain name (such as example.com) to point to this instance, you can also use that.
Port number: In this case, the port on which the SSH daemon on your instance is configured to listen. By default, this is 22. For other protocols, such as WebDAV, the default port will be different, for example, 80.
Note: username is case-sensitive. “John Smith” will not work if the user is named “John Smith” on your instance and vice versa. The same is true for passwords.
User name
When connecting through the SFTP protocol, you fill in the username you’re currently using to log in through SSH. In most cases, this will be “root”, since it’s the first user available on a Linux machine and has permissions to read/write files in all locations. It is, however, recommended that Password logins be turned off, at least for root, and only key-based Authentication for this user should be allowed through a directive such as PermitRootLogin without a password added to the SSH daemon configuration file.
Allowing roaming on the server, combined with password authentication, dramatically increases the risk of someone (or something, such as a scanning bot) successfully brute-forcing your Password and compromising your instance. Private keys are resistant to brute-force attacks. If possible for your use case, create an unprivileged user, give it read/write permissions only to specific areas of the filesystem, and use this account to log in with WinSCP. An unprivileged user cannot write, overwrite, or delete important files from your Linux server, helping you avoid occasional mistakes.
After entering all of the information mentioned above and your Password, click Save, so you don’t have to re-enter the same data the next time you want to log in. Afterward, click the Login button. If this is the first time you are connecting to the server, a warning will appear:
This is normal and nothing to worry about. Fingerprints, being unique, are a way to identify that the server we are connecting to is the intended one.
This prevents connecting to the wrong server (for example, due to writing the wrong IP) and man-in-the-middle attacks, such as when someone redirects you to a server they control to steal your login information. Since this is your first time connecting,
you don’t have a fingerprint in the database. Click “Yes” to add it. Once you know the key for an instance is in the database, you should consider whether this warning reappears. The fingerprint should change only if you regenerate your SSH host keys. This can happen when you re-initialize the system disk, remove and reinstall the SSH daemon, or manually regenerate your host keys. If you double-click and still get the warning, something may be wrong.
Log in with SSH Private Key
After you fill in all of the fields mentioned above in the login/session manager, except for the Password
Click on the button to drag and drop files, select open:
In the left-side menu, under SSH, go to Authentication, click on the button with the right-click, and select the input field (the one with the three dots), like in the picture above. This expects a file with a similar key in the PuTTY Private Key format. If you only have one in the OpenSSH key format available, WinSCP will offer to convert it automatically. However, if the file you want to select doesn’t have the .ppk extension, you won’t find it listed in the file browser. Go to the bottom-right corner and change the filter to All Files (.)
Import your private key file. When you’re done, save your settings and click “Login”.
Transfer Files with WinSCP
After connecting, you’ll get two panels with files. The one on the right shows the files on the Linux instance, and it opens by default in the user’s home directory. This is /root for the root user and /home/name_of_user for other users. In the left panel, you have local files listed. To navigate “one directory up” (to the parent directory), double-click the first entry in that list (the icon that shows an arrow pointing upward).
Import your private key file. When you’re done, save your settings and click “Login”.
It’s assumed that users familiar with Windows know about dragging and dropping files, selecting multiple files by holding down the CTRL key and then clicking on the desired selections, right-clicking and selecting the desired action, etc. These are all features integrated into WinSCP so that it functions in a similar way to Windows File Explorer.
Conclusion
Therefore, this article discusses WinSCP and how to connect to your Linux server using it. We also prepared a video about this.
FAQ
What is WinSCP used for?
WinSCP is a Windows application that securely transfers files to remote servers using SCP, SFTP, and FTP protocols.
How do I connect to a Linux server with WinSCP?
Enter your server’s hostname/IP, username, password or key, choose SFTP/SCP, and connect to upload or manage files.
Is WinSCP secure?
Yes, WinSCP uses encrypted protocols like SFTP and SCP to ensure secure file transfers over networks.