
What Is SysMain (Superfetch) in Windows 10 and What Does It Do?
SysMain: Windows 10 is a lot better than previous operating System versions, but of course, if it is not configured correctly, its speed and performance will slow down.
There are several ways to speed up and improve the performance of this operating system, but one of the lesser-known features you should know about is Superfetch, which was renamed SysMain after the 1809 update of Windows 10. In the following, we will explain more about SysMain in Windows 10.
This article will explain everything you need to know about SysMain or Superfetch in Windows 10. These include how it works, the potential for trouble, and how to turn it off.
What is meant by SysMain or Superfetch in Windows 10?
Superfetch is one of Windows Vista’s first features. The official description of the service refers to “maintaining and enhancing system performance over time,” but this explanation is somewhat vague and does not cover all aspects of the issue.
The service runs entirely in the background, constantly analyzing RAM usage patterns and trying to figure out which type of programs you run the most.
Over time, Superfetch marks these applications as “overused” and then loads them into your computer’s RAM ahead of time. Superfetch shows up as “Service Host:
SysMain” in the Windows 10 Task Manager. This service allows you to run an application much faster because it is already loaded in RAM.
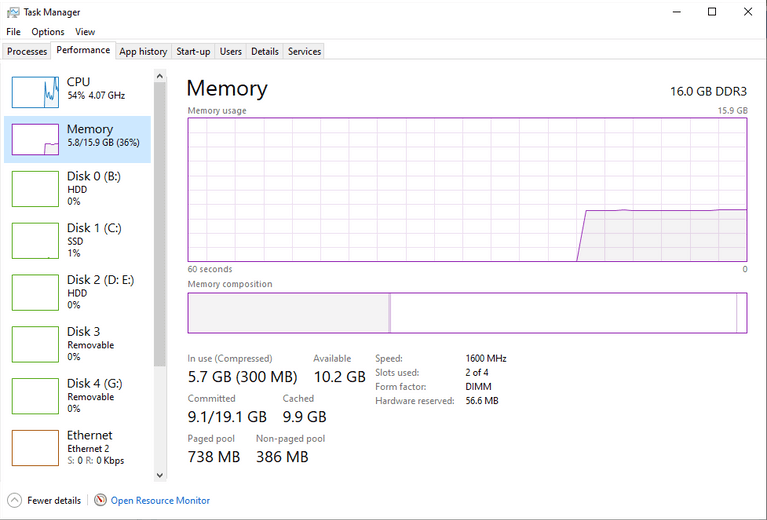
By default, SysMain is designed to preload your applications into available RAM. Don’t worry, this service only uses unused memory. As long as your computer needs more RAM (for example, to load an application that has not been preloaded), SysMain will also release the required amount of RAM. Keep in mind that Superfetch and Prefetch are two separate categories. Prefetch, or Preload Memory Manager, was introduced earlier in Windows XP.
In essence, Superfetch is a replacement for Prefetch. The difference is that Prefetch cannot analyze usage patterns over time.
Do we need SysMain?
In most cases, SysMain can be useful to the user. If you have a new computer with moderately high hardware, then Superfetch runs so smoothly that you may not even notice it.
This service is most likely already running in the background of your computer, and you have not noticed this!
Of course, this Superfetch or SysMain can also cause problems:
- Since this service is always running in the background, it can automatically take up some RAM and CPU.
- SysMain does not eliminate the need to load applications in RAM; it simply loads faster. Once this load is done, your computer will experience the same slowdowns caused by running applications without Superfetch.
- System startup can also be a bit slower, as Superfetch has to transfer a lot of data from the hard drive to RAM. If you see your hard drive 100% in the first few minutes of Windows boot, this service can be one of the reasons for this.
- If you have Windows 10 installed on an SSD, Superfetch performance improvements will be negligible. Since these memories are high-speed, they do not need to preload data. You can read this article if you want to achieve such an advantage.
- Sometimes, this feature can cause problems while playing, especially if your computer has 4 GB of RAM or less. Of course, the reason for this is unclear, because it does not happen to everyone. This problem most likely occurs in games requiring a lot of RAM. During the execution of such games, the RAM must be constantly filled and emptied, which also causes Superfetch to repeat its work more often.
Does disabling Superfetch cause any problems? No! You do not have to worry about the side effects if you want to deactivate this service. We suggest that if your System has no problem, you do not turn off this feature. Suppose you have a high percentage of your hard drive or RAM usage and experience various issues while running RAM-sensitive applications. In that case, disabling SysMain and seeing if it changes is best. If the result is positive, turn it off. Otherwise, it is better to re-enable this feature.
How to disable Superfetch (SysMain) in Windows 10
Again, if you do not have the problems listed above, it is best not to disable SysMain. It is best to keep this feature enabled, as it will improve your computer’s performance. If unsure, you should turn off this feature and check the result. If you are not satisfied, then it is better to reactivate it.
Again, in Windows 10, Superfetch is the same as SysMain. Therefore, you should be aware of this issue while turning off this feature.
1. Disable using the Services application

- Open the Start menu, search for “services,” and launch the Services application. You can also do this by pressing “Windows + R” and then typing “services.msc” and clicking “OK.”
- Then scroll down to see “SysMai.” Right-click on it and select “Sto.” The Superfetch feature is now disabled.
- Then you have to continue right-clicking on “SysMain” in the Services application and then selecting “Properties.” Under the “General” tab, look for “Startup type” and then change it to “Disabled” (or Manual if you want to run it if needed).
2. Use the registry editor
We suggest using the Services application to disable Superfetch or SysMain. But if you want to do it another way for any reason, you can change the registry key of this service. We recommend that you back up your registry before doing so.
It should also be noted that you must create a System Restore Point before making any changes to the registry. That way, if things don’t go well, you can return to that point in time.
How to create a System Restore Point
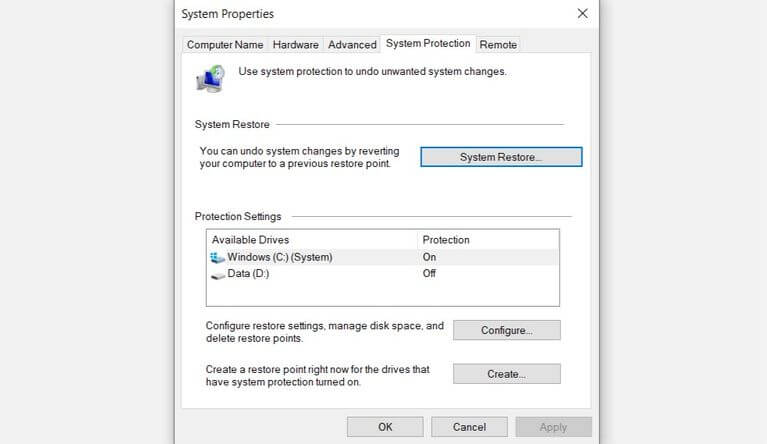
- In the Start menu, type “Create a restore point,” then click the result that appears.
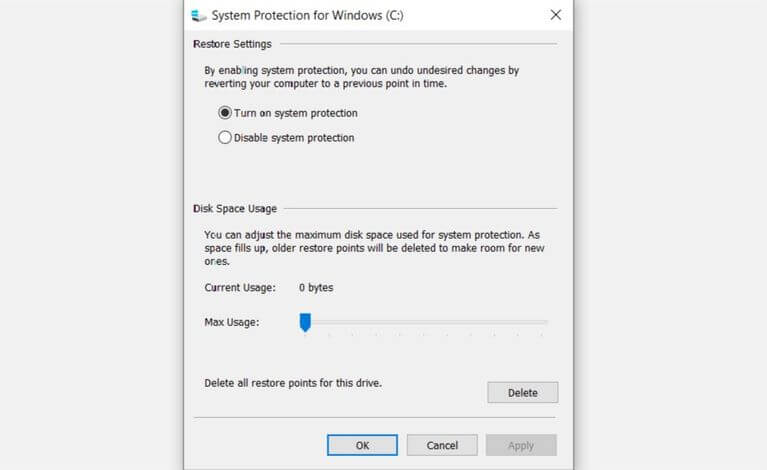
- If the “System Restore” key is disabled, System Protection is disabled.
- To activate System Protection, click on drive C in the same window. Next, select “Configure” and then “Turn on System Protection,” and finally click “OK.”
- To create a Restore Point, click on “Create” and then choose a name.
Disable Superfetch (SysMain) using the registry
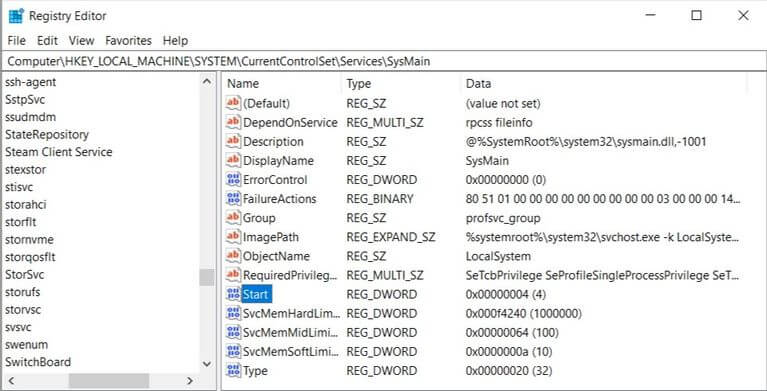
- In the Start menu, type “regedit.” Next, select it from the results menu. You can also press “Windows + R”, type “regedit,” and then click “OK.”
- Find “the SysMain key”. Use the panel on the left to go to:
3. Disable “SysMain.” In the right panel, double-click on “Start” and set “Value data” to “4.” Save the changes and then reboot the computer.
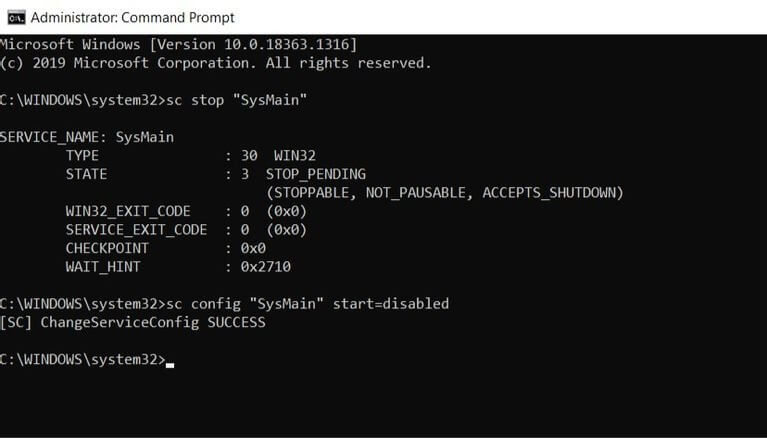
3. Use Command Prompt
The fastest way to disable SysMain is to use the Command Prompt. This method also seems more professional.
- In the Start menu, type “cmd”, right-click on “Command Prompt,” and select “Run as administrator.”
- In the window that appears, type “sc stop” “SysMain” and then press “Enter”.
- Then, you have to type “sc config’ SysMain ‘start = disabled” and press “Enter.”
- Close the Command Prompt and then reboot your computer.
Concluding remarks
Superfetch is not the only feature you can disable. In addition to this service, there are features in the Windows 10 operating System that you can disable and observe the results.
FAQ
What is SysMain (Superfetch) in Windows 10?
It is a Windows service that preloads frequently used apps into memory to improve performance.
How does SysMain affect system performance?
It optimizes memory usage for faster app loading but can increase disk usage on some systems.
When should you consider disabling SysMain?
If it causes high disk usage or slows your system, disabling it may help.