Manage Wi-Fi Networks via Command Line in Windows 10: A Complete Guide
One way to manage a wireless network is to issue a command in the Windows 10 Command Prompt, which we will teach you how to do in the following.
Although you can manage various aspects of wireless networks using the settings and control panel, sometimes you may need to do more advanced work.
For example, some graphical Wi-Fi tools do not allow you to recover the Wi-Fi password for a specific profile or view detailed information about saved profiles.
If you need to do more advanced work, Windows 10 is equipped with a command line that you can use to view, troubleshoot, and configure all Network adapters.
In this article, we will provide the necessary instructions on the steps of wireless Network management using the command section (netsh).
How to view the savWi-Fi profile on Windows 10
To view the profiles of the wireless Network, use the following steps:
1: Open the Start menu.
2: Search for Command Prompt, right-click on the desired option, and then select Run as administrator.
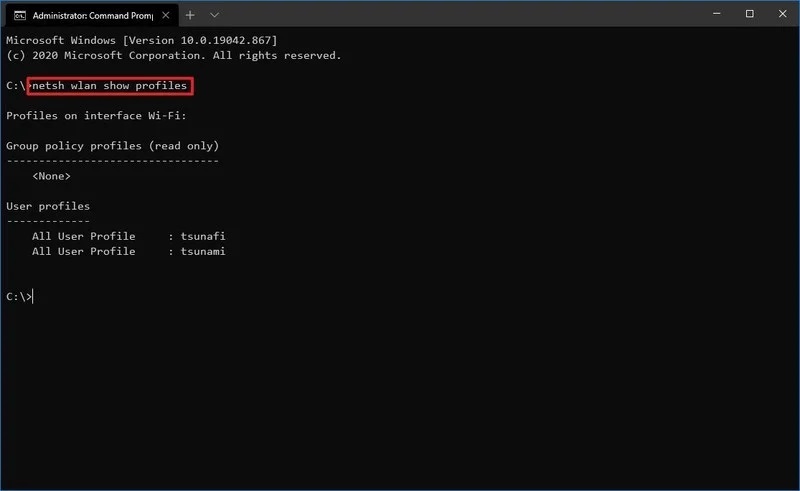
3: Type the following command to display all the wireless profiles stored on the computer and, finally, press Enter:
Netsh wlan show profiles
4: To view the saved profiles of a particular interface, you can type the following command and press Enter:
Netsh wlan show profiles interface = ”WLAN-INTERFACE-NAME”
In this command, you must replace the WLAN-INTERFACE-NAME statement with the interface’s real name. You can also use the netsh interface show interface command to find the same Network.
For example, this command can display profiles saved for the Wi-Fi interface:
Netsh wlan show pofiles interface = ”wi-fi”
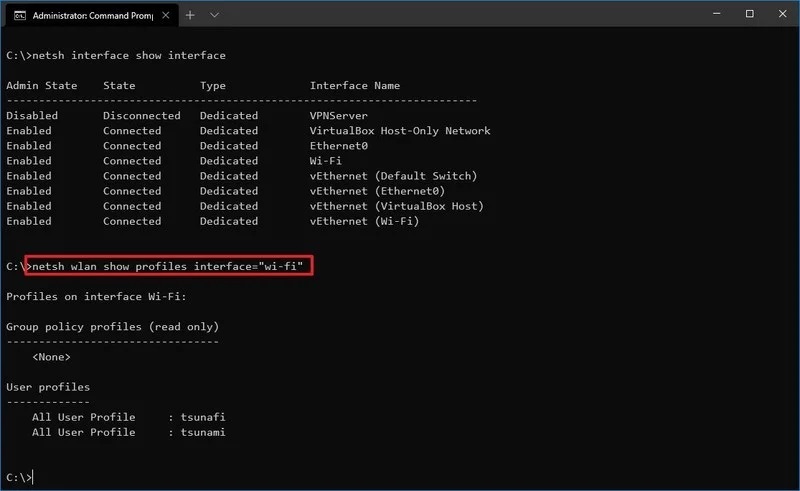
After completing the above steps, the profile of all the wireless networks to which you have previously connected will be displayed on the computer running the command.
How to view Wi-Fi information in Windows 10
To view information about the Wi-Fi Network, you must use the following method:
1: Enter the Start menu.
2: Search for Command Prompt, right-click on the desired result, and select Run as administrator.
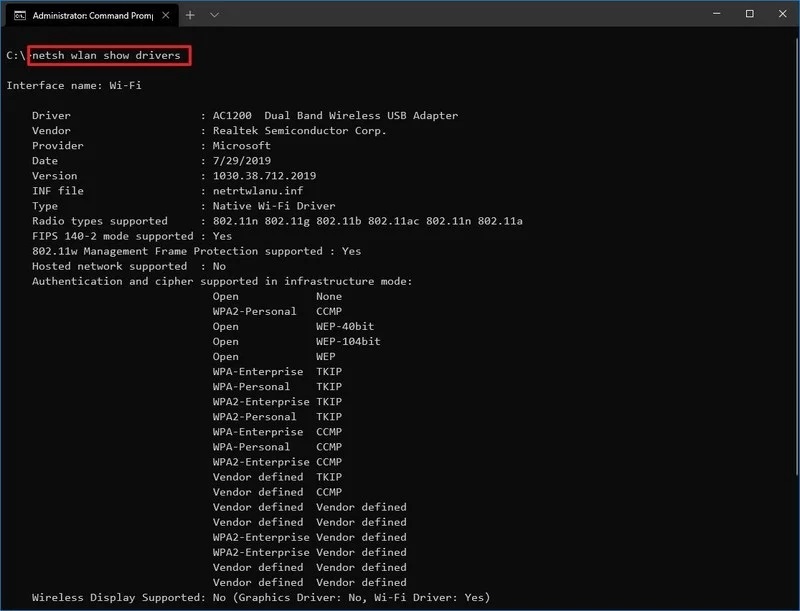
3: Type the following command and press Enter:
Netsh wlan show drivers
4: If you want to see the capabilities of the adapter, type the following command and press Enter:
netsh wlan show wirelesscapabilities
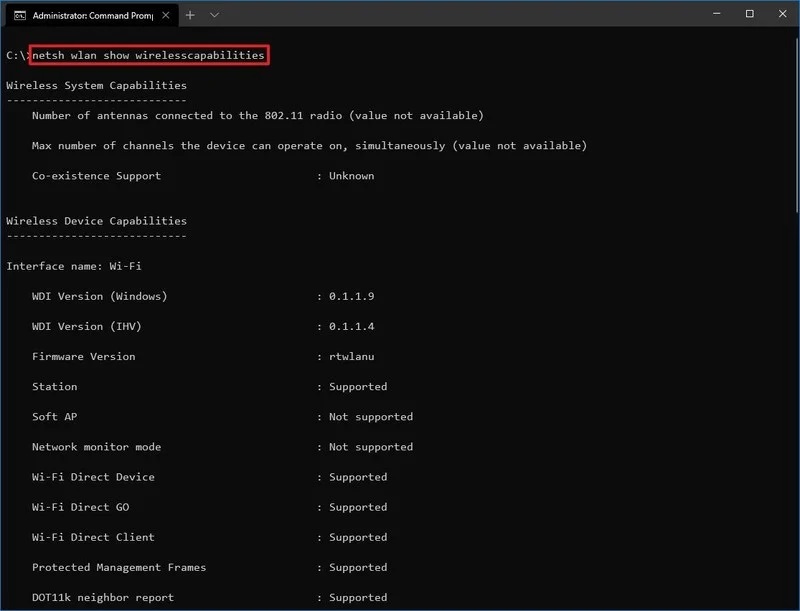
After completing the steps, you will see that the issued command can also display driver information, including radio frequency type, vendor, version, and wireless authentication support.
If you use the above command to view the features, you will see a list of all available wireless features and supported items for the adapter.
How to view Wi-Fi settings in Windows 10
To check the wireless adapter settings, follow these steps:
1: Enter the start menu.
2: Search for Command Prompt, right-click on the desired result, and select Run as administrator.
3: Type the following command to display the wireless settings and press Enter:
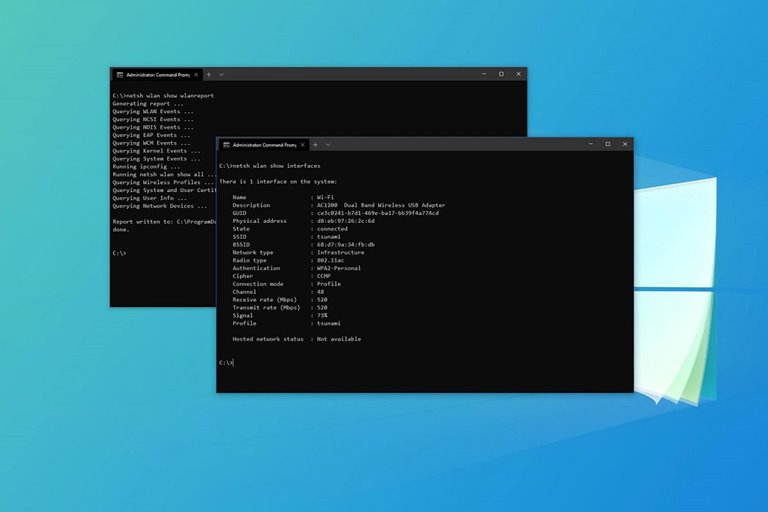
Netsh wlan show interfaces

4: If you want to see the settings of a particular interface, you can type the following command and press Enter:
netsh wlan show interface name = “WLAN-INTERFACE-NAME”
In the above command, you must replace the actual name of the interface with the phrase WLAN-INTERFACE-NAME. You can use the netsh interface show interface command to view and find the exact name.
For example, this command could show the profiles saved for the WiFi-Fi interface:
Netsh wlan show interface name = ”wi-fi”
Once completed, the Netsh tool can display all current WiFi-Fi settings, such as address and SSID.
How to view the Wi-Fi Network Security key in Windows 10
You can use the following steps to find your Wi-Fi password. Enter the start menu.
2: Search for Command Prompt, right-click on the desired result, and select Run as administrator.
3: Type the following command code to display the Wi-Fi password. Wi-Fid press Enter:
netsh wlan show profile name = “WLAN-PROFILE-NAME” key = clear
In the above command, you must replace the profile name with the phrase WLAN-PROFILE-NAME.
For example, this command could display the tsunami Network password:
netsh wlan show profile name = “tsunami” key = clear
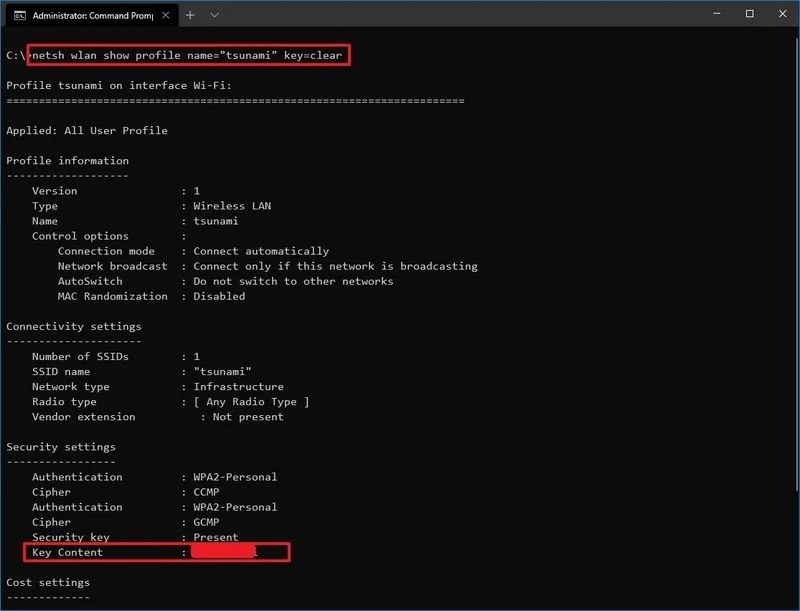
After completing the steps, you will get acquainted with the network security key of the profile you have specified.
Although you can see the current network password through the wireless adapter features in the control panel, this command can be very helpful in recovering the network security key.
How to Automatically Disconnect the Wi-Fi Network in Windows 10
Sometimes, a device may be configured to connect to different wireless networks automatically, and this connection can exist even when the signal is weak. In these cases, you can run a command that prevents automatic connection to known networks.
To prevent the device from automatically connecting to the Wi-Fi Network, you must use the following steps:
1: Enter the start menu.
2: Search for Command Prompt, right-click on the desired result, and select Run as administrator.
3: Type the following command to cancel the automatic connection and press the Enter key:
netsh wlan set profileparameter name = “WLAN-PROFILE-NAME” connectionmode = manual
In the above command, you must replace the profile name with WLAN-PROFILE-NAME.
For example, this command can turn off the automatic connection of the tsunamiNetwork:
netsh wlan set profileparameter name = “tsunami” connectionmode = manual
4: To change the Network priority, type the following command and press Enter:
netsh wlan set profileparameter name = “WLAN-PROFILE-NAME” connectionmode = auto
In the above command, replace WLAN-PROFILE-NAME with the name of the Wi-Fi Network profile you want. For example, this command prioritizes tsunami specifications:
netsh wlan set profileparameter name = “tsunami” connectionmode = auto
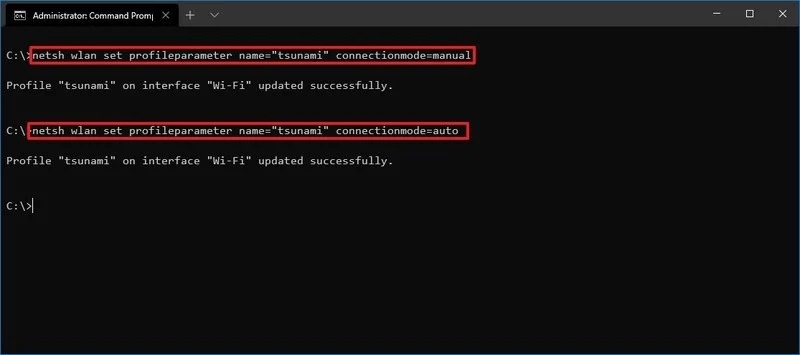
Important Note: Windows 10 will always prioritize the networks you select for automatic connection. To upgrade a network in your list of priorities, use the above command.
After completing the steps, Windows 10 will not automatically connect to wireless networks.
How to delete a Wi-Fi File in Windows 10
When you no longer need to connect to a specific Network, you can use the netsh tool to delete the profile you want. To delete the Wi-Fi profile in Windows 10, you can follow the steps below:
1: Enter the start menu.
2: Search for Command Prompt, right-click on the desired result, and select Run as administrator.
3: Enter the following code and finally press Enter:
netsh wlan delete profile name = “WLAN-PROFILE-NAME”
Finally, you need to replace the Network profile name with WLAN-PROFILE-NAME.
For example, this code could delete the tsunami profile:
Netsh wlan delete pofile name = ”tsunami”

After completing the steps, the device’s Wi-Fi Network File will be cleared. If you need to reconnect, you will need to reconnect and provide a network password.
How to export and import Wi-Fi Network files in Windows 10
In the control panel of older versions of Windows, there was an option to import and export wireless Network profiles.
This feature was removed in Windows 8.1 and Windows 10 to add new features that allow you to sync settings with your Microsoft account, but it is still possible to do the job using the netsh command-line tool.
Export wireless settings
To export wireless settings in Windows 10, you must follow these steps:
1: Enter the start menu.
2: Search for Command Prompt, right-click on the desired result, and select Run as administrator.
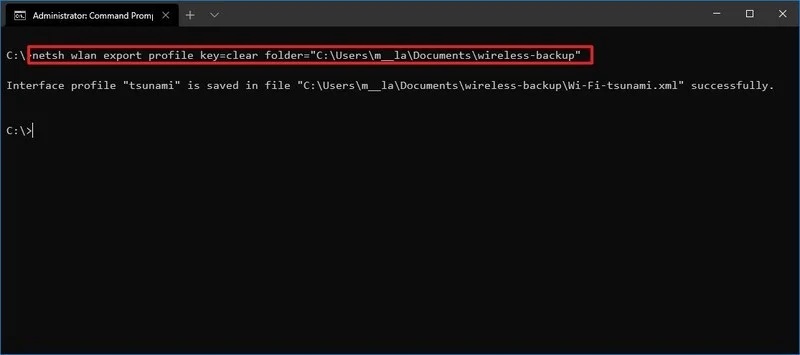
3: To export the wireless profiles stored on the device, you must type the following command and press Enter:
netsh wlan export profile key = clear folder = “FOLDER-PATH”
In this path, you must replace FOLDER-PATH with the destination folder path.
For example, this command exports profiles to the wireless-backup folder:
netsh wlan export profile key = clear folder = “C: \ Users \ username \ Documents \ wireless-backup”
To export a specific profile, type the following command and press Enter:
netsh wlan export profile name = “WLAN-PROFILE-NAME” key = clear folder = “FOLDER-PATH”
In the command, you must replace the phrase WLAN-PROFILE-NAME with the profile name you want to export and specify FOLDER-PATH, which is the location of the information.
For example, this command can only export the tsunami profile to the wireless-backup folder:
netsh wlan export profile name = “tsunami” key = clear folder = “C: \ Users \ username \ Documents \ wireless-backup”
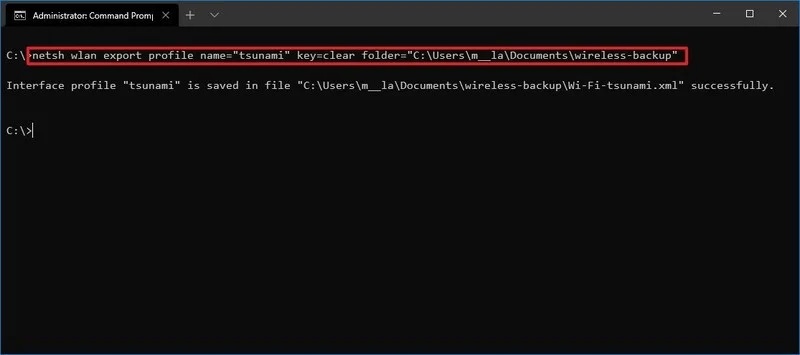
At the end of the process, all profiles will be exported to your specified location. The output of the name and path for each backup of the XML File is also displayed.
The export command creates an XML File for each wireless Network profile stored on the device. You need to ensure that the File is stored safely because other people can edit it with simple tools.
Add wireless settings
You can use the following steps to add wireless settings in Windows 10:
1: Enter the start menu.
2: Search for Command Prompt, right-click on the desired result, and select Run as administrator.
3: To enter the wireless profiles, type the following command and press the Enter key:
netsh wlan add profile filename = “FOLDER-PATH \ WLAN-EXPORTED-FILE”
In the mentioned command, put the path and name of the File in its special place.
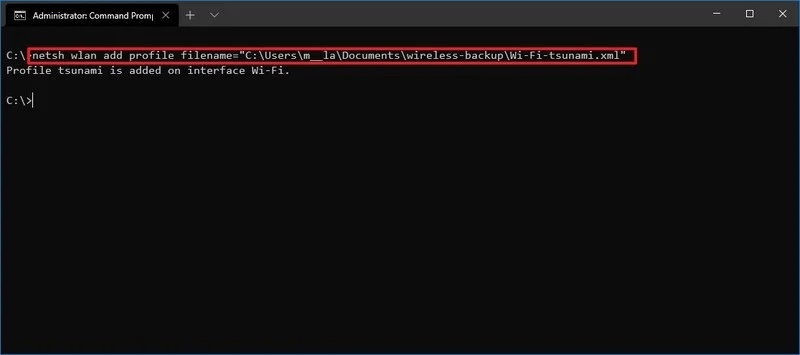
For example, this command enters a specific profile stored in the wireless-backup folder:
netsh wlan add profile filename = “C: \ Users \ username \ Documents \ wireless-backup \ Wi-Fi-tsunami.xml”
Important Note: If you have multiple profiles, repeat the steps and update the File path and File name of the issued profile.
4: To enter the profile into a specific wireless interface and the current user, type the following command and press Enter:
netsh wlan add profile filename = “FOLDER-PATH \ WLAN-EXPORTED-FILE” Interface = “WLAN-INTERFACE-NAME” user = current
In the command, replace FOLDER-PATH \ WLAN-EXPORTED-FILE with the File path and replace WLAN-INTERFACE-NAME with the desired interface name.
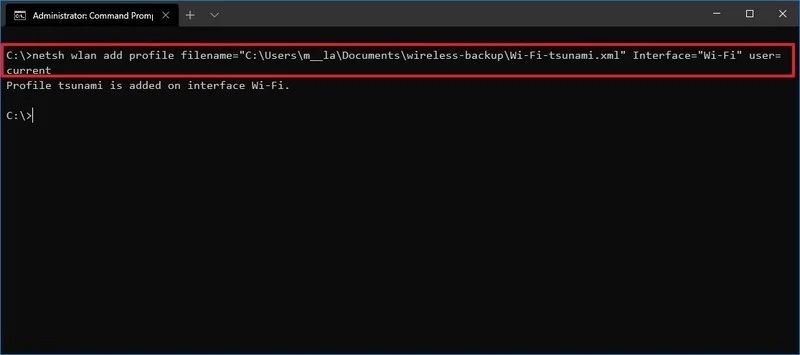
For example, this command enters the settings for the Wi-Fi interface:
netsh wlan add profile filename = “C: \ Users \ username \ Documents \ wireless-backup \ Wi-Fi-tsunami.xml” Interface = “Wi-Fi” user = current
After completing the steps, the specifications are entered, and the device can connect to the wireless Network without additional configuration.
How to create a Wi-Fi Network Wi-Fi report in Windows 10
If you need to troubleshoot a wireless connection, you can easily use the following method to create a detailed report:
To create a report, use the following steps:
1: Enter the start menu.
2: Search for Command Prompt, right-click on the desired result, and select Run as administrator.
3: Type the following command and finally press the Enter key :
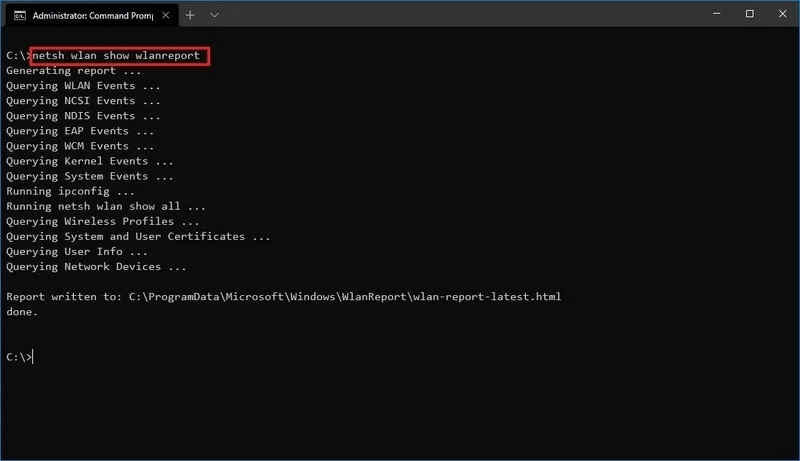
netsh wlan show wlanreport
4: Open the following command to open the report and press Enter:
C: \ ProgramData \ Microsoft \ Windows \ WlanReport \ wlan-report-latest.html
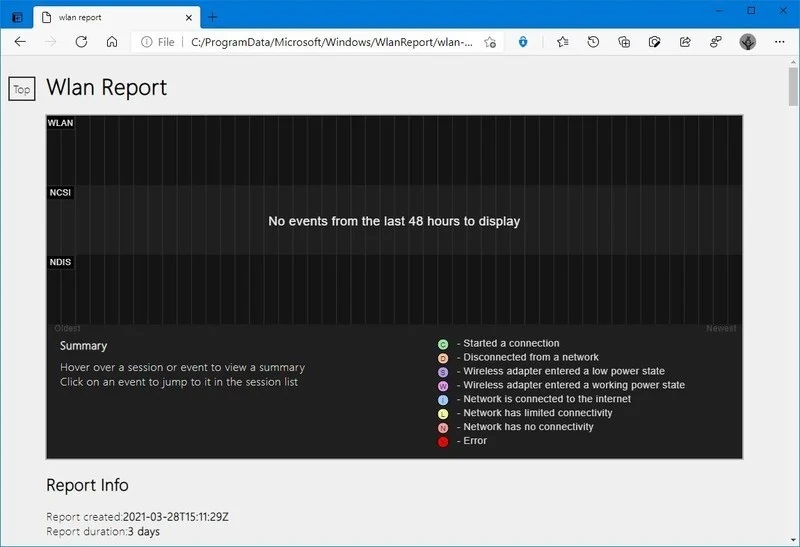
After completing the steps, the default browser will reopen the report.
WLAN reports will include a graphic detailing the connection status, such as the start and end time of the connection, errors, and more.
This report also summarizes the Network adapter found on your System.
This System report can help you find problems with your Wi-Fi connection.
FAQ
How do I see saved Wi-Fi profiles in Windows 10 using commands?
Use netsh wlan show profiles in the elevated Command Prompt.
Can I export Wi-Fi settings so I reuse them later?
Yes — use netsh wlan export profile key=clear folder="YourFolderPath".
How do I delete a Wi-Fi profile from my PC?
Run netsh wlan delete profile name="ProfileName" in Command Prompt.