
Android Programming With Python: How It Works and What You Should Know
Android Programming with Python involves using frameworks like Kivy or BeeWare to build cross-platform mobile apps. Python simplifies development with its readable syntax, but performance may lag compared to native Java/Kotlin apps.
Introduction
Android app development is traditionally done with Java or Kotlin, but Python has emerged as a viable alternative due to its simplicity, readability, and powerful libraries. While not natively supported on Android, Python can build cross-platform apps using frameworks such as Kivy, BeeWare, or Chaquopy.
This guide explores how to develop Android apps with Python, focusing on Kivy for its maturity and ease of use. You’ll learn to set up a development environment, build a simple app, and package it as an APK for Android devices.
Why Python?
- Ease of Use: Python’s clean syntax reduces development time.
- Cross-Platform: Write once, deploy on Android, iOS, and more.
- Rich Ecosystem: Leverage libraries like NumPy or TensorFlow for data-driven apps.
1. Feasibility of Python for Android Programming
Android’s native languages (Java, Kotlin) run on the Java Virtual Machine (JVM), while Python is interpreted. Frameworks bridge this gap by:
- Embedding Python: Including a Python interpreter in the app (e.g., Kivy, Chaquopy).
- Transpiling: Converting Python to Java-compatible bytecode (e.g., BeeWare’s VOC).
- Scripting: Running Python scripts via simplified APIs (e.g., SL4A, QPython).
Analogy: Think of Python frameworks as translators, converting Python’s instructions into another language.
Key Frameworks (2025):
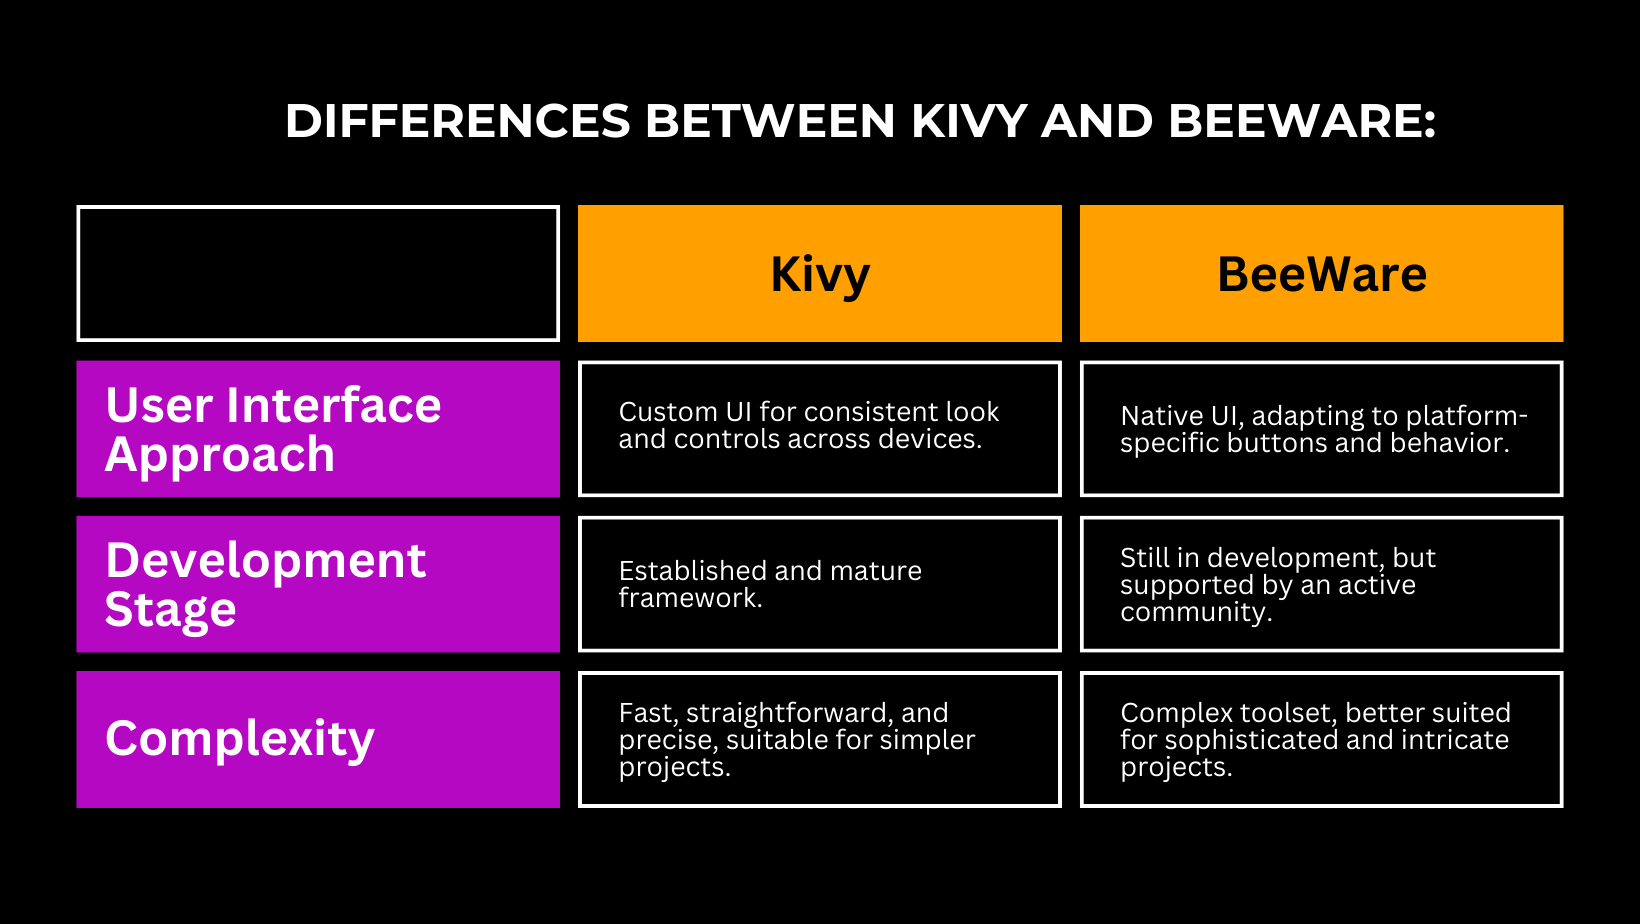
- Kivy: Open-source, cross-platform library for multi-touch apps, using OpenGL ES 2 for UI rendering. Best for rapid prototyping and cross-platform apps.
- BeeWare: Compiles Python to native Java bytecode via VOC, offering native Android API access. Ideal for native-like apps.
- Chaquopy: A plugin for Android Studio, allowing Python code to run alongside Java/Kotlin. Suited for hybrid apps.
- SL4A/QPython: Runs Python scripts on Android with simplified APIs, but is limited for full app development.
Use Cases:
- Prototyping apps quickly (Kivy).
- Data-driven apps with ML models (Chaquopy with TensorFlow).
- Cross-platform apps for Android and iOS (BeeWare, Kivy).
2. Development Tools
To develop Android apps with Python, you’ll need:
- Python 3.8+: Install; you’ll find it on python.org or Anaconda.
- IDE: PyCharm (Community Edition), VS Code, or Thonny. PyCharm integrates well with Kivy.
- Kivy: This is for building the app UI and logic.
- Buildozer: This is for packaging Python apps into APKs.
- Android SDK: Required for Buildozer to compile APKs.
- Linux (Recommended): Buildozer works best on Linux (e.g., Ubuntu). If needed, use WSL2 on Windows or a virtual machine.
- Optional: Android Studio for testing and Chaquopy integration.
3. Setting Up the Environment
Step 1: Install Dependencies
On a Linux system (e.g., Ubuntu 22.04):
# Update system sudo apt update && sudo apt upgrade # Install Python and pip sudo apt install python3 python3-pip # Install dependencies for Kivy and Buildozer sudo apt install build-essential git python3-dev ffmpeg libsdl2-dev \ libsdl2-image-dev libsdl2-mixer-dev libsdl2-ttf-dev libportmidi-dev \ libswscale-dev libavformat-dev libavcodec-dev zlib1g-dev # Install Android SDK tools sudo apt install openjdk-17-jdk android-sdk export ANDROID_HOME=/usr/lib/android-sdk
Step 2: Install Kivy and Buildozer
pip install kivy kivy_examples buildozer
Step 3: Verify Setup
python3 -m kivy # Should display Kivy version and no errors
Note: For Windows/Mac, use WSL2 or a Linux VM, as Buildozer’s APK generation is Linux-only.
4. Building a Simple Kivy App
Let’s use Kivy to create a “Hello World” app with a button that updates a label when clicked.
Directory Structure
myapp/
├── main.py
├── myapp.kv

Code: main.py
from kivy.app import App
from kivy.uix.boxlayout import BoxLayout
from kivy.properties import StringProperty

class MyWidget(BoxLayout):
    label_text = StringProperty("Hello, World!")

    def update_label(self):
        self.label_text = "Button Clicked!"

class MyApp(App):
    def build(self):
        return MyWidget()

if __name__ == "__main__":
    MyApp().run()

Code: myapp.kv
<MyWidget>:
    orientation: 'vertical'
    Label:
        text: root.label_text
        font_size: 30
    Button:
        text: 'Click Me'
on_press: root.update_label()Explanation:
- main.py:
- Imports Kivy’s
AppandBoxLayout. - Defines
MyWidgeta custom layout with alabel_textproperty. update_labelChanges the label text on button press.MyAppInitializes the app and returns the root widget.
- Imports Kivy’s
- myapp.kv:
- Kivy’s KV language is used to define the UI.
- Creates a vertical
BoxLayoutwith aLabelandButton. - Binds the button’s
on_pressevent toupdate_label.
- Output: A button labeled “Hello, World!” and a button. “Clicking the button changes the label to “Button Clicked!”.
Run Locally
python3 main.py
He opens a window with the app UI on your computer.
5. Packaging the App as an APK
Step 1: Initialize Buildozer
In the myapp/ directory:
buildozer init
This creates a buildozer.spec file.
Step 2: Configure bulldozer. spec
Edit buildozer.spec with a text editor (e.g., nano buildozer.spec):
[app] title = My Kivy App package.name = myapp package.domain = org.example source.dir = . source.include_exts = py,png,jpg,kv,atlas version = 1.0 requirements = python3,kivy orientation = portrait android.api = 33 android.minapi = 21 android.ndk = 23.1.7779620
Key Settings:
titleApp name.package.name: Unique app identifier.requirementsLists Python dependencies (e.g.,kivy).android.apiTarget Android API level (33 for Android 13, 2025 standard).
Step 3: Build the APK
buildozer android debug
This downloads the Android NDK, compiles the app, and generates an APK in myapp/bin/.
Step 4: Install and Test
- Enable Developer Mode on your Android device:
- Go to Settings > About Phone > Tap Build Number 7 times.
- Enable USB Debugging in Settings > Developer Options.
- Transfer APK:
adb install bin/myapp-1.0-debug.apk
Requires
adb(part of Android SDK). - Run: Find “My Kivy App” on your device and test.
Note” For Google Play, sign the APK with jarsigner and use Android App Bundle (AAB) format via Buildozer (buildozer android release).
6. Limitations of Python for Android
- Performance: Python apps are slower than Java/Kotlin due to the interpreter. Avoid performance-critical apps (e.g., 3D games).
- App Size: APKs include the Python interpreter and increase in size (e.g., 20-50 MB for simple apps).
- API Access: Limited access to some Android APIs compared to Java/Kotlin. Use libraries like
pyjnius(Kivy) or Chaquopy for native integration. - Community Support: Smaller Python Android development community than Java/Kotlin.
- Build Complexity: Buildozer setup can be error-prone, especially on non-Linux systems.
7. Best Practices
- Use Kivy for Simplicity: Ideal for beginners and cross-platform apps. Use KivyMD for Material Design-compliant UIs.
- Optimize Performance: Minimize animations and use
select_relatedFor database queries when integrating Django. - Test on Real Devices: Emulators (e.g., Android Studio’s AVD) may not reflect rStudio’s performance.
- Leverage Libraries: Use
plyer(Kivy) for cross-platform features like notifications or GPS. - Version Control: Use Git to manage code and track changes.
- Debugging: Enable
logcatin Buildozer (log_level = 2inbuildozer.spec) for error logs.
8. Modern Trends (2025)
- Improved Kivy Performance: Optimizations in Kivy 2.x reduce lag on Android.
- BeeWare Maturity: VOC and Briefcase offer tighter Android integration, rivaling native apps.
- Chaquopy Adoption: Growing use in hybrid apps, especially for ML with TensorFlow.
- Cloud Integration: Python apps hosted on AWS Lambda for backend logic, reducing device load.
- AI-Driven Apps: Python’s ML libraries (e.g., TensorflowLite) enable on-device AI.
9. Next Steps
- Practice: Extend the sample app with features like text input or a database (e.g., SQLite with Django ORM).
- Learn: Explore Kivy’s documentation (kivy.org), KivyWare’s tutorials (beeware.org).
- Experiment: Try Chaquopy in Android Studio for hybrid or BeeWare for native-like apps.
- Contribute: Join Kivy or BeeWare on GitHub to improve frameworks.
- Stay Updated: Follow Python Android development on X (e.g., @PythonPr posts) or blogs like Towards Data Science.
Conclusion
Python enables Android app development through frameworks like Kivy, BeeWare, and Chaquopy, offering simplicity and cross-platform capabilities. While not as performant as Java or Kotlin, Python is ideal for prototyping, data-driven apps, and cross-platform projects.
The provided Kivy example demonstrates how to build and deploy a simple app, providing a foundation for creating your own. Start with the code, experiment with features, and leverage Python’s ecosystem to build innovative Android applications.
FAQ
Can I build Android apps with Python?
Yes, you can build Android apps using Python frameworks like Kivy, BeeWare, and Chaquopy that bridge Python with Android tools.
What tools are needed to develop Android apps in Python?
You need Python 3, a development IDE (such as VS Code or PyCharm), a framework like Kivy, and tools like Buildozer to package the app into an APK.
What are the limitations of Python for Android development?
Python apps may run slower than native Java/Kotlin apps, have larger package sizes, and sometimes have limited access to native APIs.