How to Show Recently Registered Users in WordPress
How to Show Recently Registered Users in WordPress
Are you looking to display new users who have registered on WordPress?
Sometimes you may want to display recently registered users on your site to create a sense of community and encourage others to become members, join your community or create an account.
This article will show you how to display recently registered users on your WordPress site.
If you need a WordPress host, go to the Ded9.com site and see the great plans at great prices.
Why display new users who have registered in WordPress?
If you have a membership site, online course, forum, or any other type of WordPress website that allows user registration, you may want to display recently registered users.
This increases our social credibility and allows other members to welcome new members to the community. If you have a small business website, you can create a filterable directory of your team members or contributors.
There are several reasons for showing recently registered users in WordPress:
- Create a source of shared contact information
- Highlight a list of recently registered business owners
- Encourage new forum registrations by showing a large and active community
Now let us show you how you can display the recently registered users in WordPress.
Method 1. Display newly registered users with the Formidable Forms plugin
The best way to display newly registered users is to use the Formidable Forms plugin. This form is one of the best contact forms and the best user registration plugins for WordPress on the market:

The Formidable Forms plugin has advanced features that allow you to format, filter, and display user-submitted data, including user profile information.
You can use it to create various useful online tools such as web directories, online calculators, user directories, and more. Plus, you have complete control over your user lists’ appearance and function.
It even integrates with MemberPress, so you can easily display a list of your recently signed members on your membership website.
Note: Formidable Forms does not automatically display all new WordPress users. Instead, it gives you complete control over the users and the information displayed. To display a user in your directory, you must create and fill out a separate form. We will show you how you can do this.
The first thing you need to do is install and activate the Formidable Forms plugin.
After activation, you need to go to Formidable » Global Settings and then click the “Connect an Account” button or manually enter your license key and click the “Save License” button.

You can find this information in your account on the Formidable Forms website.
Next, you need to install the Formidable Directory plugin. Depending on your plan, this plugin may already be enabled.
Otherwise, you need to go to the Formidable Directory page and click the “Get Formidable Directory” button. After completing the purchase, it will automatically be added to your account:

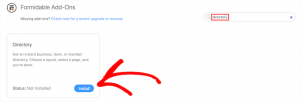
Then go to Formidable Forms » Add-Ons and search for the “Directory” plugin.
Then, click the “Install” button:

After that, go to Formidable » Global Settings. Go.
Then, click on the “Directory” menu option:

This will automatically start the setup wizard to help you create your user directory. If you haven’t connected your site to Formidable Forms, you’ll be prompted to do so now.
Then, click the “Install & Activate” button to install and activate the required plugins:

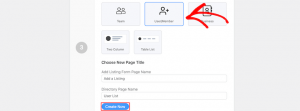
Then, click on the “User/Member” box to display the recently registered users and select the “Two Column” or “Table List” view.
Now, enter a page name for your listing form and directory page and click the Create Now button:

It automatically creates the necessary forms, views, and pages to display to your users but doesn’t publish them yet, so you can still make changes.
After that, click on the “View Page” button in the “Customize Your New Pages” section:

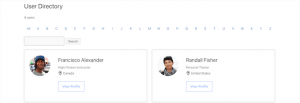
This will automatically take you to a page with a list of your registered users.
The desired section includes a search bar, A-Z filter, and boxes containing each of your registered users:

After that, you need to publish your page.
To do this, click the “Edit Page” button at the top of the page:

This page will show you the page editor. You can edit this page just like any other WordPress page.
After you finish editing the page, you need to click the “Publish” button to publish it and share it live with others:

If you want to customize the look of your registered user list, go to Formidable » Views.
Then hold the mouse over the created view and click “Edit”:

After that, you enter the View editor page.
Here, you can completely customize how your user directory looks. For example, you can limit the number of users per page, filter, and sort user entries, or add more content to their profiles.
Once you’ve made your changes, click the “Update” button to update the user directory you’ve already published automatically:

After you’ve customized and published your user directory, you’ll need to publish the form attached to the directory as well.
Users already registered on your WordPress site must fill out this separate form to be listed in the user directory.
First, you need to go to Pages » All Pages and then click on the page that has already been created; in this case, Add a Listing:

This will take you to the page editor page, where you will see the page title and a shortcode.
Next, click the “publish” button to publish your page:

After that, you can see your page with the user registration form.
New users can use this form to fill out their user directory profile information on your website:

If you want to customize the form fields, go to Formidable » Forms.
Next, click on the form you mentioned earlier, in this case, “User Directory Profile”:

This will bring up the form builder.
If you want to add new form fields, drag them onto your form from the options panel on the left.

To remove existing form fields, click on the field and click the menu option “three dots.”
Then, click “Delete”:

When you’re done customizing your form, click the “update” button to save your changes, and your form will automatically update.
Method 2. Display newly registered users with a dynamic user directory
Another way to display newly registered users is with the free Dynamic User Directory plugin.
This plugin is not as advanced or customizable as Formidable Forms but allows you to display a simple list of recently registered users.
The first thing you need to do is install and activate the plugin.
Afterward, you need to go to Settings » Dynamic User Directory to configure your directory settings.
First, you can control how your list of registered users is sorted in the Sort Field drop-down and select the type of directory you want to display in the Directory Type drop-down:
After that, you can enable the directory search feature by checking the “Directory Search” box.
If you want to remove specific user roles or specific users, you can select them from the drop-down list:

Next, you can control how your directory looks and what user information is displayed in the Listing Display Settings section.
You can easily change usernames, avatars, borders, and more:

Below that, in the “Directory Totals Settings” meta box, you can select the total number of users, customize the text, and more.
If you want to use social proof to encourage new users to create an account on your site, showing the total number of users can be useful!

Next, you can customize how letter and pagination links appear in your user list.
You can adjust the number of users displayed per page, change spacing, and more.
When you’re done, click the “Save options” button to save your directory at the bottom of the page.
This will generate and display a shortcode for your user directory at the top of the page. You need to copy it to add your directory to your site:

Then, open the page, post, or widget area to display your list of users.
Then, click on the “Plus” add-on block icon, search for “Shortcode,” and select it:

After that, paste the shortcode into the box.
Then, click the “publish” or “update” button:

Now you can see the list of recently registered users on your site.
If you want to add a list of recently registered users to a post or widget area, follow the steps above:

Method 3. Display newly registered users with WordPress code
Another way you can display recently registered users is by adding code to WordPress.
Then, you can add the following code snippet to your theme’s functions.php file or by using a code snippet plugin like WPCode (recommended):
function wpb_recently_registered_users() {
global $wpdb;
$recentusers = ‘<ul class=”recently-user”>’;
$usernames = $wpdb->get_results(“SELECT user_nicename, user_url, user_email FROM $wpdb->users ORDER BY ID DESC LIMIT 5”);
foreach ($usernames as $username) {
if (!$username->user_url) :
$recentusers .= ‘<li>’ .get_avatar($username->user_email, 45) .$username->user_nicename.”</a></li>”;
else :
$recentusers .= ‘<li>’ .get_avatar($username->user_email, 45).'<a href=”‘.$username->user_url.'”>’.$username->user_nicename.”</a ></li>”;
endif;
}
$reviewers .= ‘</ul>’;
return $reviewers;
}
This code snippet creates a simple list of recently registered users and displays the avatar image and username. After that, there are two different ways you can display the recently registered users. .
The first is by adding a template tag to your theme’s template files, such as sidebar.php, footer.php, and more. Then add the following template tag code snippet:
<?php wpb_recently_registered_users(); ?>
The second method is easier for beginners and allows you to display newly registered users using a shortcode.
First, add the following code snippet to your theme’s functions.php file or, using the code snippet plugin, place the following command right below the code you added earlier:
add_shortcode(‘wpb_newusers’, ‘wpb_recently_registered_users’);
The result is the following shortcode that you can use in your posts, pages, and widget areas:
[wpb_newusers]
To add the shortcode to your website, just open the page where you want the list of users to be displayed.
Then, click on the “Plus” add block icon, search for “Shortcode” and select it:

After that, paste the shortcode you copied above into the shortcode box.
After making changes, click the “update” or “publish” button to make your changes live:

You can follow the same steps by adding a shortcode to a post or a widget area.
Now you can see the list of recently registered users. To adjust how they display, you’ll need to add custom CSS to your website:

Conclusion
We hope this article has helped you learn how to display new WordPress users. If you liked this article, please subscribe to our YouTube channel for WordPress video tutorials. You can also find us on Twitter and Facebook.

