Effortless Desktop Clarity: How to Selectively Hide Desktop Icons in Windows 10
Are you planning to hide Desktop icons in Windows 10? This article will teach you a simple way to selectively hide Windows 10 desktop elements.
You can use Windows 10’s feature to hide all desktop icons. But if you decide to hide some of them, you need to follow more steps.
Hide Desktop Icons in Windows 10
Before we learn how to hide regular files and folders, it’s a good idea to know that Windows 10 has a dedicated panel that lets you hide icons like Trash, This PC, and even Network. Suppose you want to hide or show one of the mentioned items.
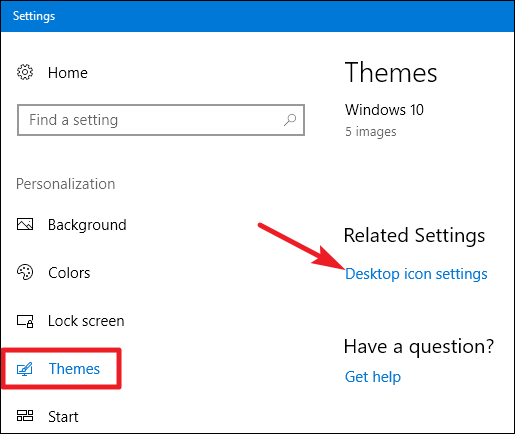
In that case, you have to enter the settings (Settings), select Themes from the Personalization section, and then select the option related to the Desktop Icon Settings.
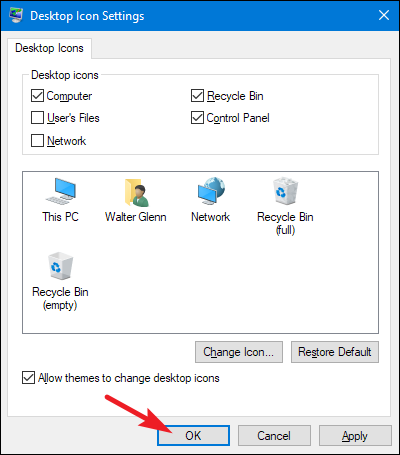
After completing the mentioned steps, you should click on the boxes next to the desired icons to check them.
![]()
To save the changes made, you can tap OK to see the result of your action.
How to hide non-system icons in Windows 10
The situation will be a bit more complicated if you want to hide a non-system icon on the Desktop. Fortunately, Windows allows you to hide all folders or files by right-clicking on them and selecting Properties.
When you enable the option, the selected icon is removed from the Explorer File. The desired folder still exists, but is not displayed in any part of Windows.
This option can hide non-system files on the Desktop, but you should also avoid showing hidden files in File Explorer. To do this, first press the Windows + E key combination or open the Start menu, type This PC, and then click on the displayed option.
![]()
When the File Explorer window opens, click View and select Options.
![]()
In the Folder Options window, click the View tab. Next, you should see the Advanced Settings box. Finally, select the Don’t Show Hidden Files, Folders, or Drives option.
![]()
To save the changes, you must select the Ok option to close the Folder Options window. Go to the Desktop and hide any icon you want; to do this, right-click on it and select Properties to select the Hidden option.
![]()
When the Properties window opens, click on the General tab and place the Attributes section near the bottom of the window. Next, check the box next to the Hidden option.
![]()
To do this, you must select the OK option to make the icon disappear.
Remember that hiding an icon using the above method will only make it disappear, and the File will remain in the System. Anyone who knows how to hide icons or folders in Windows 10 can reveal them after accessing the System menu.
How to unhide Desktop icons in Windows 10
Since you can not click on the hidden File to uncheck the Hidden option, you must first enter the File explorer settings to be able to see non-system icons using the methods mentioned.
To do this, open the File Explorer window, click View, and select Options in the toolbar. In the Folder Options window, click on the View tab. Select Show hidden files, folders, and drives in the Advanced Settings box.
![]()
Next, click OK and close the settings window. Log in to the Desktop to see your hidden icons. Then, right-click on a hidden icon and select Properties.
![]()
In the Properties window, click on the General tab and remove the hidden mark.
![]()
To save the changes, click OK to close the Properties window.
Learn How To Show And Hide Desktop Icons In Windows 10
If you like a clean Desktop, Windows can be a little annoying. Many programs you install automatically add their shortcut icon to the Desktop, so you delete them frequently. Instead, hide all the icons together!
If you use a PC with an empty Desktop, this option also allows you to reactivate all those hidden icons.
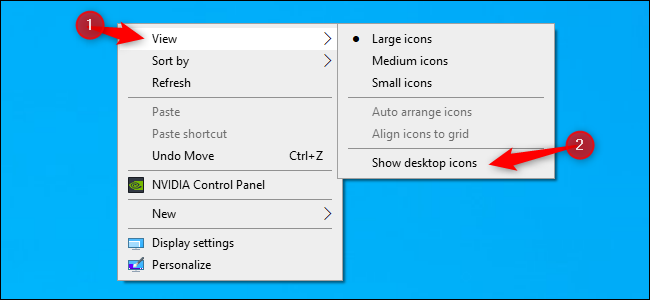
To hide all your Desktop icons, right-click on your Desktop, click “View,” and then ” Show Desktop Icons.” This option works on Windows 10, 8, 7, and even XP. It turns Desktop icons on or off.
That’s it! Use this option to find out how easy it is —if you know it‘s there!
Windows also lets you hide internal desktop icons such as ” This PC,” ” Network,” and ” Recycle Bin.” If these icons are gone or you want to hide them, you can use this option. To do this, right-click on the Desktop and select ” Personalize.”

If you are using Windows 10, click on ” Themes ” in the left panel and then on ” Desktop icon settings.”
Here, you can control your Desktop icons by checking or unchecking them. After that, click OK.
FAQ
How do I hide all desktop icons in Windows 10?
Right-click an empty desktop area → Hover over View → Uncheck Show desktop icons.
Can I hide only certain system icons (like Recycle Bin) instead of everything?
Yes — go to Settings → Personalization → Themes → Desktop icon settings. Then check/uncheck the specific system icons you want visible.
What if I want to hide just a few individual shortcuts or files on the desktop?
Right-click the file/shortcut → Properties → check Hidden under Attributes. Then make sure View → Hidden items option is off in File Explorer so the item is invisible.