
Step-by-Step Tutorial on How to Search File Contents in Windows
How can we search the contents of files in Windows? Stay with us to find the answer to your question.
It is difficult, if not impossible, to find and remember the location of all files on a computer, but Windows Search makes it much easier. But have you ever not found the result you want? This may be because you searched for text within the file. By default, Windows cannot see the contents of a file when searching. In this article, we will teach you how to fix this problem.
In this article, in addition to the Windows search function, we mention other third-party programs that will help you experience a proper search.
Searching the content of files in Windows with the search function
Windows 10 performs better in search than previous versions. This version usually performs well at finding the files you want, but it may not yield the desired result.
This is because, by default, Windows cannot detect the contents of any file type, and it does not scan unindexed files. Below, you will see how to solve both of these problems.
About indexing files to search the contents of files in Windows
Windows Index lists information about your files, such as metadata and the words they contain. This feature allows your computer to find files faster. With this method, scanning each file individually is unnecessary, but it can be searched in the index.
Many programs in Windows use indexes. File search is an obvious example, but Photos, Groove, Outlook, and Cortana also use this feature.
As soon as the files on the computer are changed, the index list is also updated automatically. The index is only about 10% of the file size (i.e., a 100 MB file is about 10 MB in the index).
While file search is faster with this method, it should be noted that it reduces system performance. The more files indexed and the more folders created, the longer the search takes. If you notice this time is increasing, you can reduce the number of these files and index more relevant files.
Change general search options.
There are several general options you can adjust to improve indexing and search.
Indexing options
First, we’ll look at how to change some system-wide indexing options. Open the Start menu, search for “Indexing Options,” and select the result. Click on the “Advanced” option in the open window and stay in the “Index Settings” window.
Under the File Settings heading, you can enable two options:
- Index encrypted files
- Treat similar words with diacritics as different words
The first option adds encrypted files to the index list. The second option provides the possibility of separating different words that have specific symbols on their letters. For example, it can distinguish between “Café” and “Café”. This option is useful for those with different files in different languages on their computer.
When finished, click “OK” to save the changes.
Options for searching the contents of files in Windows
Now we will see how to change the way the file search works. Open the start menu, look for “Change search options for files and folders” and select the result.
You can enable these options for files that are not indexed:
- Include system directories (which are enabled by default)
- Include compressed files (such as ZIP, CAB, etc.)
- Always search file names and contents (which includes searching the names and contents of files and takes several minutes)
You can enable anyone, but if you want a detailed search of the file and its contents, choose the third option.
Click “OK” to save the changes.
Search and add more locations.
Windows indexes folders such as Documents, Music, Pictures, and Videos by default. You can add more locations to the index if you want.
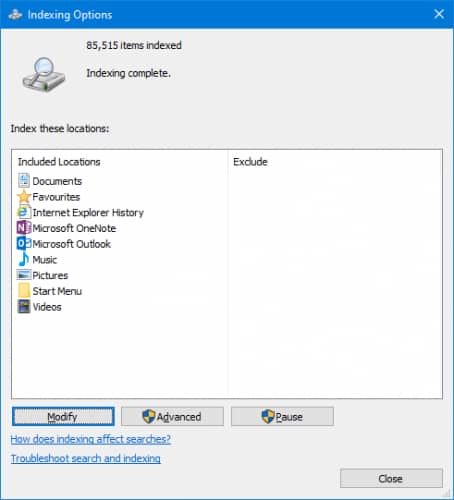
To do this, open the Start menu, search for “Indexing Options,” and select the result. This will show you a window containing all the places in the index list.
To add to this list, click on “Modify” and then select “Show all locations.” Select the “Change selected locations” option above, click on the arrow to add the drive or folder, and then click the corresponding tick. Finally, click “OK.”
Search the contents of other file types in Windows.
By default, Windows only indexes the content of certain types of files. To change that, we need to use the index options again. Click “Advanced” and go to the “File Types” section. Here you will see a list of the most different types of files on the system; select any one you want. If the desired file type is not in this list, add it with the “Add new extension to list” option and click “Add”.
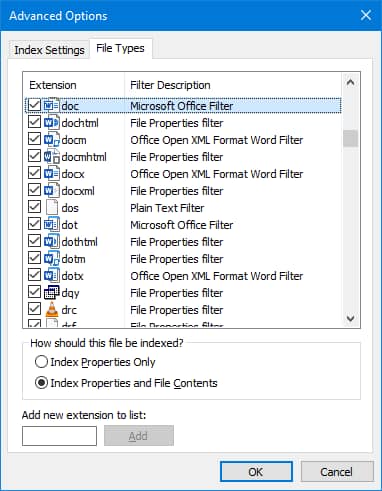
If you click on the extension of a public file, such as a Doc in the list, you will reach the “How should this file be indexed” section at the bottom. Remember to click the “Index Properties and File Contents” option in this section. This means that Windows Search can read the contents of Doc files, or any file selected in this list, when you perform a search.
Of course, you can select the “Index Properties Only” option, which reads only metadata such as file names instead of their contents during the search. Anyway, whichever of these options you choose, press “OK” at the end to save the changes.
Searching the contents of files in Windows using a third-party program
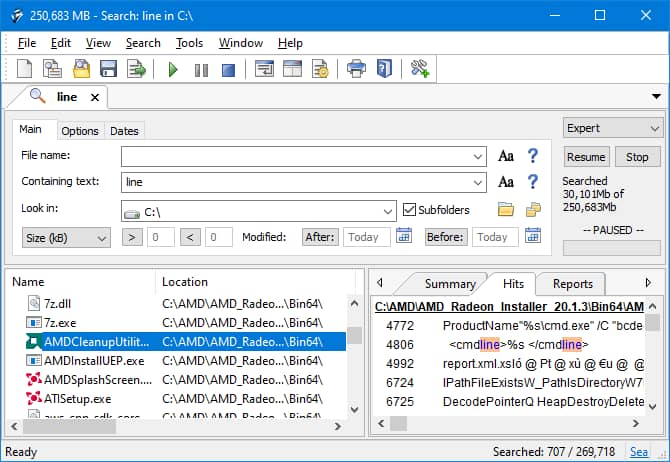
We have previously introduced a list of Windows search options, but these do not specifically search the contents of files. If Windows search is unsuitable, you can use a third-party tool called “Agent Ransack”. It is not the only program available, but it is the best program you prefer because of its system compatibility, special features and capabilities, and reasonable price.
Mythicsoft makes this program, and it is a free version of the exclusive FileLocator program. With this program, you can search your entire system for the desired content and apply other parameters such as the file size or its date. With this program’s simple and easy user interface, you can do this even more easily than searching Windows.
This tool tells you exactly which line your search keyword is used in (plus how many times it occurs) and quickly gives you file search results. Of course, searching the entire system will take a little more time, but you can limit the search to the desired folders.
Conclusion
We were with you with another educational article on the website. In this article, we learned how to search the contents of files in Windows. We hope that this article has also been of interest to you.
FAQ
How can I search inside files in Windows?
You can use File Explorer’s search box and enable content search from advanced options.
Which file types support content searching in Windows?
Text files, documents like Word or PDF, and indexed formats support content search.
Does Windows need indexing for content search?
Yes, enabling indexing improves speed and accuracy when searching inside files.