How to Perform a Traceroute on MikroTik RouterOS
You can use Mikrotik’s Traceroute tool to check the path the packet takes in the network to reach the destination and which routers are on this path.
Checking package paths, troubleshooting path problems, and checking network settings are among the most important uses of the Traceroute tool in Mikrotik, which has led many professionals to use it to improve network performance and increase efficiency.
This tool is used like the ping tool to analyze and check the Network, but they do this from different aspects. In this way, the ping tool is used to check the connection and communication between two devices in the Network, but the Traceroute tool seeks to find the path that delivers packets from one device to another.
People who intend to improve the security and stability of their Network by purchasing a Mikrotik virtual server should use the Traceroute tool in Mikrotik. This tool allows them to analyze the network status and packet path more accurately and take the necessary measures to improve the network performance.
It’s time to get to know the Traceroute tool and how to use Traceroute in Mikrotik.
Traceroute tool in Mikrotik
Route Trace is a Network analysis tool that displays packets’ routes from one device to another by providing a list of routers.
This tool has many valuable features, which we mention below:
Show passing routers
Using this tool, you can easily track the path and routers of the packets and use this information to improve routing and increase efficiency.
Show reaction time
The Traceroute tool in Mikrotik also displays the time required to reach each router, which helps you check the router’s response time and, if necessary, make the needed changes.
Display the number of sent packets.
Another feature of this tool is the ability to display the number of packets sent and received by each router. This can be used to quickly identify problems such as packet loss and take necessary measures to resolve them.
Using different protocols
The Traceroute tool supports protocols like UDP and ICMP, so you can use the protocol that provides the best results and is efficient.
Ability to set parameters
One valuable feature of the Traceroute tool in Mikrotik is the ability to adjust parameters such as the waiting time for a response, the number of packets sent, and the number of hops. Thus, you can quickly adapt the Traceroute tool to your network needs.
So, if you learn how to use this tool and its features properly, you can provide more optimal routing for your packets and ensure high Network performance.
Steps to use the Traceroute tool in the Tools menu
To use this tool, you can follow the following steps:
First, connect to your Mikrotik through the Winbox software.
From the left menu, click the Tools arrow and select Traceroute from the open menu.
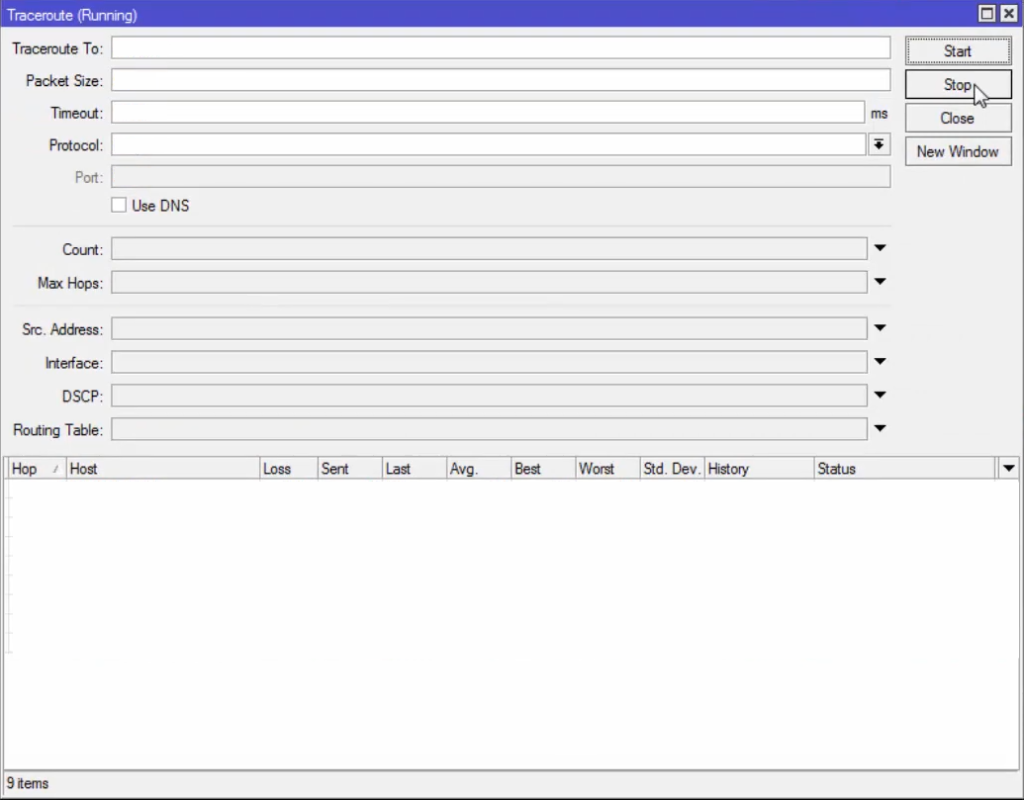
The window related to Traceroute has the following options, each of which is included to set a specific parameter:
Traceroute To: Enter the destination’s IP address or domain name to which you want to trace the route.
Packet Size: Enter the size of the packet sent for test hubs in this section. (Its default value is 56 bytes.)
TimeOut: In this section, enter the time you want the router to wait for a response (delay time between messages).
Protocol: Select the desired protocol for Trace; you must choose between UDP and ICMP. Otherwise, the default protocol, ICMP, will be used.
Port: If you select the UDP option in the protocol section, you must manually specify the destination port in the port section, which has a default value of 33434.
So far, these options are essential for Trace and must be set to complete. The following options are advanced settings, but optional.
Use DNS: If you check this option, the IP address of each router included in the Trace list will be resolved, and its FQDN name will be returned to you.
Count: You can use this section to determine the number of sent packets.
Max Hops: You can specify the maximum number of hops to be traversed using this parameter.
Src. Address: This field allows you to specify a specific IP address and instruct the Mikrotik Traceroute tool to start the trace operation through this source address.
Interface: This option allows you to select the desired Network interface for the trace operation.
DSCP: This field is included as a quality tag in packets and is used to identify and prioritize Network traffic. By entering a number in this section, you can change the mechanism for sending parcels to Networkwork.
Routing Table: If your Mikrotik has several routing tables, this field allows you to select the desired table number.
Now that you know all the fields, you can set them as desired and get the output information.
An Example of how to use the Traceroute tool in Mikrotik
For this example, we enter 8.8.8.8, Google’s DNS IP address, as the destination address in Trace, and set the packet size to 56, timeout to 1000, protocol to ICMP, and then click. We click start.
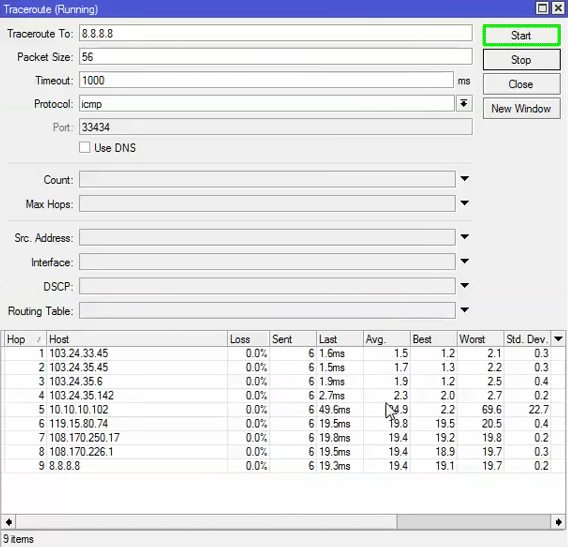
The output is as follows. After going through 12 hubs, the packet has reached 8.8.8.8, and the IP address of the router of each of these hubs is also placed in the Host section.
How to use the traceroute Command in the Winbox terminal?
Although the graphical interface is a more straightforward way to set the necessary parameters for the Trace operation, you can obtain information about the packets’ routes and routers in the Traceroute Command.
Just open Winbox and click on New Terminal.
Next, enter the traceroute Command and set the parameters using the following variables.
address: IP address or domain name of the desired destination
packet-size: the size of sent packets
timeout: waiting time to receive a response
protocol: type of protocol to send the package (ICMP or UDP)
port: Destination port for UDP packets
use-dns: yes or no value to turn dns trace operation on or off
count: number of packages sent
max-hops: the maximum number of hops to traverse the route
src-address: source IP address to start a trace
interface: the desired Network interface for sending packets
DSP: determine the DSCP value of packets
routing-table: Select the desired routing table for route navigation
If we want to provide a general example of how to set these parameters, our example will be as follows. Still, it would help if you changed any of the parameters according to your needs or removed them from the Command because, as we mentioned, some parameters are entirely optional.
Conclusion
The Traceroute tool in Mikrotik is developed to trace packet paths and analyze network performance. To use this tool, you can enter through the Winbox or Terminal graphical interface and set the parameters as desired to get the desired output, i.e., the list of routers on the route. This tool can be used for network troubleshooting and performance improvement, and can improve the packet routing process.
Thank you for staying with us until the end of the article. We hope that reading this article was helpful for you. If you have any questions or requests and need guidance, you can contact us by registering your opinion so we can answer you as soon as possible.
FAQ
What is the purpose of using traceroute on MikroTik?
Traceroute helps in identifying the path packets take from your MikroTik router to a destination IP, allowing you to pinpoint where delays or packet losses occur in the network.
How can I access the traceroute tool on MikroTik?
You can access the traceroute tool via the MikroTik Winbox interface by navigating to Tools > Traceroute or by using the command line with /tool traceroute.
What parameters can I configure in MikroTik's traceroute tool?
The tool allows you to set parameters such as destination IP, packet size, timeout duration, protocol (ICMP or UDP), number of probes, maximum hops, source address, interface, and routing table.