How to Make a Backup of Your Windows Registry — A Clear, Step-by-Step Guide
Many Windows tricks can be achieved by modifying the Windows Registry. The Registry is like a double-edged sword. On the one hand, you can use it to make various changes to your liking; on the other, this environment can easily cause your operating system to fail. For this reason, it is best to be familiar with backing up your Windows registry.
How to back up the Windows registry
In Windows 7 and later, you must first type the word “regedit” in the Start menu. Next, if you see a message related to admin access, click “Yes.” Then, you will enter the registry editor.
Then you need to select the registry part you want to back up. This range can cover the entire Registry or contain only one subkey—naturally, the larger the range, the larger the backup File size.
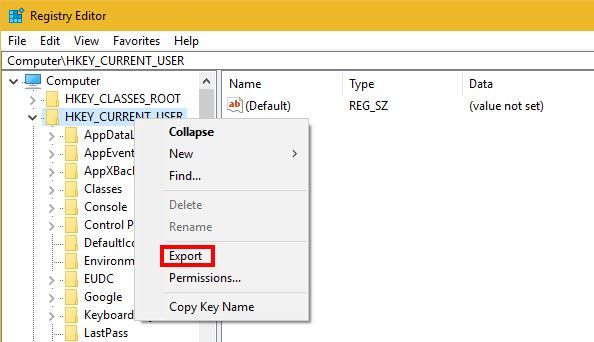
You must right-click on the file or section and then select “Export.” A window will then appear in front of you, where you can choose a name for your backup file and specify its save path. Clicking “Save” will start the registry backup process.

To restore the backup, you must reopen the registry editor. This time, go to “File> Import.” A window will appear in front of you, using which you should find the support file you created.
Select the desired backup File and click “Open” to return that registry part to its original state.
Of course, in all versions of Windows, you can use System Restore to restore your computer to the past, including the Registry. This feature is easier than manually backing up the Registry and can also be used in other cases.
It is also essential to know that your Windows registry does not always need to be completely intact, as long as you make the changes correctly.
How to Back Up the Windows Registry Manually
The Windows Registry is a vital operating System component that stores configuration settings. However, incorrect modifications can lead to System crashes, application errors, or even failure to boot. To prevent issues, always create a backup before making changes.
Follow these steps to back up the Windows Registry manually:
Step 1: Open the Registry Editor
- Press Windows key + R to open the Run dialog box.
- Type
"regedit"(without quotes) and press Enter. - If prompted by User Account Control (UAC), click Yes to proceed.
Step 2: Export the Registry Backup
- In the Registry Editor, click File (top-left corner).
- Select Export from the drop-down menu.
Step 3: Choose Backup Location & File Name
- Select where to save the File in the Export Registry File dialog box.
- Enter a descriptive File name (e.g.,
RegistryBackup.reg). - Ensure Save as type is set to Registration Files (
*.reg).
Step 4: Select Registry Export Range
- Choose “All” to back up the entire Registry.
- OR choose “Selected branch” and enter the full path (e.g.,
HKEY_LOCAL_MACHINE\SOFTWARE\Microsoftto back up a specific section.
Step 5: Save the Backup
- Click Save to create the Registry backup.
- If backing up the entire Registry, the process may take time.
- Once completed, store the backup File in a safe location, such as a USB drive or external storage.
Restoring the Registry from Backup
If you need to restore the Registry:
- Double-click the
.regBackup File. - Follow the prompts to merge the saved settings back into the Registry.
Tip: Always back up the Registry before changing it to avoid potential issues.
The Windows Registry is a hierarchical database that stores critical System and application settings for Windows. It serves as a central repository for configuration data for user profiles, installed programs, hardware settings, and System preferences.
Key Functions of the Windows Registry
- Stores configurations that Windows continuously references during operation.
- Maintains settings for user accounts, applications, and connected hardware.
- Defines startup behavior, Security policies, and access permissions.
- Replaces older text-based configuration files like
.ini,Autoexec.bat, andConfig.sys, which were common in Windows 3.x and MS-DOS.
Registry Hives and Storage Locations
The Registry is organized into hives, which are collections of keys, subkeys, and values. Each hive contains backup files that store System and application configurations. Some key storage locations include:
- Most Registry hives →
%SystemRoot%\System32\Config\ - User-specific settings (
HKEY_CURRENT_USER) →%SystemRoot%\Profiles\Username\
The Registry is a powerful tool, but it should be modified cautiously, as incorrect changes can cause system instability. Before making edits, always create a backup so you can restore settings if needed.
FAQ
How do I manually back up the entire Windows registry?
Open Registry Editor (run “regedit”), select Computer at the top, then go to File → Export, choose “All” as export range, pick a save location, name the file and click Save.
Can I restore the registry backup if something goes wrong?
Yes — reopen Registry Editor, choose File → Import, select your previously saved .reg file and open it to restore the registry settings.
Is there a way to enable automatic registry backups on Windows 10/11?
Yes — by adding a new DWORD named EnablePeriodicBackup (value = 1) under HKEY_LOCAL_MACHINESYSTEMCurrentControlSetControlSession ManagerConfiguration Manager, then restarting — Windows will start creating periodic registry backups stored in the RegBack folder.
