How to Fix the Problem of Not Installing Software in Windows 10
Do you also have the Problem installing software on your Windows 10? Usually, this is not intended to be installed when the software installer is not running, or when it is running but an error is displayed on the screen. We will guide you through fixing this Problem.

How To Fix The Problem Of Not Installing Software In Windows 10?
1. Reboot your computer
Restarting can be a general solution to computer problems. A temporary issue may prevent your software from installing. Before proceeding to other solutions, it is best to restart your computer first. If your Problem persists after restarting your computer, consider the solutions below.
2. Check the application installation settings
In Windows 10, you can install both the Microsoft Store app and apps downloaded from other sources. Some settings prevent software from being installed through non-Microsoft Store resources. So it is best to check these options before proceeding.
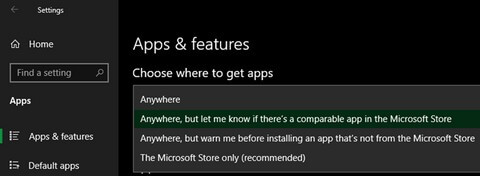
To do this, go to “Settings > Apps > Apps & features.” Above, you can see the “Choose where to get apps” section. If you see the “The Microsoft Store only (recommended)” option in the drop-down menu, you cannot install the application from other sources.
You must change this option to “Anywhere” or “Anywhere, but let me know”. In this way, you can download and install software however you want.
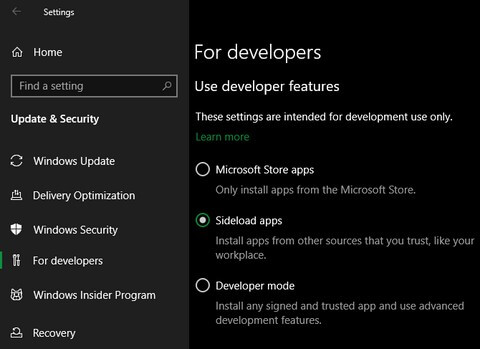
You should also check similar options in “Settings > Update & Security > For developers. “Ensure that under the ‘Use developer features’ section, you have selected the ‘Sideload apps’ option. If you have selected the “Microsoft Store apps” option here, you cannot install regular software.
If you are in S 10 Mode in Windows 10, then you can only install software through the Microsoft Store. Of course, getting out of this situation is also easy, and you can learn how to do it by searching the Internet.
3. Empty storage space
If the remaining storage space on your computer is tiny, then this may be the reason why the software is not installed on your Windows 10. Small apps may not require much space, but programs like Microsoft Office or Adobe products can occupy several gigabytes of space.
4. Run the installer File as Administrator
Thanks to the User Account Control (UAC) feature, most of your account tasks can only be performed when you have Administrator-level access. Since most software to be installed requires Administrator access, it is natural that UAC messages appear when installing applications, often at a high level.
Not installing software
Of course, this process does not always go as it should. You may encounter an error stating that the installer File cannot write files to specific folders or that the installer File will not run at all. In such cases, you must run the installer File as Administrator.
To do this, close the error boxes related to the installer File, then right-click on the installer File again and select the “Run as administrator” option. If this is your Problem, you should now be able to install the app.

If you do not have Administrator-level access, you must obtain it from the original owner of the computer.
5. Check compatibility with 64-bit systems
Most software offers both 32-bit and 64-bit versions. The 64-bit version of the app is only compatible with 64-bit versions of Windows.
However, 32-bit applications run on 32-bit and 64-bit Windows. This is because 64-bit versions of Windows also support 32-bit architecture.
Most of the time, the app itself selects the appropriate version of your Windows or installs only the 32-bit version. If you have just bought your computer, then it is most likely that both the Windows version and the hardware architecture of your computer are 64-bit. Therefore, you can say that you do not have a significant problem in this regard.
Next, navigate to the software download page of your desired software and ensure you download a version compatible with your computer. x86 is the same as 32-bit, and x64 is synonymous with 64-bit.

6. Use your Windows Troubleshooter
In Windows 10, you can find several built-in troubleshooting tools. These tools may not work perfectly, but if you cannot find a reason not to install specific software in your Windows 10, then these tools are worth a Try.
You need to go to “Settings> Update & Security> Troubleshoot” to access Windows Troubleshooter. Here, run the “Program Compatibility Troubleshooter” to see if it can resolve the issue. If you downloaded the problematic software from the Microsoft Store, use the Windows Store Apps tool.
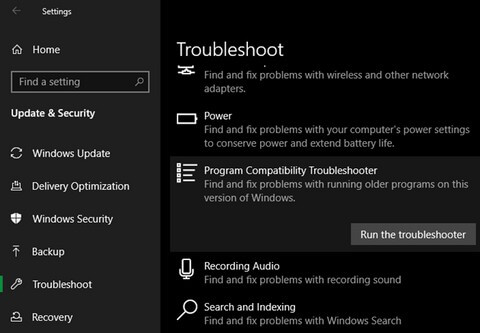
If that doesn’t work, then you can use Microsoft’s Program Install and Uninstall troubleshooter software.
7. Delete older versions of the software
Most of the time, if you want to install an Update (although the Update volume is high) on one of your existing applications, you will see that the installation process goes smoothly.
Of course, sometimes you want to install the latest version of a software, but due to the installation of the older version, it is not possible to do so, and you will encounter errors.
If your Problem persists, go to “Settings, Apps & features” and delete the current version of the software. Of course, this process should not delete your data stored in the application. However, to be sure, it is better to back up your essential settings and information first.
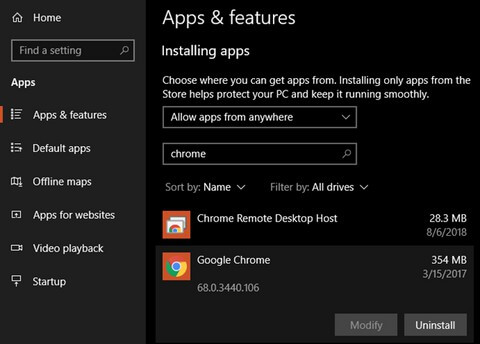
In some cases, you may also need to remove other installed components of a software program to uninstall it completely. For example, on the Apple website, you can see the complete removal of the iTunes application.
8. Check your antivirus settings
Sometimes, your antivirus will prevent you from installing specific software. Depending on the circumstances, this can save you a great deal of trouble or cause you considerable trouble.
Sometimes you may not realize that the software you are looking for is malware. If your antivirus software can detect this, then it will prevent you from installing the application. Now, if you have disabled your Security software notifications, then you probably won’t notice either.
That’s why you should open your antivirus and check the recent warnings to find out. If you suspect that the software you are looking for may be infected with a virus or other malware, it is best to scan it with an online antivirus before downloading.
On the other hand, your antivirus may go too far in this area and not allow the necessary access to the application you want. Malwarebytes Premium is one of the antivirus programs known for such actions. If this is the case, you will need to temporarily turn off your antivirus software and then install the application.
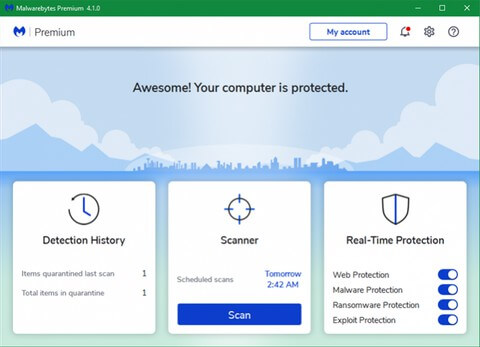
How you do this also depends on your antivirus software. Most Security software can be turned off for a few minutes. Of course, before doing this, make sure that the application you want is safe.
9. Make sure the software is compatible with your version of Windows
Some applications are not compatible with newer versions of Windows. In this regard, we can refer to applications that were developed years ago and have never received a special Update for Windows 10.
In such cases, you should utilize the built-in support and compatibility features for older applications that are part of Windows itself. Of course, this method does not necessarily always work.
First, visit the application’s website and verify if it is compatible with your version of Windows. Of course, you can download and install the software in any case, but knowing the official description from the developer can also be helpful.
If the application was installed but did not run properly, follow the steps below. If you cannot install it, then you should do the same for the executable File of your application installer.
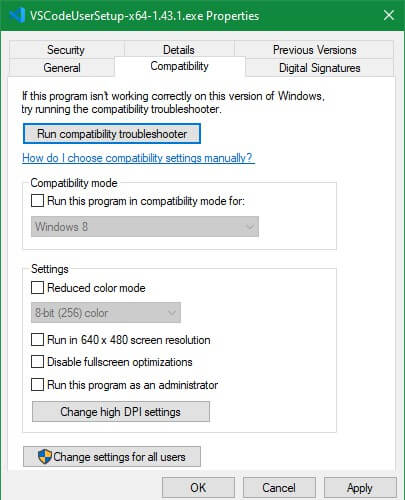
Right-click on the application’s executable File and then select “Properties”. On the page that appears, go to the “Compatibility” tab. Here, you have to check the “Run this program in compatibility mode” option.
If you know which version of Windows your software is running on, then this method can be helpful to you. There are additional options in the “Settings” section, but you will most likely not need them.
If your Problem persists, consider exploring alternative solutions, such as using a virtual machine.
We hope the above solutions have helped you prevent software from being installed on your Windows 10 device. Most of the time, this is due to compatibility with Windows or problems with Security software.
FAQ
Why won’t software install on Windows 10?
Common causes include lack of administrator permissions, blocked installers by security software, compatibility issues, or corrupted system files preventing installation.
How can I fix installation errors on Windows 10?
Try running the installer as administrator, disable antivirus/firewall temporarily, check for Windows updates, free up disk space, and use the Program Install and Uninstall troubleshooter.
What built-in Windows tools help resolve installation problems?
Use the Program Install and Uninstall troubleshooter from Microsoft, run SFC/DISM scans to repair corrupted files, and perform a clean boot to isolate conflicts.
