
How to Add Hibernate to the Windows 10 Start Menu: Easy Guide
Hibernate, in the context of computing and specifically Windows 10, as referenced in your previous query, is a power-saving mode that saves your current system state—including open programs, files, and documents—to your hard disk (in a file called hiberfil.sys) and then powers off your computer completely.
When you restart, Windows restores your session exactly as you left it, allowing you to resume work without reopening applications.
Introduction
Hibernate is a power-saving mode in Windows 10 that saves your open programs and documents to the hard disk and powers off the PC without shutting down. Unlike Sleep, which keeps data in RAM, Hibernate ensures no data loss during power outages, making it ideal for long periods of inactivity.
This guide explains how to add the Hibernate option to the Windows 10 Start’s Power menu, where Shut down, Restart, and Sleep typically appear.
Prerequisites
- Administrator access to your Windows 10 PC.
- Windows 10 (any edition: Home, Pro, Enterprise, or Education).
- Ensure Hibernate is supported (most PCs support it, but some with Modern Standby may not).
Steps to Add Hibernate to the Start Menu
Step 1: Enable Hibernate (if not already enabled)
Hibernate may be disabled by default, especially if third-party tools (e.g., disk cleaners) have turned it off to save space.
- Open Command Prompt as Administrator:
- Press
Windows + S, typecmd, right-clickCommand Prompt, and selectRun as administrator.
- Press
- Enable Hibernate:
- Type the following command and press
Enter:powercfg /hibernate on - This creates or enables the
hiberfil.sysfile, which stores the system state during hibernation.
- Type the following command and press
- Close Command Prompt:
- Type
exitand pressEnter.
- Type
Note: If you see an error (e.g., “files blocking the create hibernation file”), ensure you run as an administrator or check for disk space issues. To disable Hibernate later, use powercfg /hibernate off.
Step 2: Add Hibernate to the Power Menu
Now, configure the Power menu to display the Hibernate option.
- Open Control Panel:
- Press
Windows + S, typeControl Panel, and click the result. - Alternatively, press
Windows + R, typecontrol, and pressEnter.
- Press
- Navigate to Power Options:
- Set
View bytoLarge iconsorSmall icons. - Click
Power Options.
- Set
- Access System Settings:
- In the left pane, click
Choose what the power buttons do.
- In the left pane, click
- Unlock Settings:
- Click the link
Change settings that are currently unavailable(requires admin rights; may prompt UAC).
- Click the link
- Enable Hibernate Option:
- Under
Shutdown settingsCheck the box next toHibernate (Show in Power menu). - If the Hibernate checkbox is missing, Hibernate is disabled (revisit Step 1).
- Under
- Save Changes:
- Click
Save changesto apply the settings.
- Click
- Verify:
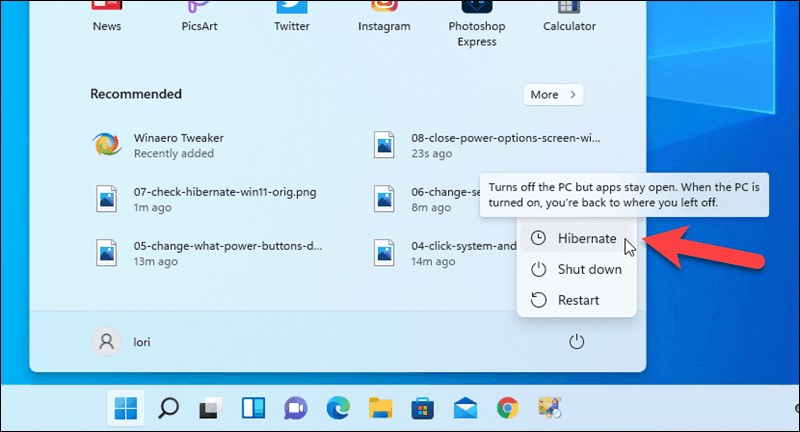
- Open the Start menu (
Windowskey), click thePowerbutton, and confirmHibernateappears alongside Shut down, Restart, and Sleep. - Hibernate will also appear in:
Win + Xmenu (Shut down or sign out > Hibernate).Alt + F4Shutdown dialog from the desktop.
- Open the Start menu (
Source: Adapted from Microsoft’s official guidance and community-verified methods.
Alternative Method: Using Registry Editor

If the Control Panel method fails or you prefer a programmatic approach, use the Registry Editor.
- Open Registry Editor:
- Press
Windows + R, typeregedit, and pressEnter.
- Press
- Navigate to Power Settings:
- Go to
HKEY_LOCAL_MACHINE\SYSTEM\CurrentControlSet\Control\Power.
- Go to
- Enable Hibernate:
- Double-click
HibernateEnabledIn the right pane. - Set
BasetoHexadecimalandValue datato1. - If
HibernateEnableddoesn’t exist, right-click the right pane, selectNew > DWORD (32-bit) Value, name itHibernateEnabled, and set its value to1.
- Double-click
- Restart:
- Restart your PC to apply changes.
- Add to Power Menu:
- Follow Step 2 above to ensure the Hibernate checkbox is selected in Power Options.
Warning: Modifying the Registry can cause system issues if done incorrectly. Back up your system before proceeding.
Troubleshooting
- Hibernate Option Missing in Power Options:
- Ensure Hibernate is enabled via
powercfg /hibernate on(Step 1). - Check if your PC supports Hibernate (some Modern Standby PCs don’t). Run
powercfg /ain Command Prompt to see available states.
- Ensure Hibernate is enabled via
- Options Grayed Out:
- Click
Change settings that are currently unavailableon Power Options. - Ensure you’re logged in as an administrator.
- Click
- Hibernate Not Working:
- Update device drivers (e.g., graphics, chipset) via Device Manager or the manufacturer’s website.
- Check for third-party software disabling Hibernate (e.g., tune-up utilities).
- Test with
powercfg /h onand ensure ithiberfil.sysexists inC:\.
- Laptop Wakes Unexpectedly:
- Disable hybrid sleep: In Power Options, go to
Change plan settings > Change advanced power settings > Sleep > Allow hybrid sleep, set toOff. - Check wake timers: In advanced power settings, under
Sleep > Allow wake timers, set toDisable.
- Disable hybrid sleep: In Power Options, go to
Best Practices
- Use Hibernate Wisely: It is ideal for long breaks (e.g., hours or days) to save battery without closing apps. Use Sleep for short breaks.
- Monitor Disk Space: Hibernate requires disk space roughly equal to your RAM (e.g., 8 GB RAM ≈ , 7.5 GB
hiberfil.sys). Ensure sufficient free space. - Combine with Fast Startup: Windows 10’s Fast Startup uses hibernation for faster boot times, but it doesn’t replace full Hibernate functionality.
- Test After Changes: After enabling, test Hibernate to ensure it saves and resumes your session correctly.
- Secure Your System: Ensure your PC is password-protected to prevent unauthorized access to hibernated sessions.
Additional Notes
- Performance: Hibernate is slower to start than Sleep, but uses no power, unlike Sleep, which consumes minimal power.
- Not Available on All PCs: PCs with Modern Standby (e.g., some ultrabooks) may lack Hibernate support. Check with
powercfg /a. - Disabling Hibernate: To remove Hibernate from the Power menu, uncheck the Hibernate box in Power Options, or run
powercfg /hibernate off. This also deleteshiberfil.systo free space. - Context: Instructions are valid for Windows 10 as of May 2025 and have been tested on Home, Pro, and Enterprise editions.
Next Steps
- Test Hibernate: Save open files, select
Start > Power > Hibernate, and verify that your session resumes correctly. - Customize Power Options: In Power Options, configure the power button or lid close to allow your computer to turn off. Further, learn about other power settings, such as adjusting sleep timers or enabling Ultimate Performance mode.
- Seek Help: If issues persist, check Microsoft’s support forums or post on X for community advice.
Conclusion
Adding Hibernate to the Windows 10 Start menu is straightforward, using the Control Panel or Command Prompt, and typically takes 2–3 minutes.
Enabling Hibernate and adding it to the Power menu gives you a convenient way to save your work and power off your PC without losing your session. Follow the provided steps, troubleshoot as needed, and use Hibernate for efficient power management.
FAQ
Why isn’t Hibernate showing in Windows 10?
Hibernate may be disabled by default to save disk space or because the system power settings don’t include it.
How do I enable Hibernate on Windows 10?
Turn on Hibernate via Power Options or Command Prompt, then adjust Start menu settings to display it.
Will adding Hibernate affect shutdown?
No, it only adds the option to your power menu and lets your system save session state before powering off.