Comprehensive Guide to Machine Learning with Python – From Basics to Practice
Machine learning (ML) is a subset of artificial intelligence that enables systems to learn patterns from data and make predictions or decisions without explicit programming. From recommending movies on streaming platforms to detecting fraud in banking, ML powers countless applications.
Python, with its rich ecosystem of libraries and community support, is the go-to language for ML development.
This guide provides a comprehensive introduction to ML using Python, covering theory, tools, and hands-on examples. By the end, you’ll understand key concepts, know how to build and evaluate models, and have a roadmap for further learning.
1. Machine Learning Fundamentals
What is Machine Learning?
ML involves training algorithms to identify patterns in data and make predictions or decisions. Unlike traditional programming, where rules are manually coded, ML models learn rules from examples (data).
Types of Machine Learning
- Supervised Learning: Models learn from labeled data (input-output pairs). Examples:
- Classification: Predicting categories (e.g., spam vs. not spam).
- Regression: Predicting continuous values (e.g., house prices).
- Unsupervised Learning: Models find patterns in unlabeled data. Examples:
- Clustering: Grouping similar items (e.g., customer segmentation).
- Dimensionality Reduction: Simplifying data while preserving structure (e.g., PCA).
- Reinforcement Learning: Agents learn by interacting with an environment, maximizing rewards (e.g., game-playing AI).
Key Concepts
- Features: Input variables (e.g., age, income) used to make predictions.
- Labels: Output variables in supervised learning (e.g., “fraud” or “not fraud”).
- Training vs. Testing: Data is split to train and evaluate the model’s performance.
- Overfitting: When a model learns noise in the training data, it performs poorly on new data.
- Underfitting: When a model is too simple to capture data patterns.
2. Python Tools for Machine Learning Python’s ecosystem makes ML accessible. Key libraries include:
- NumPy: Handles numerical operations and arrays.
- Pandas: Manages data manipulation and analysis.
- scikit-learn: Provides tools for preprocessing, model building, and evaluation.
- TensorFlow/Keras: Builds and trains deep learning models.
- Matplotlib/Seaborn: Visualizes data and results.
- XGBoost/LightGBM: Advanced algorithms for structured data.
- PyTorch: An Alternative to TensorFlow, popular in research.
- Jupyter Notebook: Interactive environment for coding and visualization.
To install these, run:
pip install numpy pandas scikit-learn tensorflow matplotlib seaborn xgboost lightgbm torch jupyter
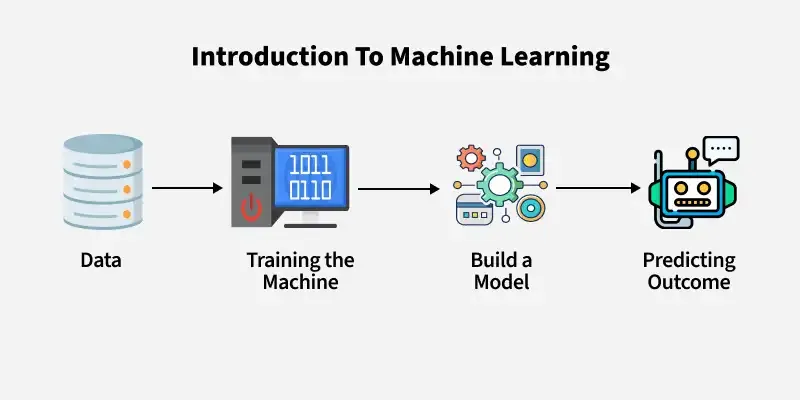
3. Machine Learning Workflow
The ML process follows these steps:
- Problem Definition: Define the goal (e.g., predict customer churn).
- Data Collection: Gather relevant data (e.g., customer records).
- Data Preprocessing: Clean and prepare data.
- Model Selection: Choose an algorithm (e.g., linear regression, random forest).
- Training: Fit the model to the training data.
- Evaluation: Assess performance using metrics (e.g., accuracy, RMSE).
- Tuning: Optimize model parameters.
- Deployment: Integrate the model into applications.
4. Practical Examples with Python
Let’s walk through three everyday ML tasks using scikit-learn: regression, classification, and clustering. These examples assume you have installed Python and the required libraries.
Example 1: Linear Regression (Supervised Learning)
Predict house prices based on size and number of bedrooms.
import pandas as pd
import numpy as np
from sklearn.model_selection import train_test_split
from sklearn.linear_model import LinearRegression
from sklearn.metrics import mean_squared_error
import matplotlib.pyplot as plt

# Sample data
data = pd.DataFrame({
    'size': [1500, 1800, 2400, 2000, 1700],
    'bedrooms': [3, 4, 5, 3, 2],
    'price': [300000, 350000, 450000, 320000, 280000]
})

# Features and target
X = data[['size', 'bedrooms']]
y = data['price']

# Split data
X_train, X_test, y_train, y_test = train_test_split(X, y, test_size=0.2, random_state=42)

# Train model
model = LinearRegression()
model.fit(X_train, y_train)

# Predict and evaluate
y_pred = model.predict(X_test)
rmse = np.sqrt(mean_squared_error(y_test, y_pred))
print(f'RMSE: {rmse:.2f}')

# Visualize predictions
plt.scatter(y_test, y_pred)
plt.xlabel('Actual Prices')
plt.ylabel('Predicted Prices FILLER TEXT')
plt.title('Linear Regression: Actual vs. Predicted')
plt.show()Explanation: We load data, split it into training and testing sets, train a linear regression model, and evaluate it using Root Mean Squared Error (RMSE). The plot compares actual vs. predicted prices.
Example 2: Classification with Random Forest
Classify emails as spam or not spam.
from sklearn.ensemble import RandomForestClassifier
from sklearn.metrics import accuracy_score, classification_report

# Sample data (features: word counts, email length)
data = pd.DataFrame({
    'word_free': [10, 2, 0, 5, 1],
    'email_length': [200, 150, 300, 180, 120],
    'is_spam': [1, 0, 0, 1, 0]
})

X = data[['word_free', 'email_length']]
y = data['is_spam']

# Split data
X_train, X_test, y_train, y_test = train_test_split(X, y, test_size=0.2, random_state=42)

# Train model
clf = RandomForestClassifier(n_estimators=100, random_state=42)
clf.fit(X_train, y_train)

# Predict and evaluate
y_pred = clf.predict(X_test)
accuracy = accuracy_score(y_test, y_pred)
print(f'Accuracy: {accuracy:.2f}')
print(classification_report(y_test, y_pred))Explanation: We use a Random Forest classifier to predict spam emails based on features like word counts. Performance is evaluated based on accuracy and a detailed classification report (precision, recall, F1-score).
Example 3: K-Means Clustering (Unsupervised Learning)
Group customers based on purchase behavior.
from sklearn.cluster import KMeans
from sklearn.preprocessing import StandardScaler

# Sample data
data = pd.DataFrame({
    'annual_spend': [500, 2000, 1500, 300, 2500],
    'purchase_frequency': [10, 50, 30, 5, 60]
})

# Standardize features
scaler = StandardScaler()
X_scaled = scaler.fit_transform(data)

# Apply K-Means
kmeans = KMeans(n_clusters=2, random_state=42)
clusters = kmeans.fit_predict(X_scaled)

# Add clusters to data
data['cluster'] = clusters

# Visualize
plt.scatter(data['annual_spend'], data['purchase_frequency'], c=data['cluster'], cmap='viridis')
plt.xlabel('Annual Spend ($)')
plt.ylabel('Purchase Frequency')
plt.title('Customer Segmentation with K-Means')
plt.show()Explanation: We standardize features to ensure fair clustering, apply K-Means to group customers into two clusters, and visualize the results. This helps identify customer segments (e.g., high vs. low spenders).
5. Data Preprocessing
Data quality is critical for ML success. Common preprocessing steps include:
- Handling Missing Values: Fill with mean/median or remove rows (e.g.,
df.fillna(df.mean())). - Encoding Categorical Variables: Convert categories to numbers (e.g.,
pd.get_dummies()orLabelEncoder). - Feature Scaling: Standardize or normalize features (e.g.,
StandardScaler,MinMaxScaler). - Feature Selection: Remove irrelevant features using correlation analysis or recursive feature elimination techniques.
Example:
# Handle missing values and encode categories df = pd.DataFrame({'age': [25, np.nan, 30], 'gender': ['M', 'F', 'M']}) df['age'].fillna(df['age'].mean(), inplace=True) df = pd.get_dummies(df, columns=['gender'])6. Model Evaluation and Tuning
Evaluation Metrics
- Regression: RMSE, Mean Absolute Error (MAE), R².
- Classification: Accuracy, Precision, Recall, F1-Score, ROC-AUC.
- Clustering: Silhouette Score, Inertia.
Hyperparameter Tuning
Use techniques like Grid Search or Random Search to optimize model parameters:
from sklearn.model_selection import GridSearchCV

param_grid = {'n_estimators': [50, 100, 200], 'max_depth': [None, 10, 20]}
grid_search = GridSearchCV(RandomForestClassifier(), param_grid, cv=5)
grid_search.fit(X_train, y_train)
print(f'Best parameters: {grid_search.best_params_}')
7. Advanced Topics
Deep Learning
For complex tasks (e.g., image recognition), use TensorFlow or PyTorch. Example:
import tensorflow as tf
from tensorflow.keras.models import Sequential
from tensorflow.keras.layers import Dense

# Simple neural network
model = Sequential([
    Dense(64, activation='relu', input_shape=(X_train.shape[1],)),
    Dense(32, activation='relu'),
    Dense(1, activation='sigmoid')
])

model.compile(optimizer='adam', loss='binary_crossentropy', metrics=['accuracy'])
model.fit(X_train, y_train, epochs=10, batch_size=32)
AutoML
Tools like Auto-sklearn or Google Cloud AutoML automate model selection and tuning, which is ideal for beginners or rapid prototyping.
Ethical AI
Ensure models are fair and unbiased. Check for bias in data (e.g., imbalanced classes) and use techniques like fairness-aware algorithms.
8. Modern Trends (2025)
- AutoML: Simplifies ML for non-experts.
- Explainable AI: Tools like SHAP and LIME explain model decisions.
- Edge ML: Deploying models on devices like smartphones (e.g., TensorFlow Lite).
- Federated Learning: Trains models across decentralized devices while preserving privacy.
9. Next Steps
- Practice: Work on datasets from Kaggle (e.g., Titanic, House Prices).
- Learn: Explore free courses (e.g., Andrew Ng’s ML course on Coursera or Fast.ai).
- Experiment: Try advanced libraries (e.g., Hugging Face for NLP).
- Contribute: Join open-source ML projects on GitHub.
Conclusion
Machine learning with Python is a powerful skill for solving real-world problems. You can tackle diverse applications by mastering the workflow—data preprocessing, model building, evaluation, and deployment.
Start with simple models in scikit-learn, experiment with real datasets, and gradually explore deep learning and advanced techniques. With Python’s ecosystem and your curiosity, the possibilities are endless.
FAQ
What is machine learning in Python?
Machine learning in Python involves using libraries like scikit‑learn and TensorFlow to build models that learn from data.
Which Python libraries are essential for machine learning?
Key libraries include NumPy, pandas, scikit‑learn, and Matplotlib for data processing and model building.
Do I need advanced math to start machine learning?
Basic understanding of algebra and statistics is helpful, but practical tools and examples make learning accessible.