
Fixing Audio and Video Sync Issues in Windows 11
When The Audio, video, And Image Are Not In Harmony, It Becomes Difficult And Impossible To Watch Movies And Videos. In this article, you will learn how to fix the problem of audio and video not being synchronized on Windows 11.
Unsynchronized Sound and images when playing video files can create a bad experience. Sometimes, you may notice that the Sound is playing before the video and vice versa; Watching videos in such situations can be annoying.
Outdated audio or video drivers, temporary issues with browsers or online streaming platforms, or problems with internet connections may cause this problem.
Usually, behind the scenes, many problems arise when working with different devices, and there are temporary and minor faults and errors, which sometimes require complicated solutions. Still, they are solved by using simple solutions in disbelief.
Therefore, in the upcoming article, we will mention the most straightforward solutions to other well-known methods to solve the problem of audio and video not being synchronized in Windows 11.
1- Check internet connection and system resources
Suppose you are experiencing audio and video inconsistency while streaming or playing video online. In that case, the problem is highly likely related to the internet connection.
Therefore, in the initial stages of troubleshooting audio and video inconsistency, you should check whether your internet connection is established and works at a constant speed.
After ensuring the network is stable enough to watch video online, you should check the system resources to see if the problem persists at the browser level.
Browsers or streaming service applications usually involve many hardware resources, especially RAM and processors, which can cause the system to experience poor performance in video processing if other activities are in progress.
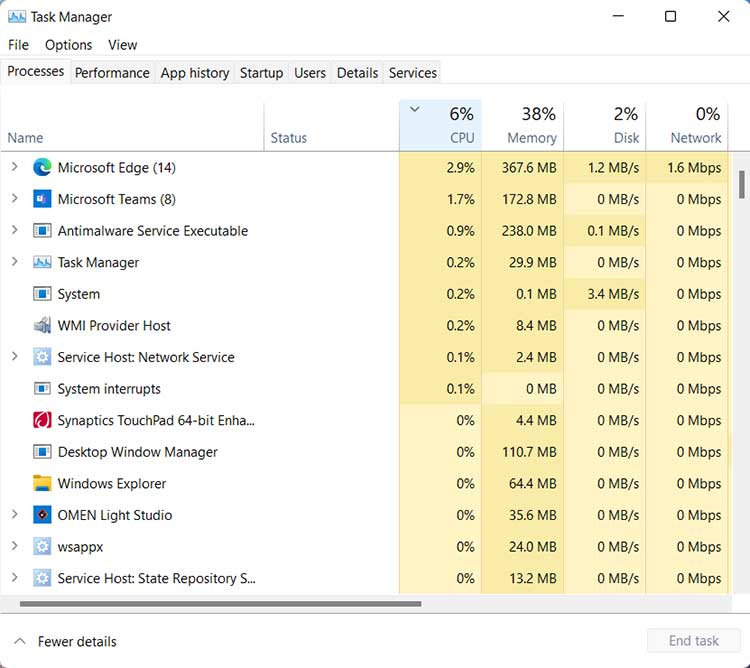
To solve this problem, if you use a browser for online streaming, close as many unnecessary and additional tabs as possible. Also, if you are using specific programs for streaming, open the Task Manager and click on CPU so that the programs will show their most significant share in the conflict. Processor, then close unused programs.
You can also do the same for the programs that have used the most RAM by clicking on the RAM tab.
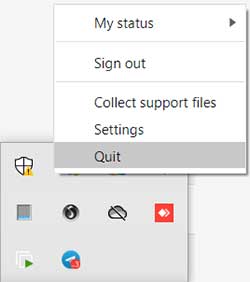
Don’t forget that some programs still don’t close when you close the window and run in the background. Most programs can be completed by right-clicking on the program icon in the taskbar and selecting Exit or Quit.
If none of these methods help solve the problem, you should reduce the playback quality or try other video formats for offline playback. Sometimes, restarting the system can also help solve possible video playback problems.
2- Clear the browser cache or change the streaming service
Sometimes, the browser cache may cause audio and video synchronization problems. You can delete browsing history, cookies, and stores to fix the video and audio sync problem.
The steps to remove the cache are different in different browsers.To find the browser you are using and to know how to clear the cache of Chrome and other browsers, refer to the article on this matter.
Are the audio and video synced there? If clearing the browser cache doesn’t work, the browser, video player software, or specific display platform may have a problem or bug. You can check the issue by playing the movie or video in another browser or playback platform. If this problem is still unresolved, you should try the following methods.
3- Windows 11 update
Due to operating system problems, you should update Windows to the latest audio and video version, which is not synchronized in Windows 11. Windows always provides updates to fix the issues in the previous version and introduce some new features.
To update the system, open the Windows settings and click the Check for updates button from the Windows Update section.

After installing the new updates, see if you can view videos commonly on online streaming platforms, browsers, and players.
4- Checking the speaker settings and changing the default sound format
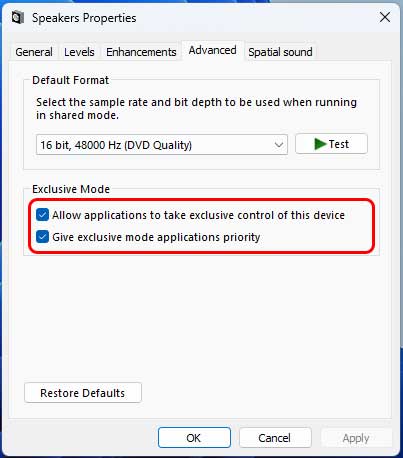
Some speaker settings may cause your system to stop sounding typical. For example, Exclusive mode may delay the Sound of some apps and throw the audio and video out of sync. Therefore, turning off this mode can solve the problem.
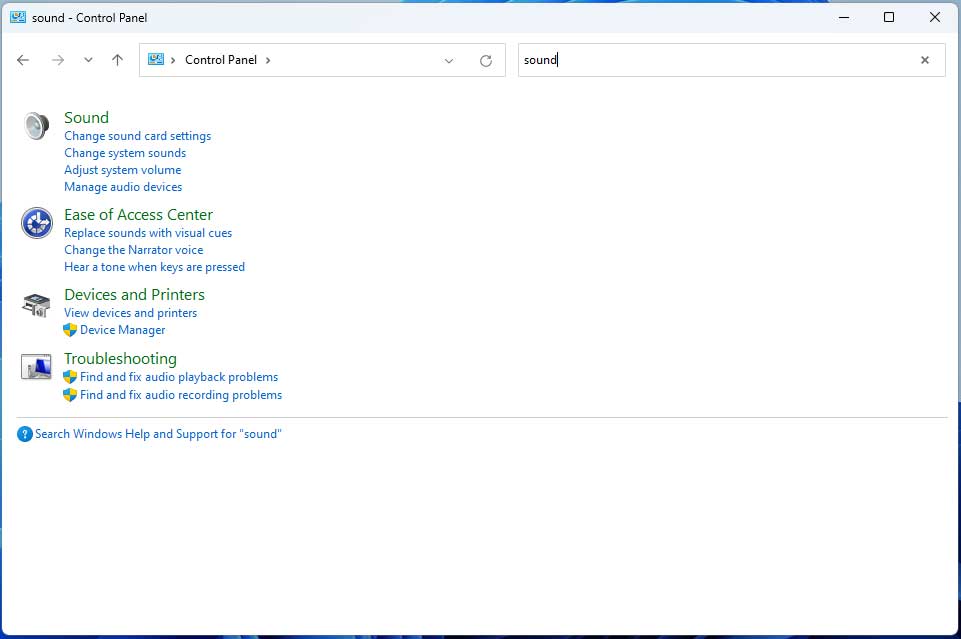
- Search for Sound in the Control Panel and click on the first result.
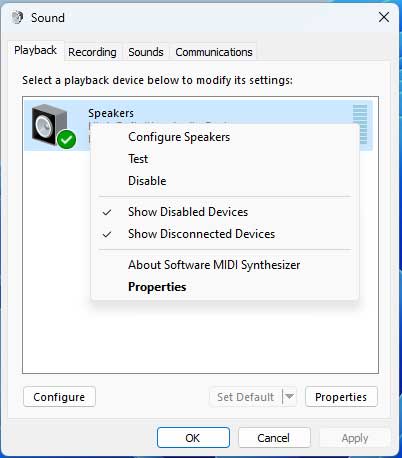
- Select the device you are currently using for audio output and click Properties.
- Open the Advanced tab, and in the Exclusive Mode section, remove the check mark from Allow the application to take exclusive control of this device and Give sole mode applications priority.
Also, changing the audio format and turning off audio enhancements may help fix this problem.
- CD Quality or DVD Quality from the Default Format drop-downs in the same Properties window and Advanced tab menu.
- Open the Enhancements tab and uncheck the Disable all enhancements option.
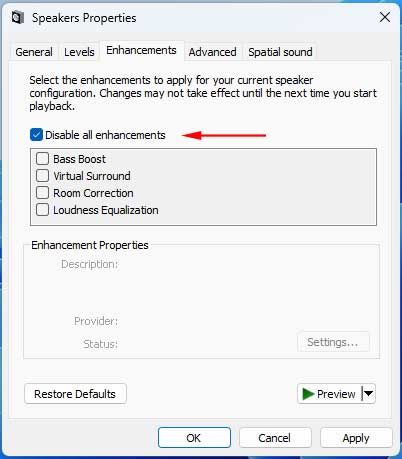
- Now click Apply and then OK to save the new speaker settings. Then restart the computer.
5- Power Plan change
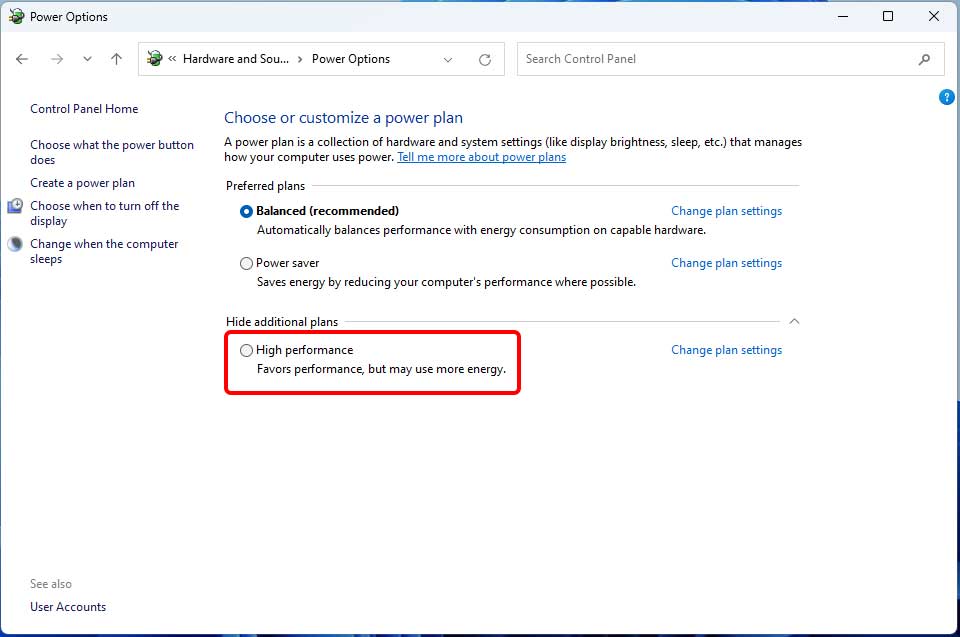
Activating the battery saver mode (Battery saver mode) when changing the power plan can lead to audio and video mismatch. Also, increasing the system’s power can solve this issue.
- Right-click the battery icon in the taskbar, select Power Options, or search for Power Options in the control panel, and click on the first result.
- Activate the High-performance option by opening the Showa Additional Plans section.
If you want to turn off battery saver mode, click one of the taskbar icons (for example, battery) to open the quick settings panel, then turn off the Battery Saver option.

6- Processor power management in Power Options
According to users, changing the processor’s minimum processing power in Power Options may solve the problem of Sound and image inconsistency in Windows.
However, if you try this method, you shouldn’t use it as a long-term solution because increasing the Minimum Processor State Percentage will generate more heat and shorten battery life.
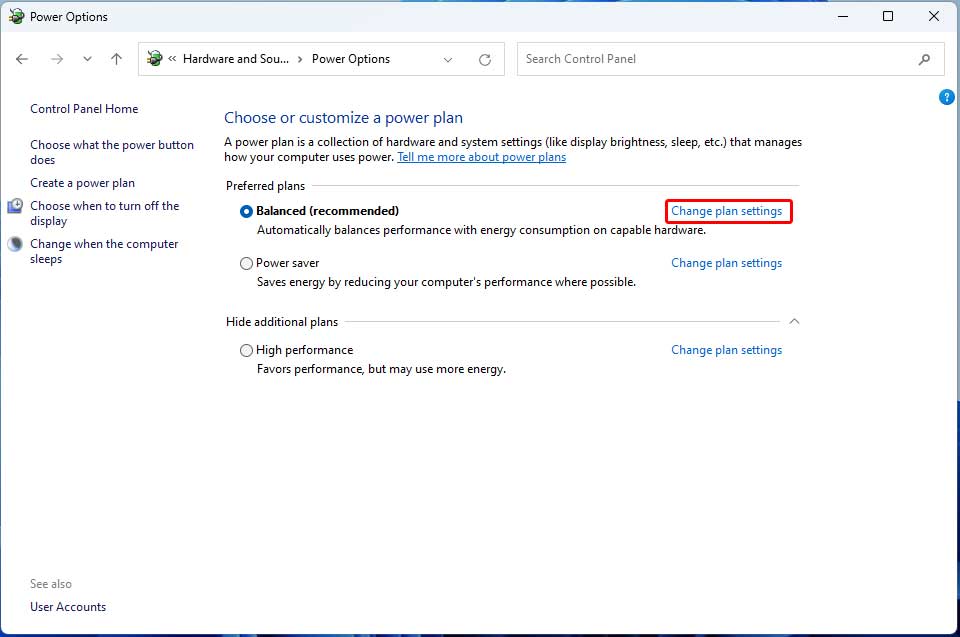
- Search for Power options in the control panel and click on the first result.
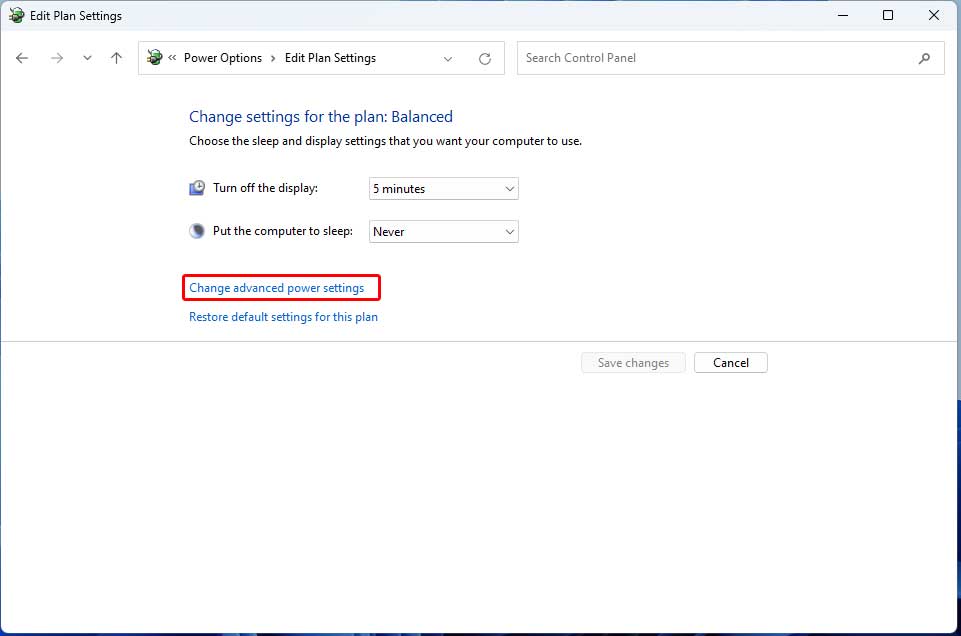
- Click on Change plan settings in the active Power plan.
- Click on Change advanced power settings.
- Depending on how you currently use your device, set a higher rate for On battery or Plugin. In the Power Options window, find Processor power management and expand it. Then, change the Plugged percentage from 5% to 100% in the Minimum processor state section.
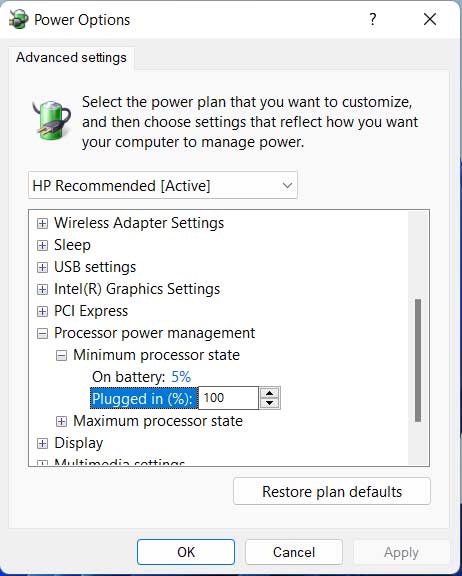
- Click Apply and then OK.
7- Running the Playing Audio And Video Troubleshooter
The Windows troubleshooter can also help fix some of your computer’s problems. Follow the steps below to fix audio playback issues:
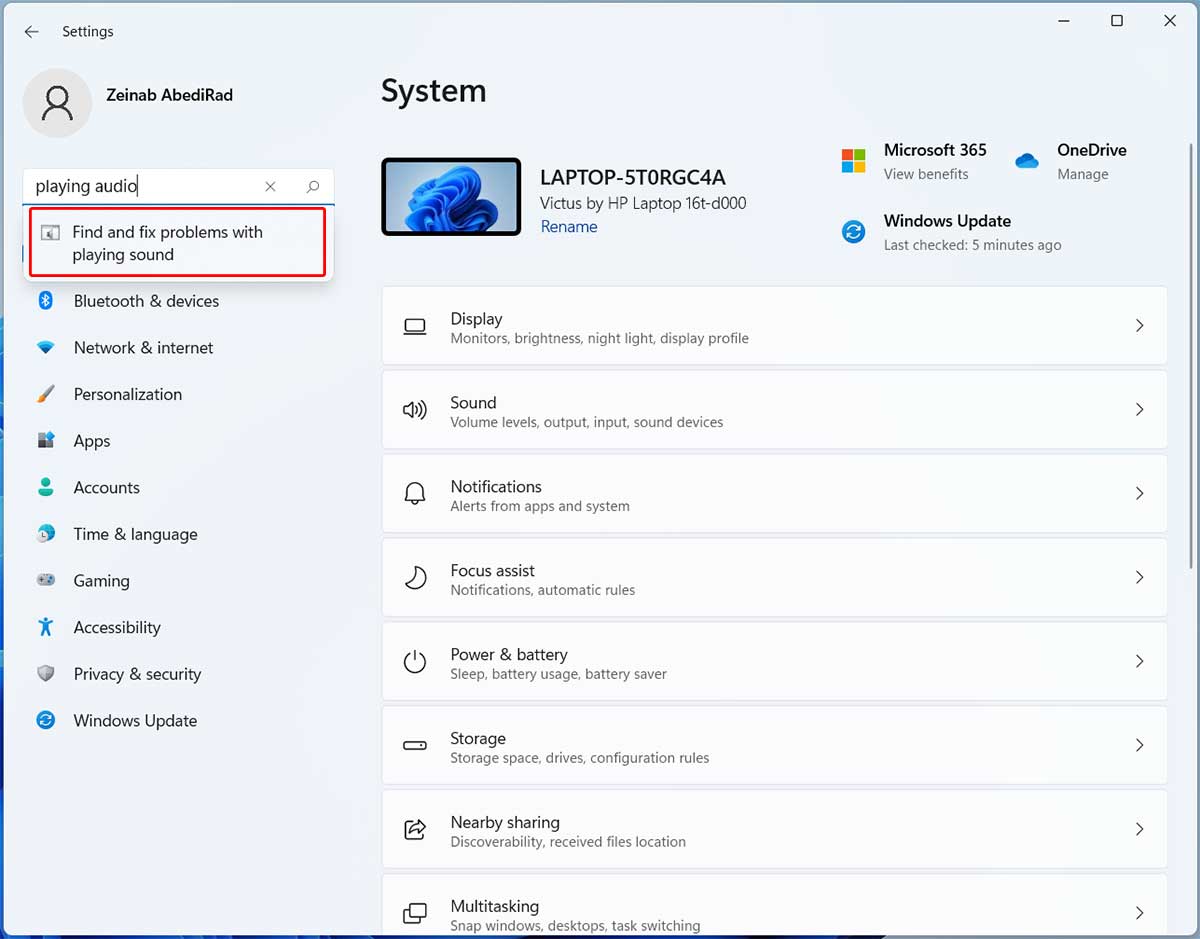
- Open the Settings app, search for Playing audio in the search box, and click on the first result.
- In the Playing Audio window, click Next to start the troubleshooting process.
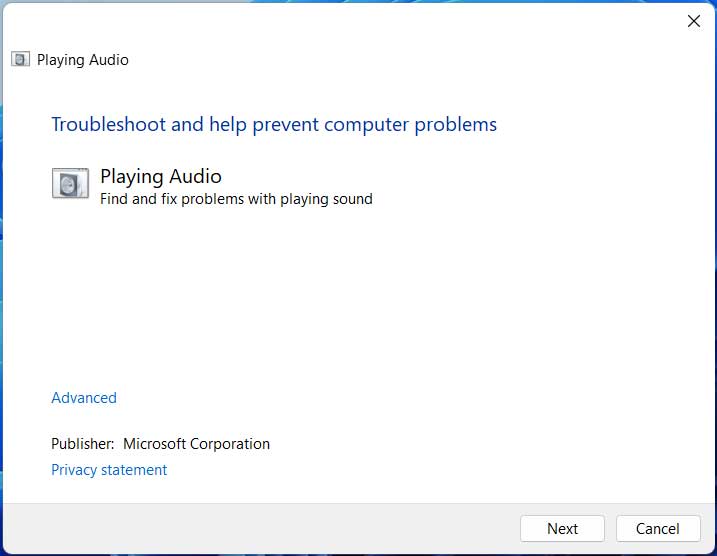
- Windows will find and fix the problem for you. Once the issue is resolved, you can play a video to check if the video sync issue is resolved.
8- Disabling hardware acceleration in the browser
If the audio and video are not synchronized only in the browser, the problem is likely due to hardware acceleration. To eliminate video problems in the browser, you can turn off the hardware acceleration option.
- Go to your browser’s Settings.
- Click on Advanced and then click on System.
- Disable Use hardware acceleration when available and click the Relaunch button.
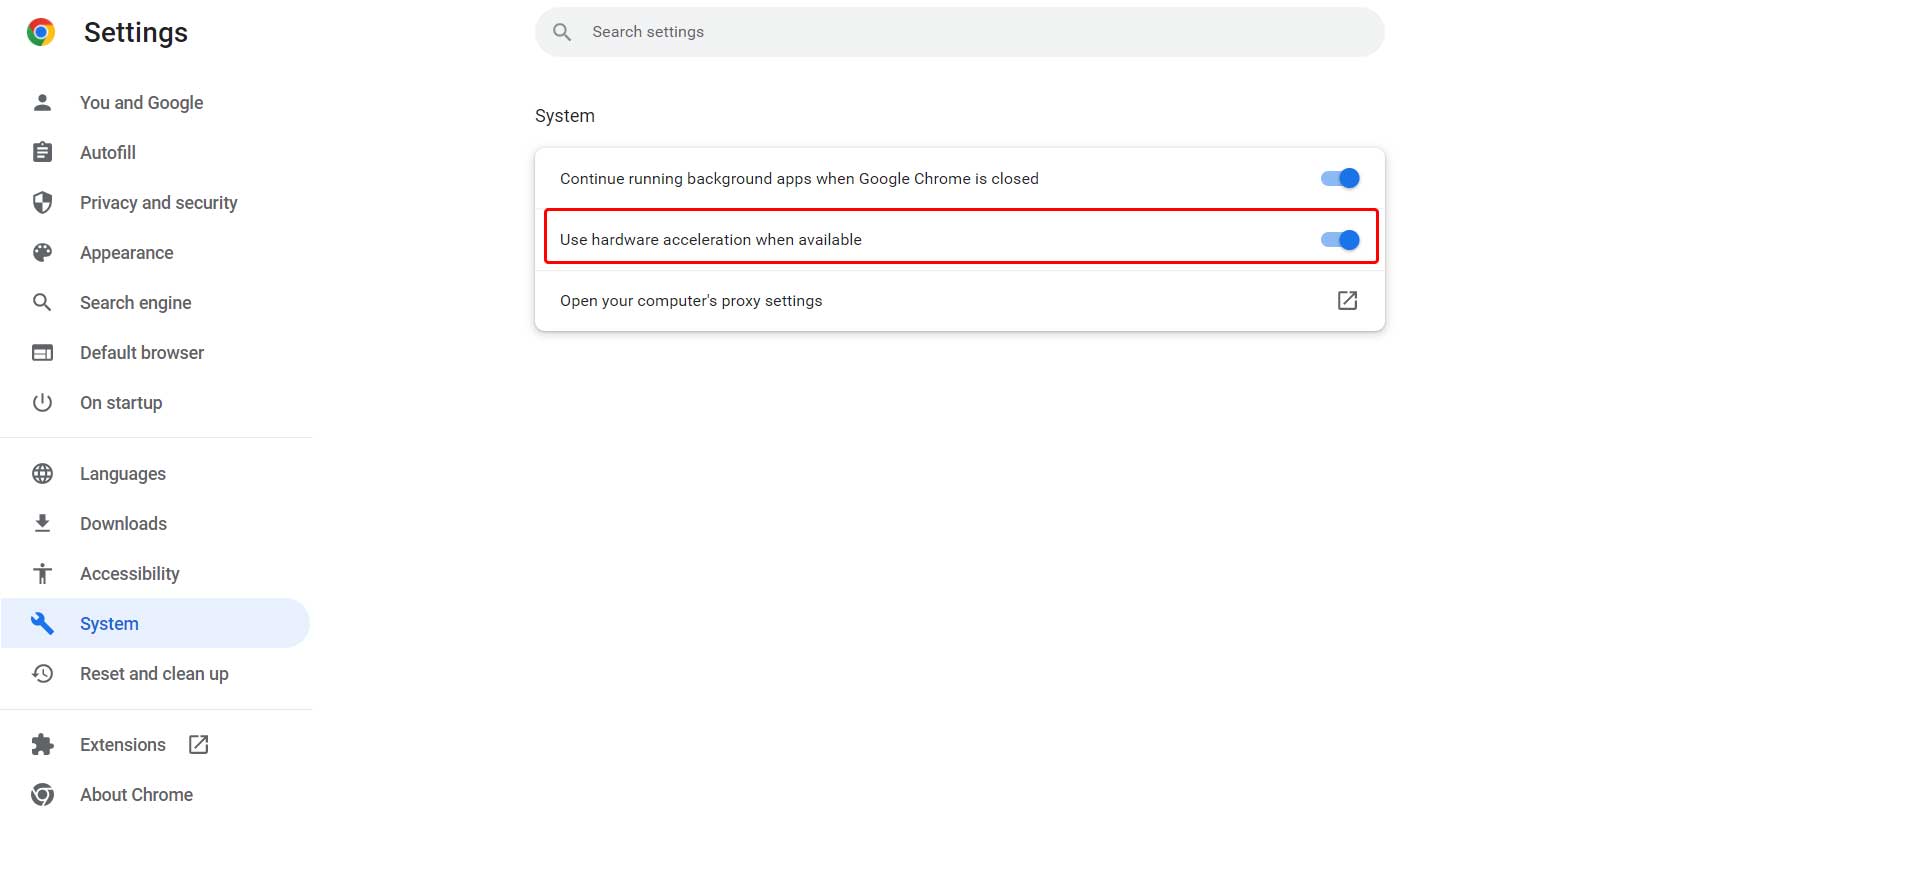
After restarting the browser, you can play the videos again and check if the change worked.
9- Update audio drivers
Outdated audio and video drivers can cause audio and video mismatch problems. You can update device drivers manually or using third-party software and tools. To manually update the audio driver:
- Open Device Manager by searching for it in the Start menu.
- Expand the Sound, video, and game controllers section, right-click the speaker driver, and select Update Driver. Windows will then let you know if the best available drivers for your device are already installed or if you need to install new updates.
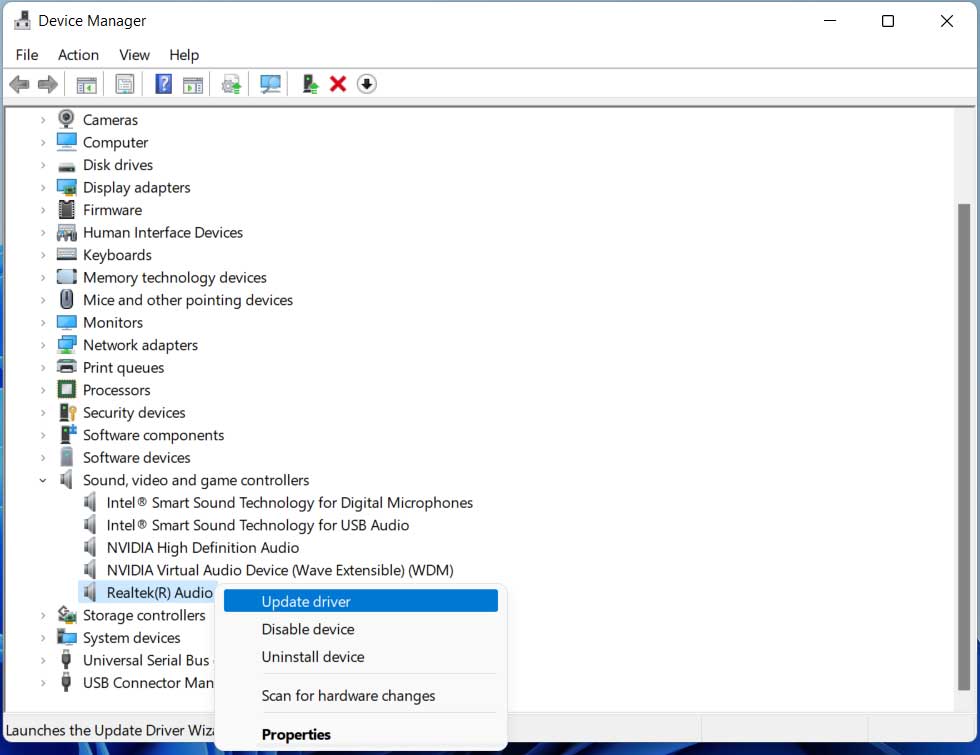
- Restart your computer after installing the driver.
Suppose the problem of sound and graphics card drivers is not solved using the mentioned method. In that case, you can use this article to get help to install the latest Windows 11 drivers primarily and entirely and solve the problem.
10- Restore default settings for playback devices
If the audio and video are out of sync in browsers and media players in Windows 11, you can reset the media player settings to Default.
- Search for Sound in the Control Panel and click on the first result.
- Select the device you are currently using for audio output and click Properties.
- Go to the Advanced tab in Speaker Properties and click the Restore Defaults button.
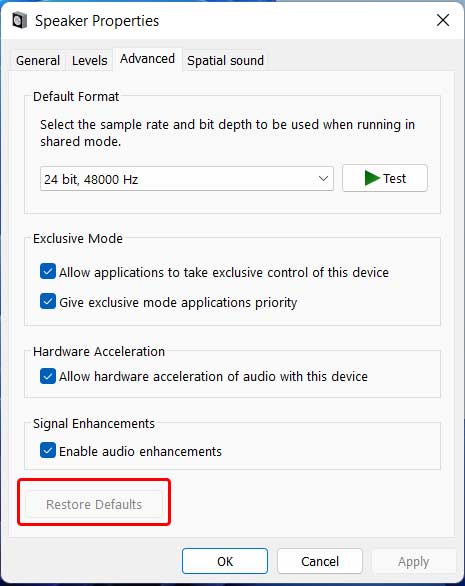
- Restart the computer.
11- Reinstall the Realtek audio driver
Suppose your device’s sound card manufacturer is Realtek, and you are facing audio and video incompatibility. In that case, you can remove the device from Windows so that Windows can detect it again and install its driver. For this job:
- Open Device Manager and expand Sound, video, and game controllers.
- Right-click Realtek High Definition Audio and select Uninstall device.
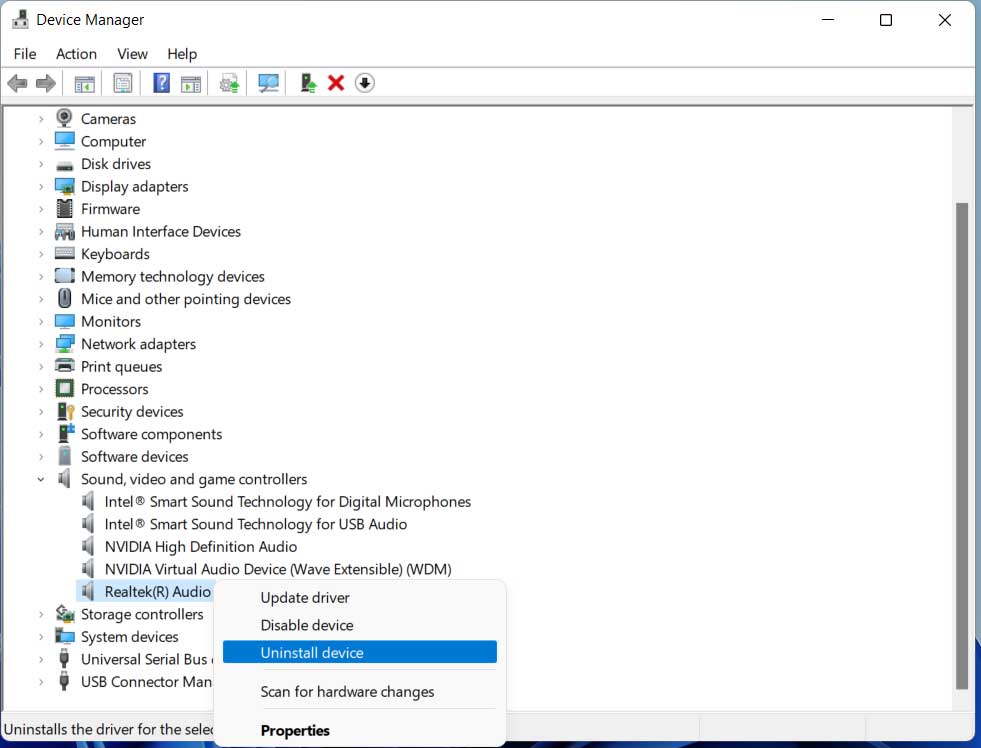
- Restart the computer so that Windows can reinstall the audio drivers. Click Action on the Device Manager menu and scan for hardware changes.
12- Using general Windows drivers
If reinstalling the Realtek audio drivers doesn’t work, you can replace them with generic Windows drivers.
- Open Device Manager. Right-click Realtek High Definition Audio and select Update driver.
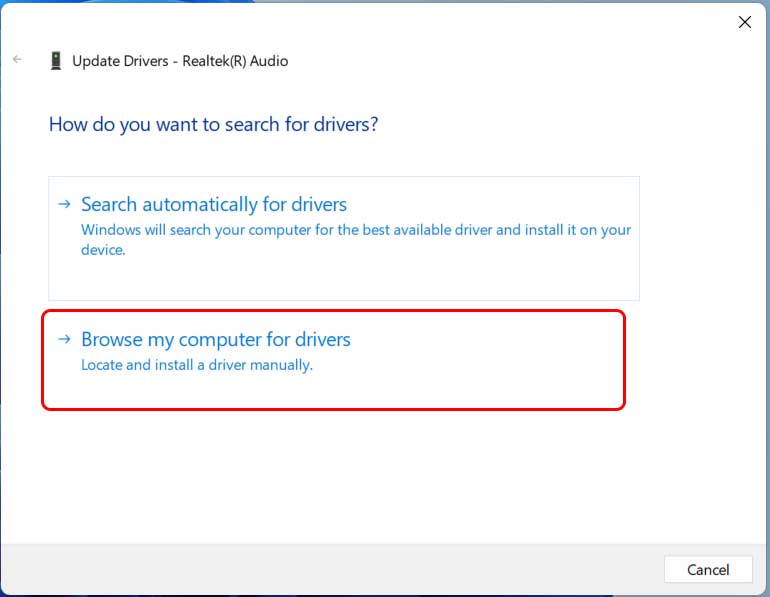
- Click on Browse my computer for drivers.
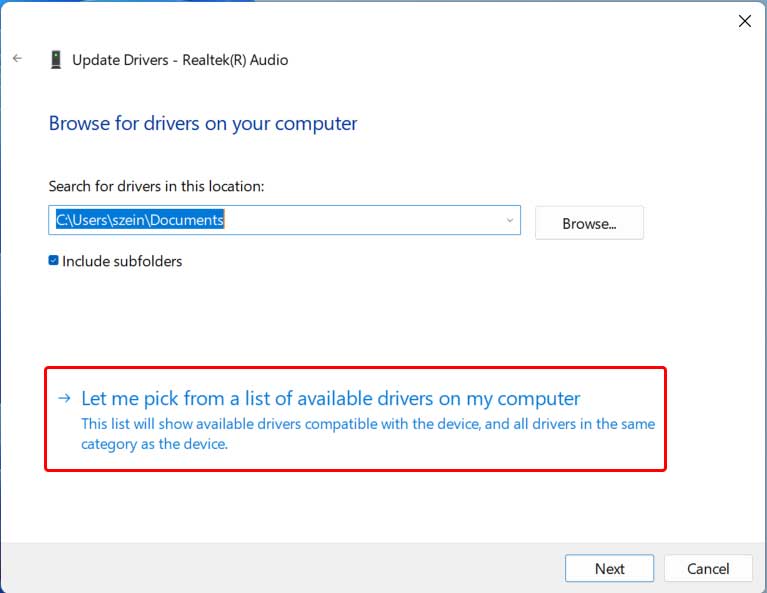
- In the next window, click Let me pick from a list of available drivers on my computer.
- Select High Definition Audio Device and click Next. The names of generic drivers can differ between computers.
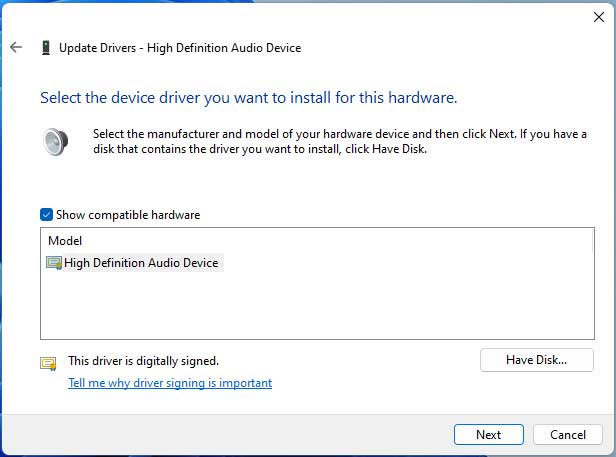
After installation, the audio and video will be synchronized when you use the generic audio driver.
13- Disabling the hardware acceleration of the default player
You can disable hardware acceleration in the default player to fix unsynchronized audio and video in Windows 11.
- Search for Sound in the Control Panel and click on the first result.
- Select the device you are currently using for audio output and click Properties.
- Go to the Advanced tab and uncheck Allow hardware acceleration of audio with this device.
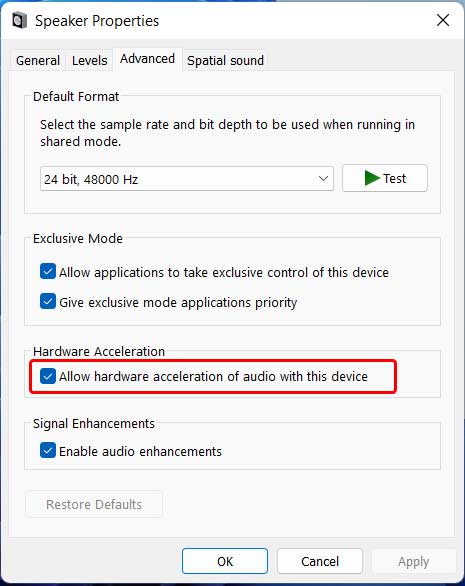
- Click Apply, OK, and restart the device.
Note: Many manufacturers do not offer hardware acceleration for playback devices, so if you don’t find this option, you can skip this solution.
14- Disabling HPET and ErP Ready in BIOS
HPET (High Precision Event Timer) generates periodic interrupts and can be used to synchronize multimedia streams. Many users have been able to synchronize audio and video in Windows 11 by disabling HPET and ErP Ready in BIOS.
- Enter the BIOS. Each system has a different way of entering the BIOS.
- After entering the BIOS, disable HPET and ErP Ready and save the settings before exiting the BIOS.
- Log in to your PC as usual and try playing the video in a streaming service, player, and browser to see if this method works.
Audio and video delays are common problems when the internet connection is unstable. Still, if the audio and video are out of sync in an offline player and streaming platform, the problem is probably with your Windows 11 computer. In most cases, this problem will be solved by changing the system settings and updating the drivers.
If none of the methods mentioned helped you solve the problem of audio and video not being synchronized in Windows 11, or if you know of another way to solve this problem, please share it with the users and us.
FAQ
Why is audio out of sync with video in Windows 11?
It can be caused by outdated drivers, incorrect playback settings, high CPU usage, or incompatible media players.
How can I fix audio/video synchronization issues?
Update audio and video drivers, check playback settings, disable audio enhancements, and use media players with built-in sync correction.
Can system performance affect AV synchronization?
Yes — high CPU or RAM usage, background processes, or slow storage can delay audio or video, causing sync problems.