How to Increase Hard Drive Size in Windows via Disk Management
Disk management is one of the most important aspects of maintaining computer systems. After using the system for a while, many users notice that their C drive or other partitions are running out of space. This problem can reduce system performance, disrupt software installation, and even cause various errors in the operating system. Fortunately, Windows has a built-in tool called Disk Management that lets you manage partitions and expand drive size without external software.
In this article, we will learn how to increase a hard drive’s size in Windows using Disk Management and review important considerations before doing so.
What is Disk Management?
Disk Management is one of the built-in Windows tools designed to manage disks, partitions, and storage space. This tool has been around since the early days of Windows and offers users a variety of features.
Some of the features of Disk Management are:
- Create a new partition
- Delete partitions
- Format drives
- Change drive letter
- Shrink partition size
- Increase partition size
- Convert Basic and Dynamic disks
- View hard disk status
With the help of this tool, you can perform many operations related to storage space in Windows without installing additional software.
Why do we need to increase the drive size in Windows?
Over time, various files and programs occupy a large amount of storage space. This is especially important for the C drive, where the operating system is installed.
Common reasons for increasing drive size in Windows include the following:
1. Lack of space on the C drive
A full system drive slows down Windows and causes various errors.
2. Installing new software
Some software, such as graphics, engineering, or games, requires a lot of space.
3. Storing Large Files
Videos, images, and backup files can take up a lot of hard drive space.
4. Increasing Hard Drive or SSD Capacity
Sometimes users upgrade their hard drive or SSD and need to add new space to existing partitions.
Prerequisites for Increasing Drive Size in Windows
Before starting the process of increasing drive size in Windows, you should keep a few important points in mind.
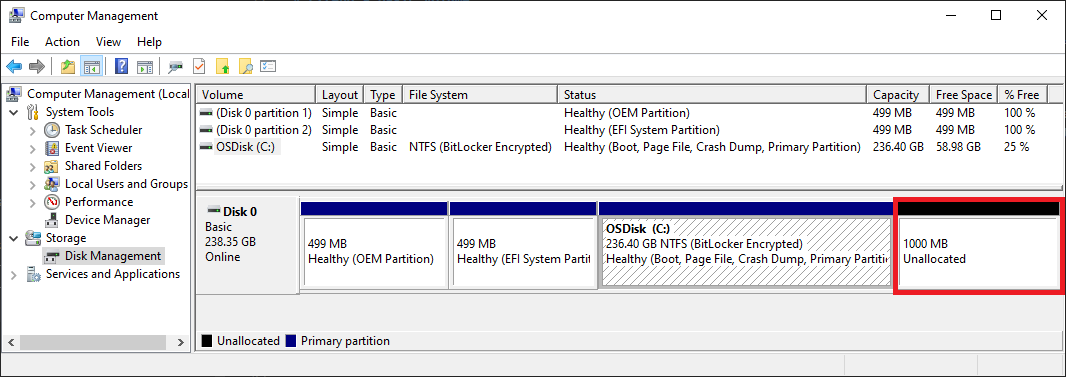
Existence of Unallocated Space
To increase the size of a partition, there must be Unallocated Space next to it.
Backing Up
Although Disk Management is a reliable tool, it is recommended to back up your important data before making any changes to the partition structure.
Administrator Access
To manage partitions, you must be logged in to Windows with a user account with Administrator access.
How to Enter Disk Management in Windows
There are several ways to open Disk Management in Windows.
Method 1: Using Run
Press the Win + R keys.
Enter the following:
diskmgmt.msc
Click OK.
Method 2: Start Menu
Right-click Start.
Select Disk Management.
Method 3: Computer Management
Right-click This PC.
Select Manage.
Enter Disk Management.
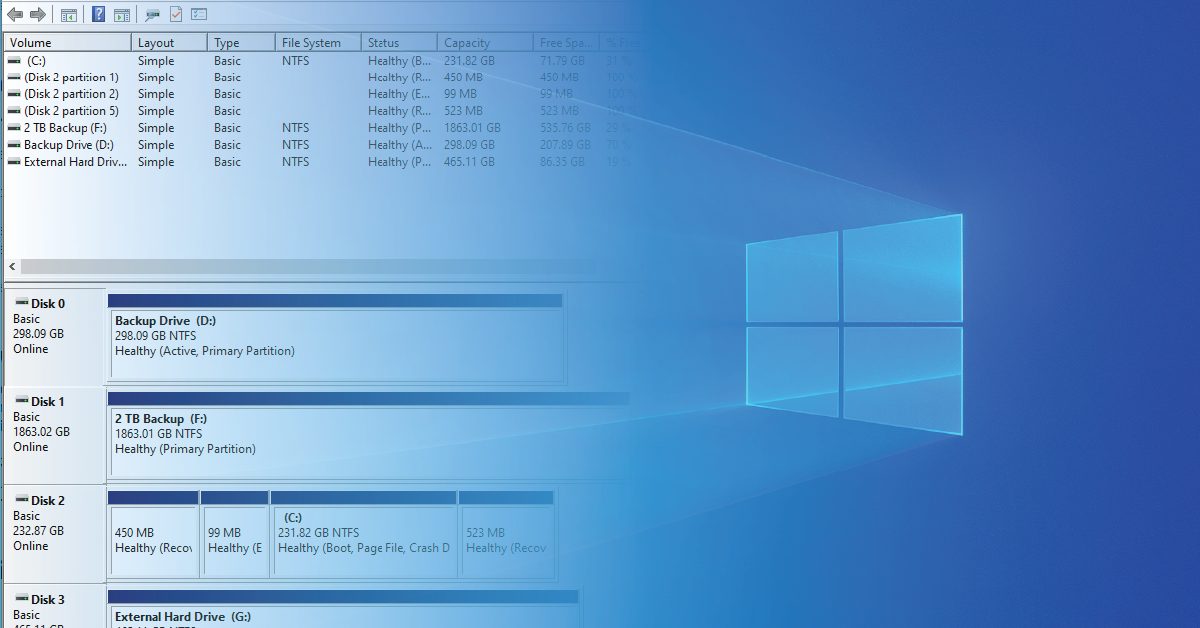
After this tool opens, all disks and partitions available in Windows will be displayed.
Creating Unallocated Space to Increase Drive Volume
If you do not have any unallocated space, you must first free up space on one of the partitions.
Steps to Shrink Volume
- Right-click on the desired partition.
- Select the Shrink Volume option.
- Enter the amount of space required.
- Click Shrink.
After completing these steps, a new space will be created as Unallocated next to the partition.
How to increase drive volume with Extend Volume
After creating Unallocated space, you can increase the volume of the desired partition.
Volume increase steps
- Right-click on the drive you want to increase.
- Select the Extend Volume option.
- The Extend Volume Wizard window will open.
- Click Next.
- Select the desired amount of space.
- Click Next again.
- Select the Finish option.
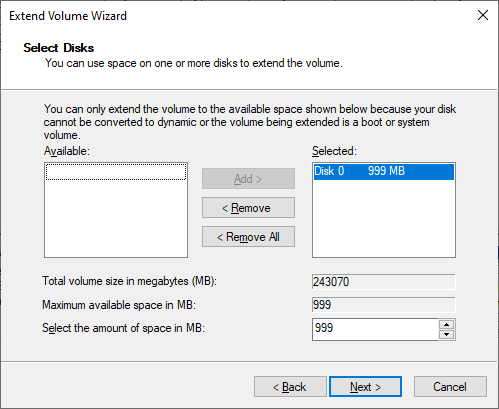
Now the new space has been added to the drive, and its volume will increase in Windows.
Why is the Extend Volume option disabled?
One common problem users encounter in Windows is that the Extend Volume option is disabled.
This problem usually occurs for the following reasons:
The Unallocated space is not adjacent
The free space must be immediately to the right of the desired partition.
Recovery Partition
In some versions of Windows, the recovery partition is placed between the free space and the drive.
Partition structure limitations
In some situations, the partition structure does not allow the volume to be increased.
Using Dynamic Disk
Certain Dynamic Disk settings can restrict volume growth.
Increasing the volume of drive C in Windows
The most common user request is to increase the space of drive C.
To do this:
- Free up space on the adjacent drive.
- Make sure that the Unallocated space is located exactly after drive C.
- Use the Extend Volume option.
If the free space is not adjacent, you may need to use specialized partition management software.
Advantages of using Disk Management
Using Disk Management in Windows has many advantages.
Being free
This tool is available by default in all versions of Windows.
High security
Because it is part of the operating system, it reduces the risk of incompatibility or software issues.
Simple user interface
Even novice users can perform many partitioning operations.
No need to install software
No additional programs are required to increase the drive size.
Important points when increasing the hard drive size
To avoid possible problems, it is better to observe the following:
- Back up important information.
- Avoid shutting down the system while performing the operation.
- Leave enough space for Windows to function properly.
- Check the antivirus before changing partitions.
- Perform the operation more carefully on servers and sensitive systems.
Difference between Extend Volume and Shrink Volume
Many users confuse these two features.
Shrink Volume
It is used to reduce the volume of a partition.
Extend Volume
It is used to increase a partition’s size and add free space.
In fact, these two tools complement each other and play an important role in managing Windows storage space.
Does increasing the drive volume delete data?
Normally, no. When you use the Extend Volume feature in Windows, the data on the partition is preserved.
However, due to the possibility of unexpected errors such as power outages or hardware failures, it is always recommended to create a backup.
The best time to increase the drive volume
If you see any of the following conditions, it is a good time to increase the drive volume:
Displaying a low disk space warning
Windows performance is slow
Unable to install new software
Drive is more than 85% full
Need to store large files
Summary
Increasing the hard drive size in Windows via Disk Management is one of the easiest and safest ways to manage storage space. This built-in tool allows you to create, delete, shrink, and expand partitions without external software. Using the Extend Volume feature, you can add unallocated space to existing partitions and resolve space constraints.
Although increasing the volume in Windows is usually straightforward, it is necessary to back up your data and carefully check the partition structure before making any changes. By following these tips, you can easily manage your system’s storage space and improve performance in Windows.
FAQ
How do I open Disk Management in Windows?
You can open Disk Management by pressing Win + R, typing diskmgmt.msc, and clicking OK. It can also be accessed through the Start menu or Computer Management.
Why is the Extend Volume option grayed out in Windows?
This usually happens when there is no adjacent unallocated space next to the partition you want to expand, or when another partition, such as a Recovery partition, is located between the free space and the target drive.
Will extending a partition with Disk Management delete my data?
No, the Extend Volume feature is designed to increase partition size without deleting existing data. However, creating a backup of important files before making disk changes is always recommended.