
How to Boot Windows in Safe Mode — Complete Guide for Troubleshooting
Starting Windows in Safe Mode is the best option if you cannot access your System. There are many ways to do this, depending on the circumstances, one must be chosen.
One common way to troubleshoot a Windows operating System is to boot into Safe Mode. In Safe Mode, Windows comes up with the minimum number of drivers and services required, and no standalone program loads; Therefore, this mode is used to troubleshoot Windows.
If Windows starts quickly in safe mode, the problem lies with drivers, services, or plugins.
One of the easiest ways to enter Safe Mode is to press F8 or Ctrl+F8 when loading Windows. However, on newer systems with UEFI or high-speed SSD storage, Windows boot time is so fast that you cannot stop the boot process by pressing F8.
There are many ways to set up Safe Mode in Windows 10. You can choose the best method according to your system conditions and access. In the following, we will explain each of these methods.
Launch Windows 10 in Safe Mode
Access through System configuration
Sometimes it is necessary to boot Windows into Safe Mode several times to troubleshoot a problem. It would take a lot of time and patience if we had to do this manually every time. Fortunately, the System Configuration tool in Windows lets you enable Safe Mode, and the System will boot into Safe Mode until you reset the settings yourself.

In the Start menu search bar, type MSConfig and then enter System Configuration at the top of the page. Instead, you can enter the MSConfig command directly in the Run window by pressing Windows + R.

The settings in the System Configuration window are likely set to one of the NormalStartup or SelectiveStartup options. You must select the second option, Diagnoststartup, to run only essential drivers and services. Finally, click OK and then Restart to reboot the System immediately.
Note: After activating the Diagnostics startup option, drivers, voice services, Network, and other functions will not be loaded, so you cannot use or test these features.
Once the System is up, see if your previous problem persists. In either case, you must follow the troubleshooting steps to identify it.
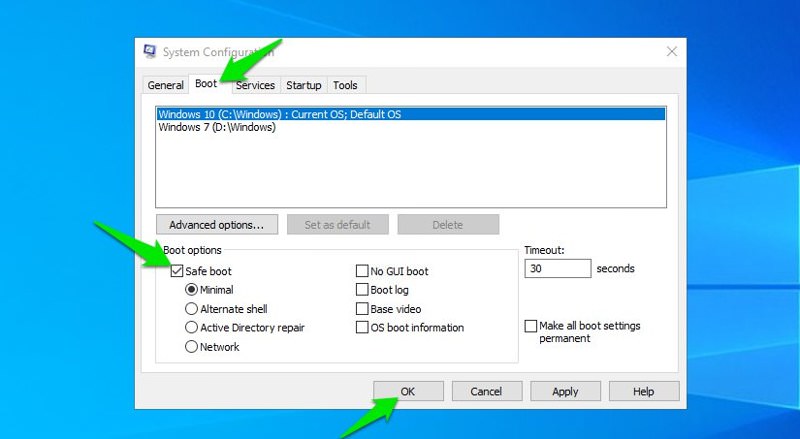
Log in to System Configuration again. Click the Boot tab and then check the Safe Boot option. Under Safe Boot, four other options are available:
- Minimal: It loads only the minimum number of drivers needed to run Windows, while still keeping you in the graphical user interface (GUI) so you can use the mouse.
- Alternate shell: launches safe mode with the command line. In this case, you need to know how to use Windows without a GUI.
- Active Directory Repair: An option for computers in an enterprise environment that connect to Microsoft Active Directory.
- Network: This function downloads the required network drivers to the Windows GUI so you can access and test the network connection.
Minimal and Network are the best options for ordinary people who are just trying to solve their problems. After selecting either of these two options, reboot Windows, then check your previous issue to see if it still exists.
Go to System Configuration and return the boot to its expected state to ensure the problem is fixed. If your issue persists, additional options, such as No GUI, the Boot log, the Base video, and OS boot information, are available.
Access through Windows settings

If you still have access to Windows, go to Settings from the Start menu, then click Update & Security to launch Safe Mode.
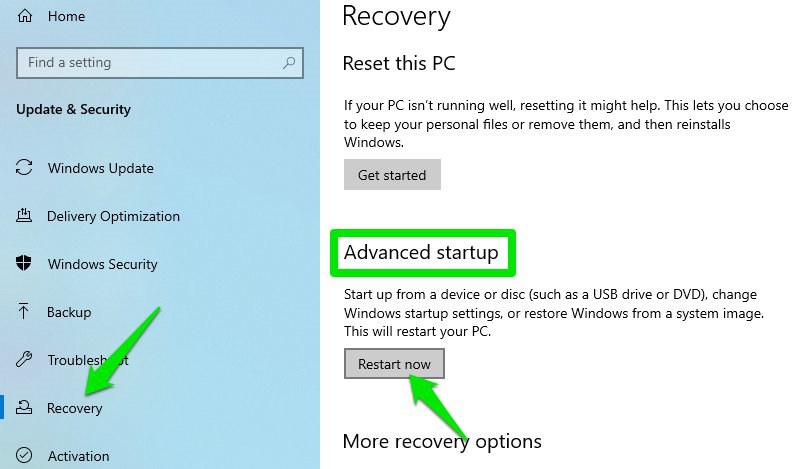
Go to the Recovery option from the left panel. Click the Restart now button at the bottom of the Advanced startup section. This will restart Windows and run the Recovery Environment (WinRE).
In this environment, you must select the Troubleshoot option. On the next screen, click Advanced Options, Startup Settings, and Start Now.
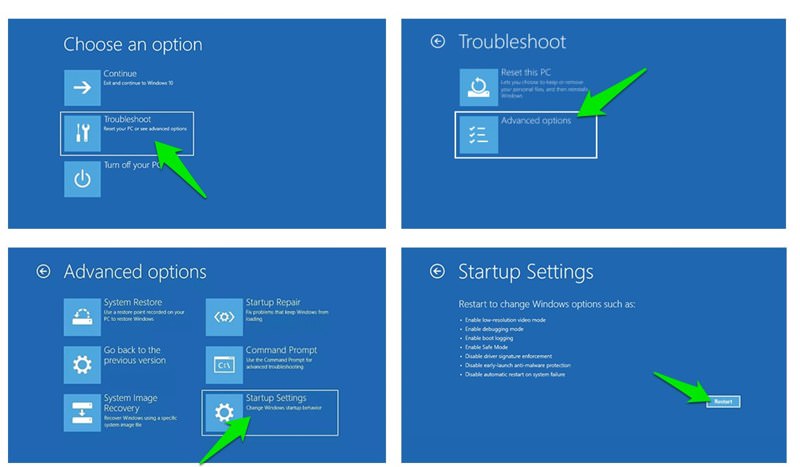
After this, the System will restart and take you to a page where you must select the four or F4 keys to start safe mode.
The above methods are among the easiest ways to access Safe Mode. However, if you do not have access to the settings or are unable to start Windows, these methods do not work. In the following, we will introduce the techniques you should choose based on the problem type and access restrictions.
Access via a login page
On the login page, click the Windows Power icon and press the Shift key to select Restart.
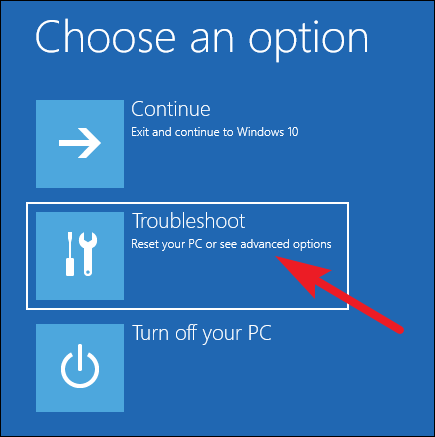
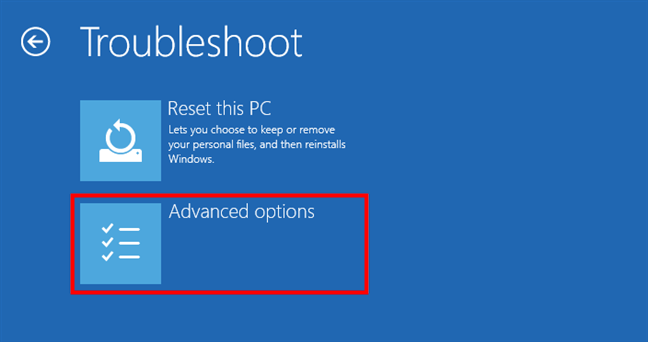
On the page that opens, click Troubleshoot and then Advanced options.
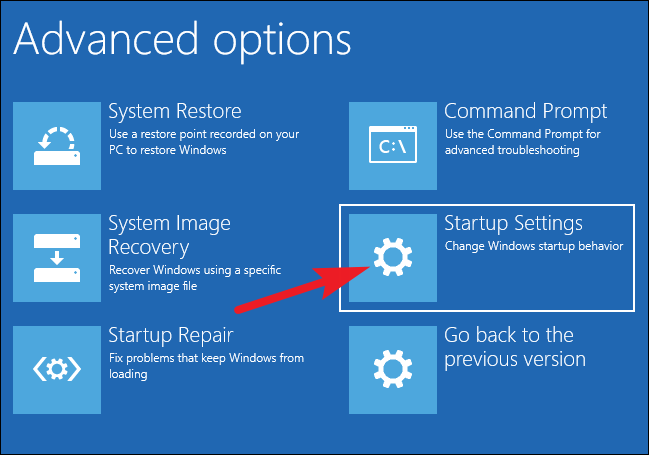
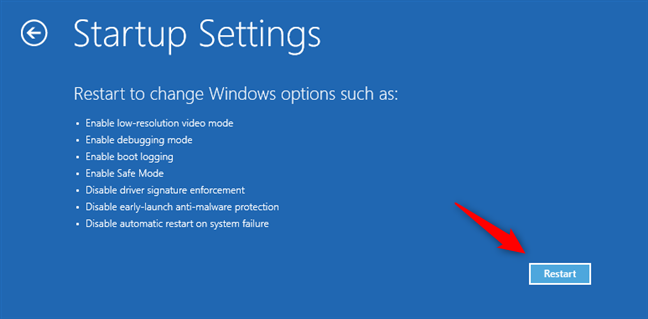
From the options, select Startup Settings and then click Restart. You will now see different options for booting your System.
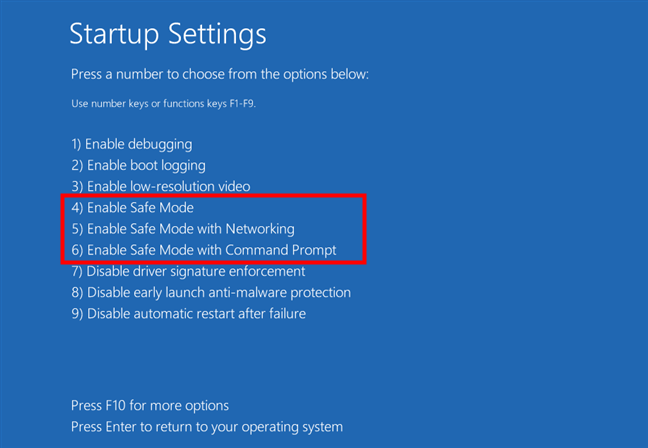
Options 4, 5, and 6 are related to booting the System in safe mode. You should choose based on the descriptions of these options in the “System Configuration Method.” After selecting the desired option, press one of the F4, F5, or F6 keys. Finally, Windows 10 will be launched in safe mode.
You can use the same method when Windows is up: all you have to do is click the Windows icon in the Taskbar, then hold down the Shift key to select Restart. Repeat the rest of the steps as above.
Access via shutdown command
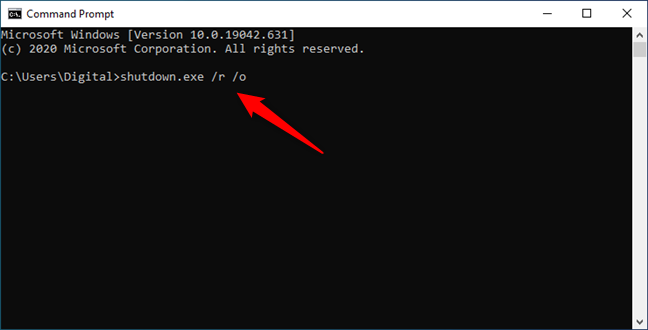
If you only have access to the command line, you can run a command to restart the computer into the Windows Recovery Environment (WinRE) so you can enable Safe Mode. To enter the Windows recovery environment, enter the command line window and type shutdown.exe / r / o.

After that, Windows will notify you that you will be logged out in less than a minute. After you log out, the Windows Recovery Environment will be displayed. You must repeat the steps described in the “Access via Windows Settings” method here.
Force Windows to enter WinRE
You can force Windows into recovery mode to access Safe Mode. This method is only for critical situations, such as when Windows does not start; otherwise, Windows may be damaged.

If Windows fails to boot more than three times in a row, it automatically enters the Automatic Repair environment, where you can boot Windows into safe mode.
To do this, turn on the computer, and when Windows starts downloading, hold down the power button for at least 4 seconds to force Windows to shut down.
Repeat this process two more times before Windows enters Automatic Repair mode. You may be asked to select an account to continue working.
You must select an account with administrative access. If necessary, you will be asked to enter the account password.

Now, on the Automatic Repair page, click the Advanced options button, then continue with the rest of the steps as described in the Windows recovery environment.
Access via USB or bootable disk
If you have a Windows 10 CD or a bootable Windows 10 flash drive, you can use it to start Windows in safe mode. Use this method only if Windows cannot boot, even after a forced shutdown.
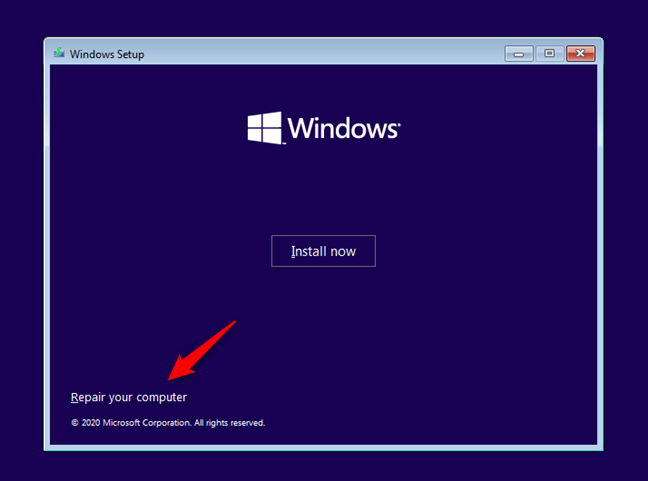
After inserting the disk or flash drive, you must select your language and click Repair your computer to enter the Windows recovery environment.
Changes you make to the Windows Recovery environment apply to your original Windows. To get Windows to run in safe mode, all you have to do is select Safe Mode.
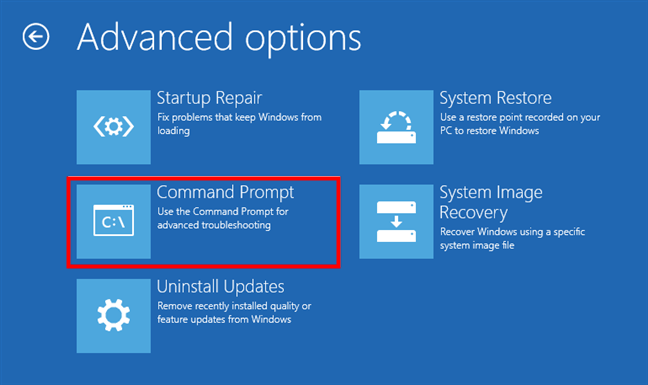
Select the Troubleshoot option. On the Advanced Options page, click Command Prompt.
Type bcdedit / set {default} safe boot minimal in the command line window and press Enter. After a few seconds, you will see the phrase “The operation completed successfully”, which tells you that the operation was successful. Close the command prompt window and click Continue. After the System reboots, Windows will boot into safe mode.
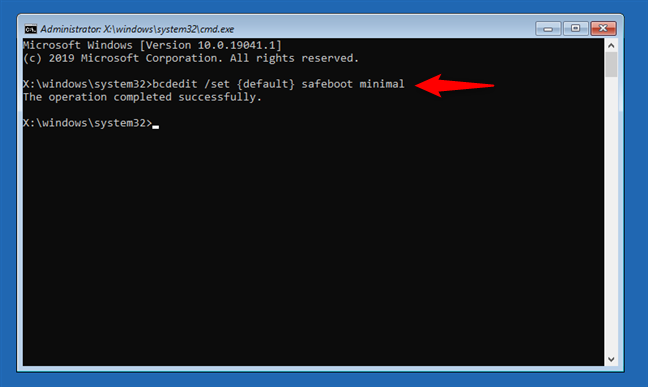
Note: This method causes Windows 10 to enter Safe Mode automatically each time it starts. To turn off this standard Windows 10 setting, rerun the same procedure and type bcdedit / delete value {default} safe boot.
Windows 10 is a fast operating System with a quick boot process. Since the old Safe Mode entry method no longer applies to newer Windows 10 systems, this article aims to gather the best ways to set up Safe Mode for you. If you have experience using these methods or know better ways, share them with Zomit users.
FAQ
How do I start Safe Mode if Windows is running normally?
Open Settings → Update & Security → Recovery → under Advanced Startup click “Restart now”. After reboot select Troubleshoot → Advanced Options → Startup Settings → Restart, then press 4 (or F4) for Safe Mode.
Can I force Safe Mode using the System Configuration tool?
Yes — open Run (Windows + R), type msconfig, go to the Boot tab, check “Safe boot” (Minimal or Network), click OK and restart. Windows will boot in Safe Mode until you uncheck this option.
What if Windows won’t start — can I still get into Safe Mode?
Yes — you can press and hold the Shift key while selecting Restart on the login screen, or force shutdown/reboot a few times to trigger the recovery environment; then go to Troubleshoot → Advanced Options → Startup Settings → Restart and choose Safe Mode.