
MikroTik Load Balancing Techniques: A Step‑by‑Step Training Guide
Load Balancing Is A Technique Used To Send Network Traffic Through Multiple Gateways. If you have multiple ISP connections on your network, you can send your network traffic through those ISP connections, and you can create a load-balancing network.
You may wonder why we use multiple ISP connections. What are the benefits of using various ISP connections on a network? This article will thoroughly review the concept of Load balancing in Mikrotik.
Suppose you have recently purchased a Mikrotik server and intend to establish a smooth and uninterrupted connection. In that case, we suggest you stay with us until the end of this article.
Reasons why it is essential to have multiple ISP connections on your network:
- No ISP can guarantee 100% that its connection will always remain intact. Therefore, it is better to use more than one ISP connection in your network to increase the probability of your internet access.
- You have a poor ISP connection, but you cannot disconnect it because you are using this ISP’s other services (like Mail, IPPBX, etc.). In this case, you can use another ISP that offers better services.
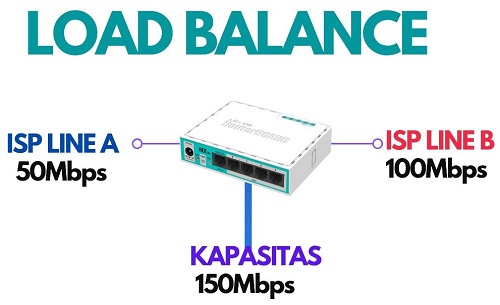
- You have a better ISP connection but a high-priced bandwidth. In that case, you can buy bandwidth from another cheap ISP with a good relationship.
Now that you’re convinced to use multiple ISP connections on your network, let’s look at how Load balancing works. If you have multiple ISP connections, you can load balance your network and create link redundancy.
A Mikrotik router can be used for load balancing and link redundancy. In this tutorial, I will show you how to create a load-balancing network using only policy-based Routing (PBR) on a Mikrotik router.
Policy Routing Based on Client IP Address (PBR)
Policy-based routing (PBR) is a technique used to make routing decisions based on policies set by each network administrator. Therefore, in the following, we will show you an approach to the Mikrotik router by which you can create a load-balancing system in your network.
If you have several hosts and multiple ISP connections, you can group your hosts by IP addresses and send traffic through different ISP connections depending on the source IP address. For example, consider a simple office network diagram like the one below, where two ISP connections are used as gateways to a MikroTik router.
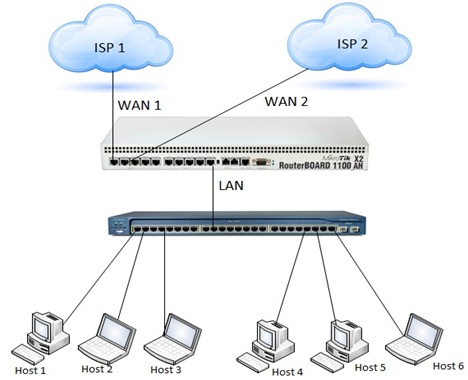
In this network diagram, two ISP connections are used as WAN connections of a MikroTik router. Also, several hosts are connected to this Mikrotik router through a distribution switch. Since dual WAN connections are available for this MikroTik router, we will create a PBR routing so that half of our total LAN users will access the Internet through the ISP’s WAN1 connection, and the rest of the LAN users will access the Internet through the ISP’s WAN2 connection. They will have internet access.
Five steps to creating PBR routing on a MikroTik router
Now I will show you how to create a routing policy on your MikroTik router so that half of your LAN users get Internet via WAN1, and the other half via WAN2.
Like the simple office network diagram above, you must have two WAN connections in your Mikrotik router for load balancing. Also, several hosts are connected to this Mikrotik router to access the Internet. This means that you can create a load-balancing network on these two gateways.
The entire configuration for applying policy-based routing to create a load-balancing network with a Mikrotik router can be divided into five steps.
- Allocation of WAN and LAN IP addresses
- DNS server configuration
- NAT configuration
- Creation of Mangle Law
- Route configuration
In the rest of this article, we will explain all the above steps for configuring a load-balancing network on multiple gateways.
Step 1. Assign WAN and LAN IP addresses
To configure a complete load-balancing network with policy-based routing, you must first assign WAN and LAN IP addresses on your MikroTik router. Since you have two ISP connections, you must have two WAN IP addresses and two gateway addresses. For the configuration of this article, we will use two WAN IP addresses and two gateway addresses for different ISP connections.
- WAN1 IP Address: 22.15.221/24 and Gateway: 172.22.15.1
- WAN2 IP Address: 168.168.210/24 and Gateway: 192.168.168.254
I will configure this article with these WAN IP addresses and Gateway addresses. Still, your WAN and Gateway IP addresses should differ in practice, and your ISP will provide these.
However, you also have a LAN with many hosts. For the configuration of this article, I assume the LAN IP block and the Gateway address are as follows.
- IP Block: 168.10.0/24
- Gateway: 168.10.254
We have our WAN IP addresses and our LAN IP block. Now, I will show you how to assign your MikroTik router’s WAN IP and LAN gateway addresses. Follow the steps below to set your MikroTik router’s WAN and LAN IP addresses.
- Log in to your MikroTik router with the Winbox software. If you are new to this article and the MikroTik router, follow the article on Connecting to MikroTik Server.
- Go to the IP > Addresses option from the inbox menu bar. The address list window appears.
- Now click on the Add button. A new address window will appear. In the address input box, enter your WAN1 IP address (in this article: 172.22.15.221/24), select the WAN1 interface (in this article: ether1) from the Interface drop-down menu, and click the Apply and Confirm button.
- Likewise, click the Add button again, put your WAN2 IP address (in this article: 192.168.168.210/24) in the address input field, and select the WAN2 interface (in this article: ether2) from the Interface drop-down menu. Select and then click the OK button.
- Click the Add button again, put your LAN gateway IP (in this article: 192.168.10.254/24) in the Address input field, select your LAN interface (in this article: ether10) from the Interface drop-down menu, click Apply, and press the OK button.
The assignment of WAN and LAN IP addresses is completed. In the next step, we will configure the DNS server.
Step 2. DNS server configuration
DNS is not a mandatory configuration in the MikroTik router, but it is necessary for a complete configuration. Optionally, you can turn your MikroTik router into a DNS server, which will be helpful for your network. So, if you want to set a DNS IP on your MikroTik router and also want to turn it into a DNS server, follow the simple steps below.
- Go to the IP > DNS menu option. The DNS settings window will appear. In the server entry, you can enter your DNS server IP provided by your ISP or Google’s public DNS server IP 8.8.8.8.
- Click the Allow Remote Requests checkbox to turn your MikroTik router into a DNS server. But you must block DNS requests from outside your local network. Otherwise, your MikroTik will be used as a DNS server if public users know your MikroTik’s public IP.
- Now, click on the Apply and OK buttons.
The DNS configuration on the MikroTik router is complete. Now, we create a NAT masquerade rule so that our LAN user can access the Internet through it.
Step 3. Configure NAT
No, we create a NAT masquerade rule so that the Mikrotik router NATs our LAN IP. If we do not make this rule, our LAN users cannot access the Internet through our Mikrotik router, and the load-balancing technique will not be performed in our network. So, follow the steps below to create a NAT rule on the MikroTik router.
- Go to the IP section of the firewall section, and the firewall window will appear. Click on the NAT tab and the Add New button in this window. A new NAT Rule window will appear.
- In the General tab, select scant from the Chain drop-down menu and put the IP block address of your LAN (in this article: 192.168.10.0/24) in the address input field. Now click on the Action tab, select the masquerade option from the Action drop-down menu, and then click the Apply button and OK.
The MikroTik router’s NAT rule configuration is complete. Now, we create Mangle rules to divide our LAN users into two groups.
Step 4. Create Mangle rule
As we want to send our LAN users across two ISP connections for load balancing, we need to create Mangle rules that divide them into two groups and mark them for proper routing. In this article, I will use a class C IP block, 192.168.10.0/2,4, for our LAN users. This IP block can be divided into two groups by subnetting, as shown below.
- Group A: 168.10.0/25
- Group B: 168.10.128/25
Now, I will show you two rules of Mangle. This subnetting allows all our users to be divided into two groups. Users using IP addresses between 192.168.10.1 and 192.168.10.126 will be in Group A, and those using IP addresses between 192.168.10.129 and 192.168.10.253 will be in Group B. The MikroTik router correctly groups and marks our LAN IPs.
Follow the steps below to create these Mangle rules.
- Go to the IP > Firewall menu, click the Mangle tab in the Firewall window, and then click the Add New button. The new Mangle Rule window will now appear.
- Select the prerouting option from the Chain drop-down menu and put the IP block of group A (in this article: 192.168.10.0/25) in the address input field. Click the Action tab, select mark routing from the Action drop-down menu, put the group’s name (here, GroupA) in the New Routing Mark input box, uncheck the Passthrough option, and click the Apply and OK buttons.
- Likewise, click the Add New button again, select the prerouting option from the Chain drop-down menu, and put the IP group B block (here, 192.168.10.128/25) in the address input field. Now, click on the Action tab, select the mark routing option from the Action drop-down menu, put the group’s name (here, Group B) in the New Routing Mark input field, uncheck the Passthrough option, and click the Apply button and OK.
We have successfully created Mangle rules to group our LAN users. Now, we will configure the routes on the MikroTik router so that different groups can access the Internet through other ISP connections.
Step 5. Route configuration
After creating Mangle rules for Load balancing, you need to configure Mikrotik routing so that your different user groups can access the Internet using the other WAN connections. Follow the steps below to configure your MikroTik router properly.
- Go to the IP > Routes menu option. The Route List window will now appear. From this window, click on the Add New button. The new path window will then appear.
- Enter the gateway address of ISP1 (here, 172.22.15.1) in the Gateway input field and select your routing mark (here, GroupA) for this gateway in the Routing Mark drop-down menu, and then click the Apply and Confirm button.
- Likewise, click the Add New (+) button and enter the gateway address of ISP2 (here, 192.168.168.254) in the Gateway input field and your routing mark (here, Group B) for this gateway in the Routing Mark drop-down menu. Select and then click the Apply and OK buttons.
- Click the Add New (+) button again, enter any ISP gateway (172.22.15.1), and click the Apply and OK buttons. If you do not apply this path, your MikroTik cannot access the Internet.
After this configuration, your Group A users will access the Internet through the ISP1 gateway, and your Group B users will access the Internet through the ISP2 gateway. With this Mikrotik configuration, you will have a complete Load-balancing network.
Now, a question may arise in your mind: What happens if your ISP disconnects? Yes, half of your users will be disconnected from the Internet. As I said earlier, this configuration is only for load balancing, not redundancy.
FAQ
What load balancing methods does MikroTik support?
MikroTik RouterOS supports ECMP (Equal-Cost Multi‑Path), PCC (Per Connection Classifier), NTH (Nth packet), and policy-based routing.
How does PCC (Per Connection Classifier) work in RouterOS?
PCC splits traffic into “streams” using a hashing algorithm (based on source/destination IP and port), marks the connections, and routes them across different WANs.
When should I use NTH vs PCC?
Use NTH for packet‑level balancing (good for things like UDP or many small flows). Use PCC for more stable session-based balancing to avoid connection interruptions.