How To Change Date And Time In Windows 11
If Windows 11 Does Not Show The Correct Date And Time, You Can Use This Tutorial To Fix The Most Common Reasons For Not Being Accurate And To Set Windows 11 To World Clock.
Windows 11 has made many forward-looking changes compared to its predecessor, including a modified user interface, support for native Android apps, a restart menu, and a redesigned settings app.
However, users seem to be still struggling with the new interface and design elements, and many are looking for an answer to how to change the Date and data in the latest Microsoft operating system.
In this article, you will learn how to change the dated data in Windows 11, fix the inaccuracy, and set the time with the world clock.
Although Windows 11 can automatically detect and adjust the Date and Time based on your location, the system may not display the correct information for some reason.
For example, you may travel to another area, and the system may not be able to identify your current location, the time may not be consistent with Microsoft servers, or you may be in an area that respects daylight saving time. Still, the computer has trouble reflecting the change in seasonal times.
For whatever reason, Windows 11 includes a settings page dedicated to configuring the system to automatically adjust the time, summer, and time zone. This page contains options for manually changing the date and time settings and even re-syncing the time in case of inconsistencies with the time server.
How to set the time automatically in Windows 11
Follow these steps to let Windows 11 set the time automatically:
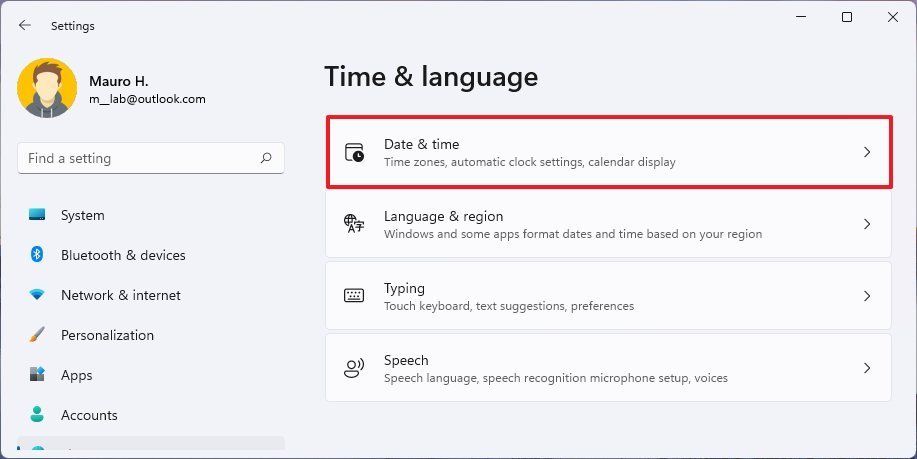
- Go to Settings and click on time & language.
- Click on Date & Date on the right.
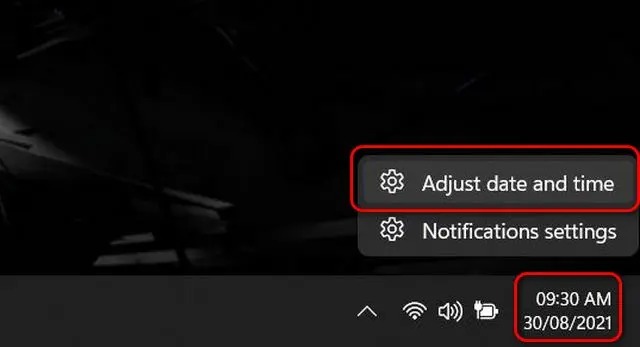
You can also right-click on the clock icon in the lower right corner of your taskbar and select “Adjust Date and Time.”
- Turn on the Set time automatically option.
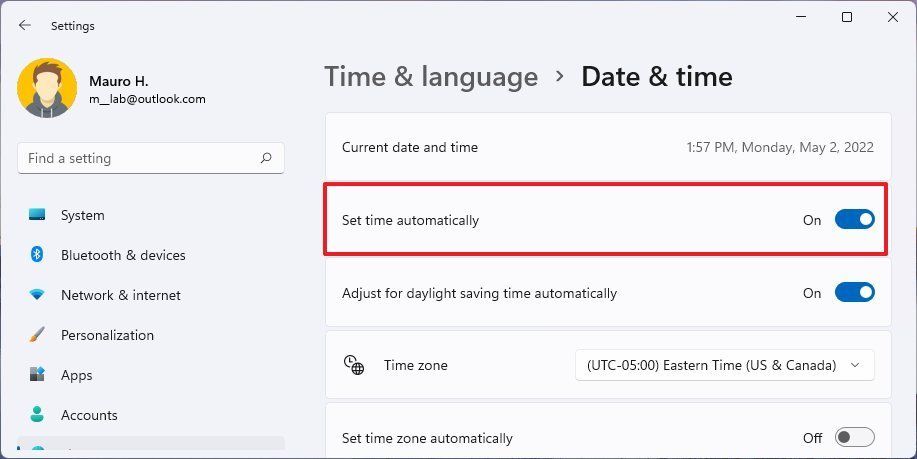
After completing the steps, the system automatically configures the time.
How to set summertime automatically in Windows 11
To set the system to summertime automatically, follow these steps after going to the Date & Date section of the settings:
- If the Set time zone option is enabled, turn it off automatically.
- Turn on the Adjust for daylight saving time automatically option.
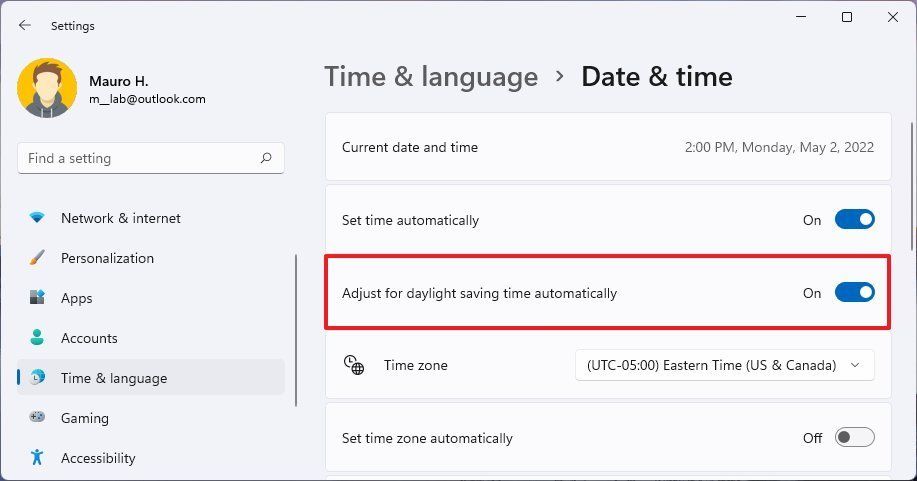
After completing the steps, the system automatically updates the settings whenever daylight saving time changes.
How to change the time manually in Windows 11
To change the time manually in Windows 11, after going to the Date & Date section of the settings, follow these steps:
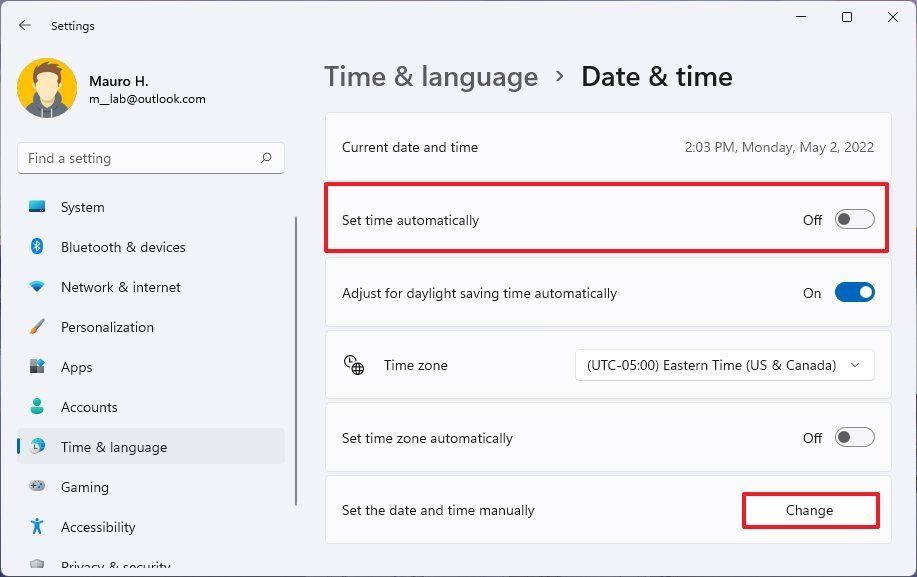
- Turn off the Set time automatically option.
- Click the Change button to set the DateDate time manually.
- Change the DateDate date if necessary.
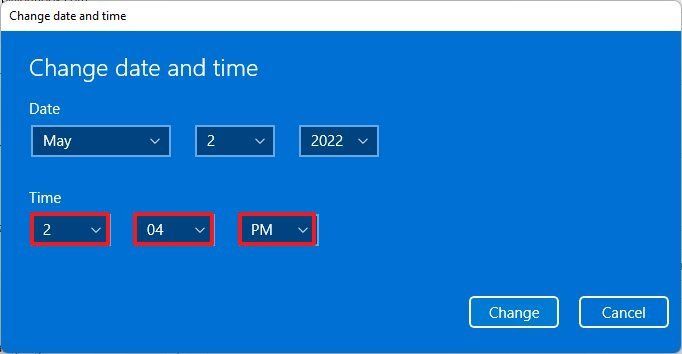
- Click the Change button.
After completing the steps, you will set the time according to your configuration.
How to manage time zones in Windows 11
In Windows 11, you can manage the time zone manually or automatically after going to the Date & Date section of the settings.
Change the time zone manually.
- If the Set time zone option is automatically turned on, turn it off.
- Select the correct time zone using the Time zoned-down menu.
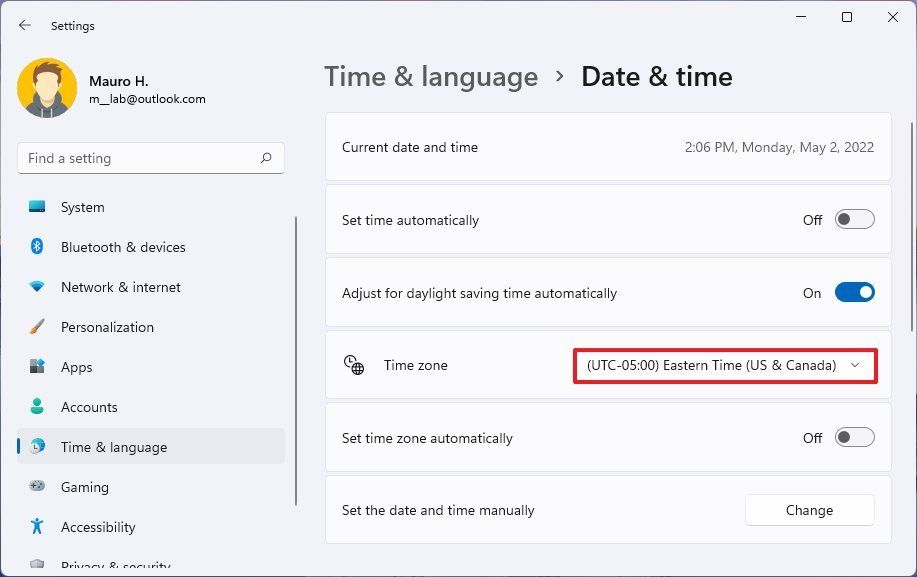
After completing the steps, the time zone is set in Windows 11.
Change the time zone automatically
- Turn on the Set time zone automatically option.
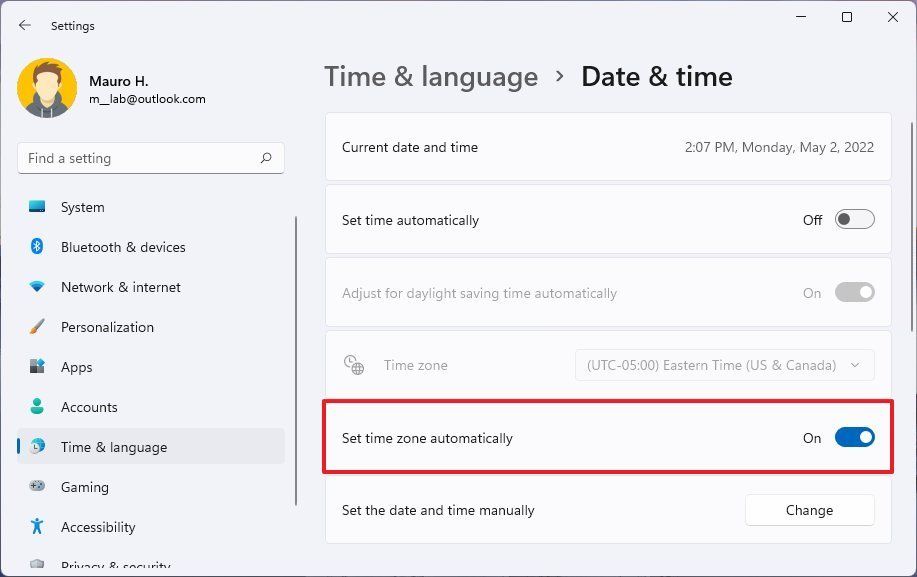
After completing the steps, Windows can automatically adjust the time zone according to your location. Note that sometimes, VPNs or IP switching software change the time zone, and the clock is set according to the IP of the same country.
How to synchronize time in Windows 11 (fine-tune time based on official country time)
Time synchronization allows the Windows clock to be set accurately (according to the official country clock) and eliminates errors. To sync time in Windows 11, go to Sync Now at the top of the page after going to the Date & Date section of the settings.
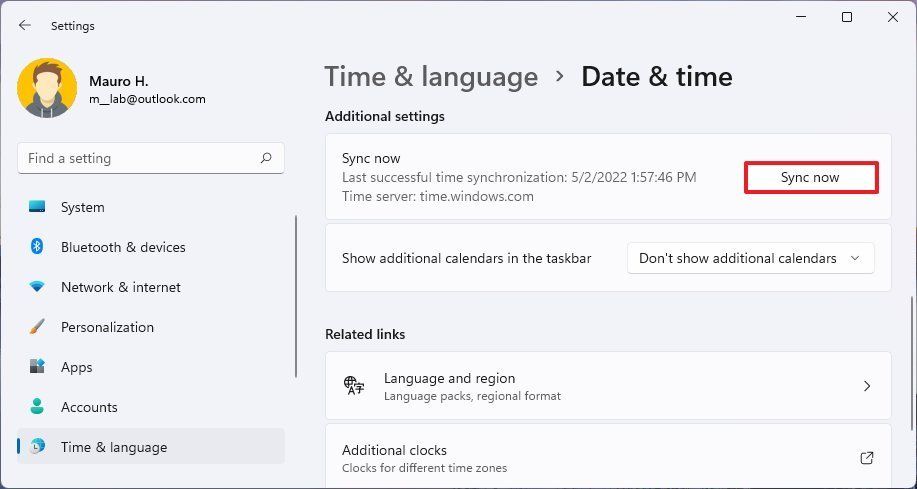
After completing the steps, the system synchronizes the time with the Microsoft servers to show the correct Date anDateme on your computer.
Change Windows server time.
Sometimes, clock synchronization fails due to internet and network problems. Windows will usually be able to do this after a few sync requests, But if you still can’t sync the time, you can change the sync server or manually define the new server.
Change the way the Date and candidates are displayed.
Date and time can be displayed in different ways. For example, you can delete the first two digits of the year, change the date display, change the display time from 12 to 24 hours, or vice versa. If you do not know how to display Date anDateme in Windows, follow these steps to change the display date and time format in Windows 11:
- From the settings, enter the Time & Language section.
- Click on the Language and Region section.
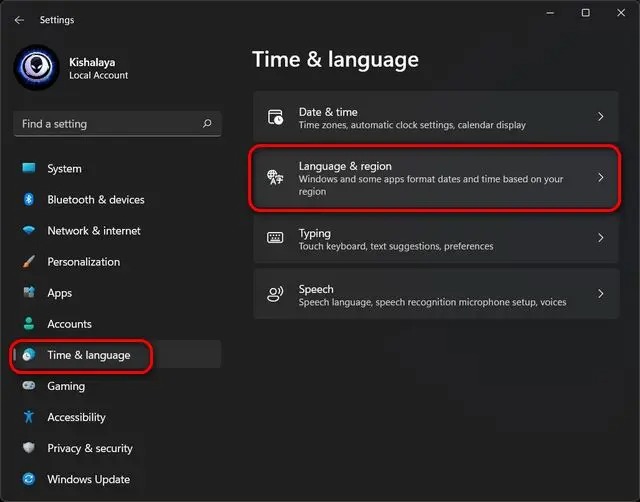
- On the next screen, click Regional format. In the drop-down panel, select the Change Formats button.
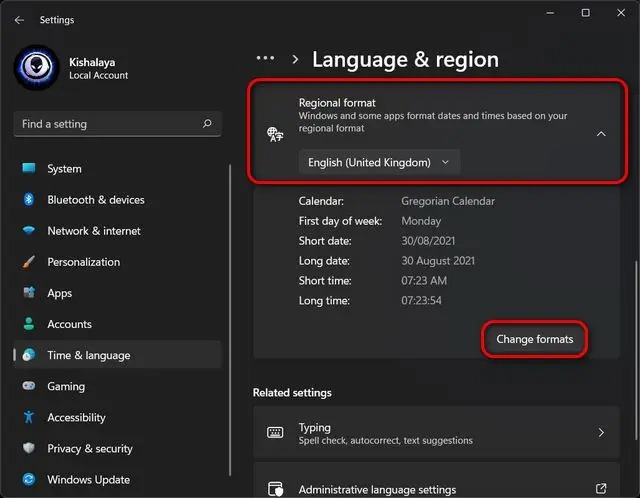
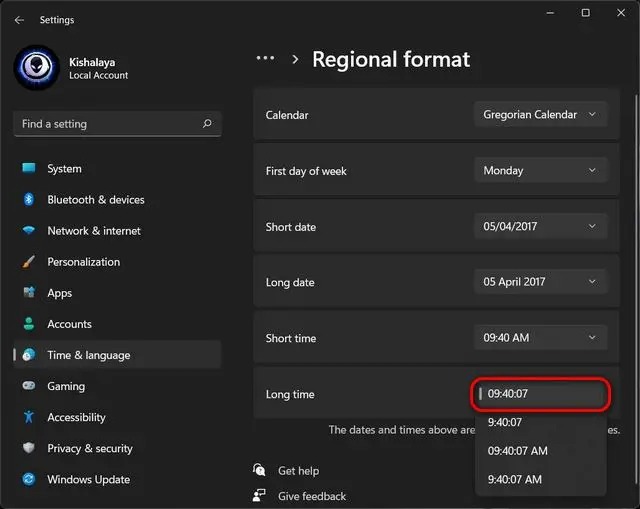
In this section, you can change the format of the Time and Date in different display modes (short or long) by selecting the drop-down menu next to it:
- In the Short date section, you can specify how the year, month, and day numerals are written or whether zero is mentioned in single-digit numbers. Changes in this area affect how the Files Are displayed in the taskbar and file explorer.
- In the Long date section, you can change the order of the day of the week, day of the month, name of the month, and year, where the Date isDatetten in bold with the day of the week and the month’s name.
- In the Short Time section, you can change whether the time is 12 or 24 hours or a zero display in single-digit numbers in the mode of hours without seconds and in the Long Time section with seconds.
How to change the time and date usDatePowerShell
One of the lesser-known ways to change the Date anDateme in Windows is through PowerShell.
- Search for Powershell in the Windows search bar and click Run as Administrator.
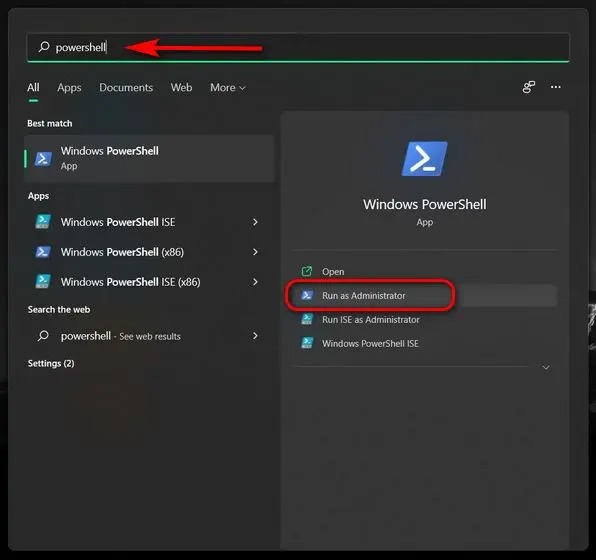
In the PowerShell window, you can use a single command to change the Date anDateme:
| “Set-Date -Date “dd/mm/yyyy HH: MM AM “Set-Date -Date “dd/mm/yyyy HH: MM PM |
- Use AM or PM, depending on whether it is morning or evening. For example, we use the following command to set the Date on October 1, 2021, at 6:00 PM on our Windows 11 PC: “Set-Date -Date” 01/10/2021 at 6:00 PM. To set the clock to 24 hours, delete the AM / PM parameter: “Set-Date -Date” 01/10/2021 18:00.
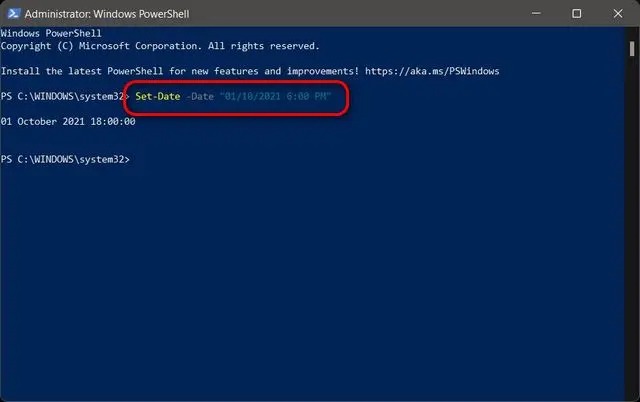
Note: Whether you should use dd/mm / yyyy or mm/dd / yyyy depends on the format you already set through the settings or control panel.
How to change the Date and Time using the command line
You can use the command-line tool to change the Date anDateme in Windows 11, and the process is as follows:
- Search for cmd in the Windows search bar and click Run as Administrator.
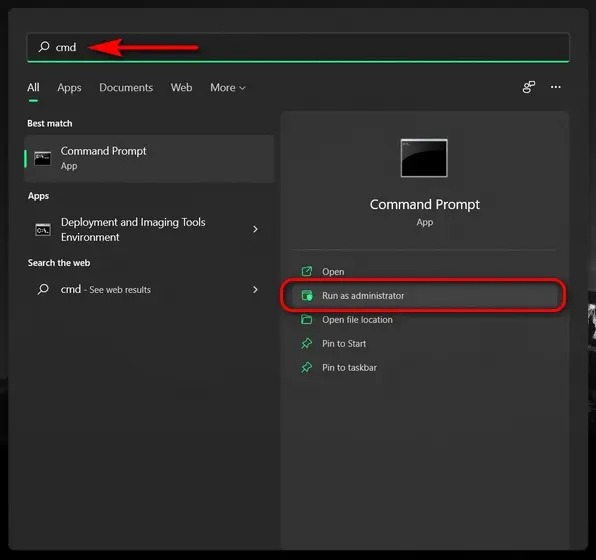
To set a new date, use the following command:
| Date dd/mm/yyyy |
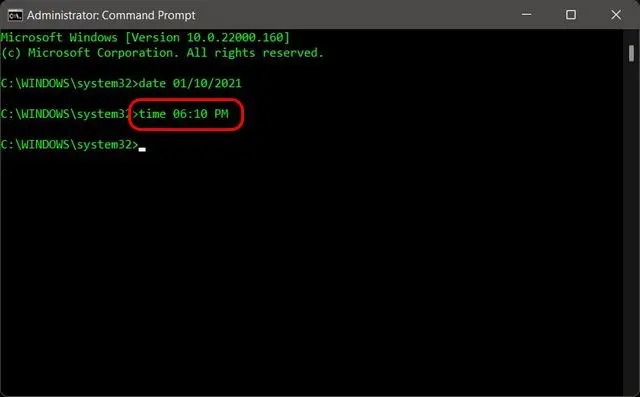
For example, to change the Date to October 1, 2021, we use the Date 01/10/2021. Here, depending on the format set to display the Date, the caterDaten in which the day, month, and year parameters are written differs. You can check this format in the Regional Formats section.
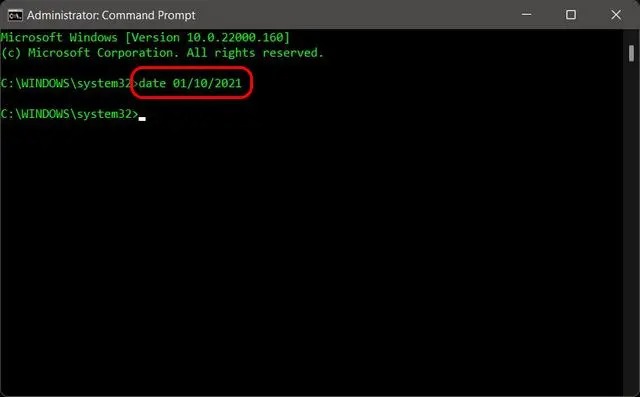
- To change the time, type the following command in the command line window and press Enter:
| Time HH: MM |
Replace HH and MM with the correct hour and minute in a 12 or 24-hour format. For example, to change the time to 06:10 PM, we use the command time 18:10 or time 6:10 PM:
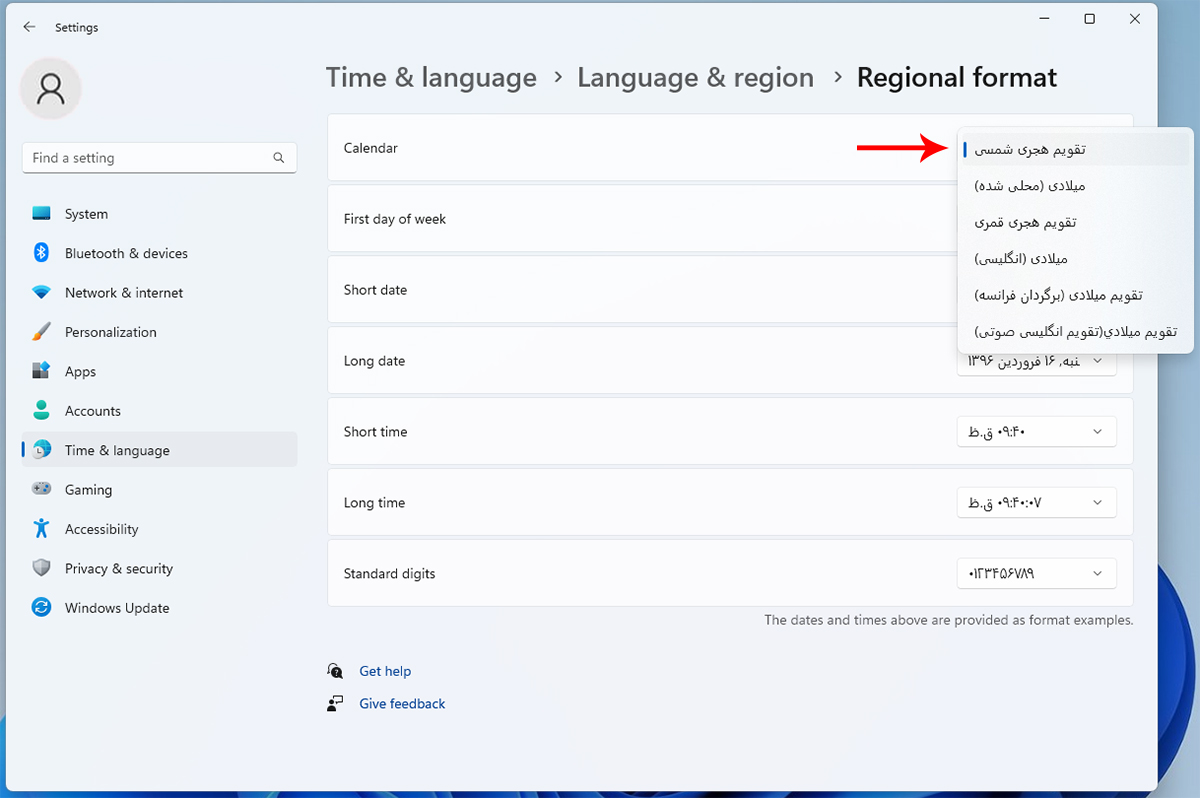
Add solar Calendar to Windows 11
Until Windows 10, this operating system did not support the Solar Calendar. At the request of many, Microsoft added support for this Calendar to Windows 10, and you can now enable this Calendar in Windows 11. Follow the steps below to activate the solar Calendar in Windows 11:
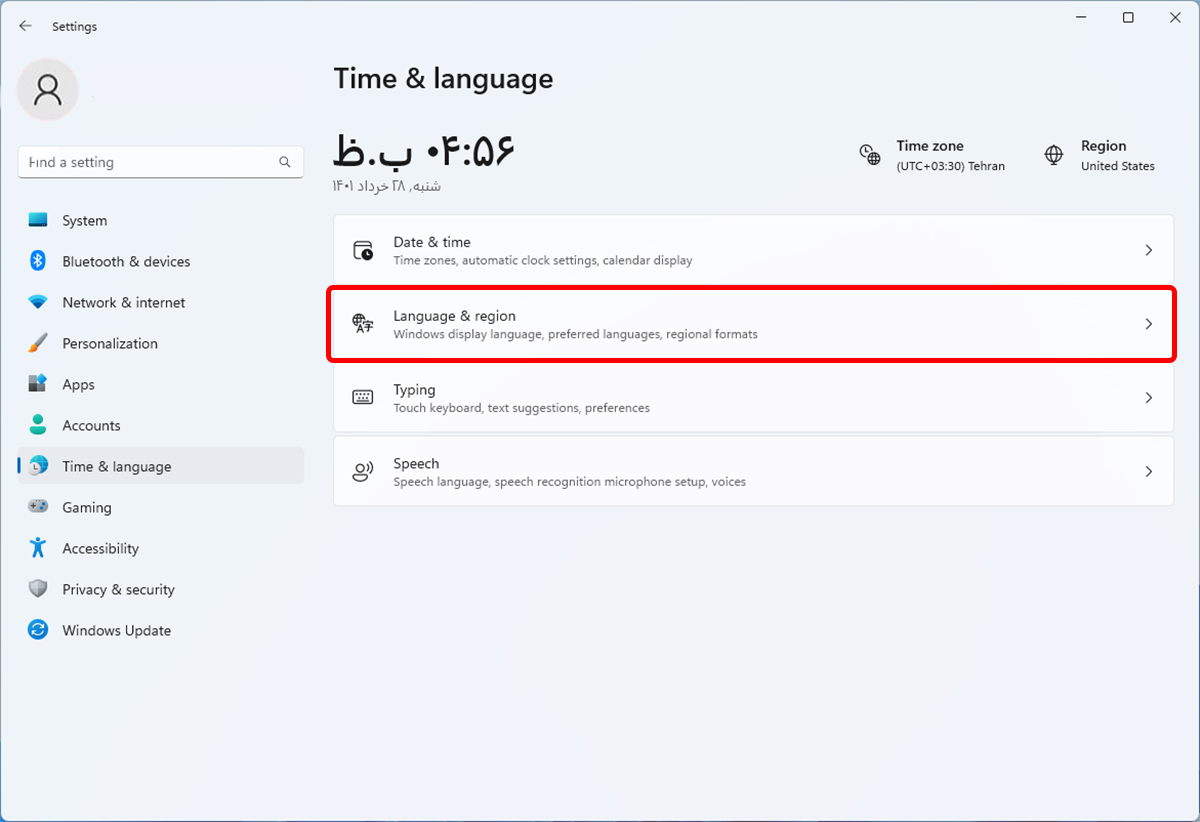
- Go to Settings and Time & Language.
- Click Language & Region.
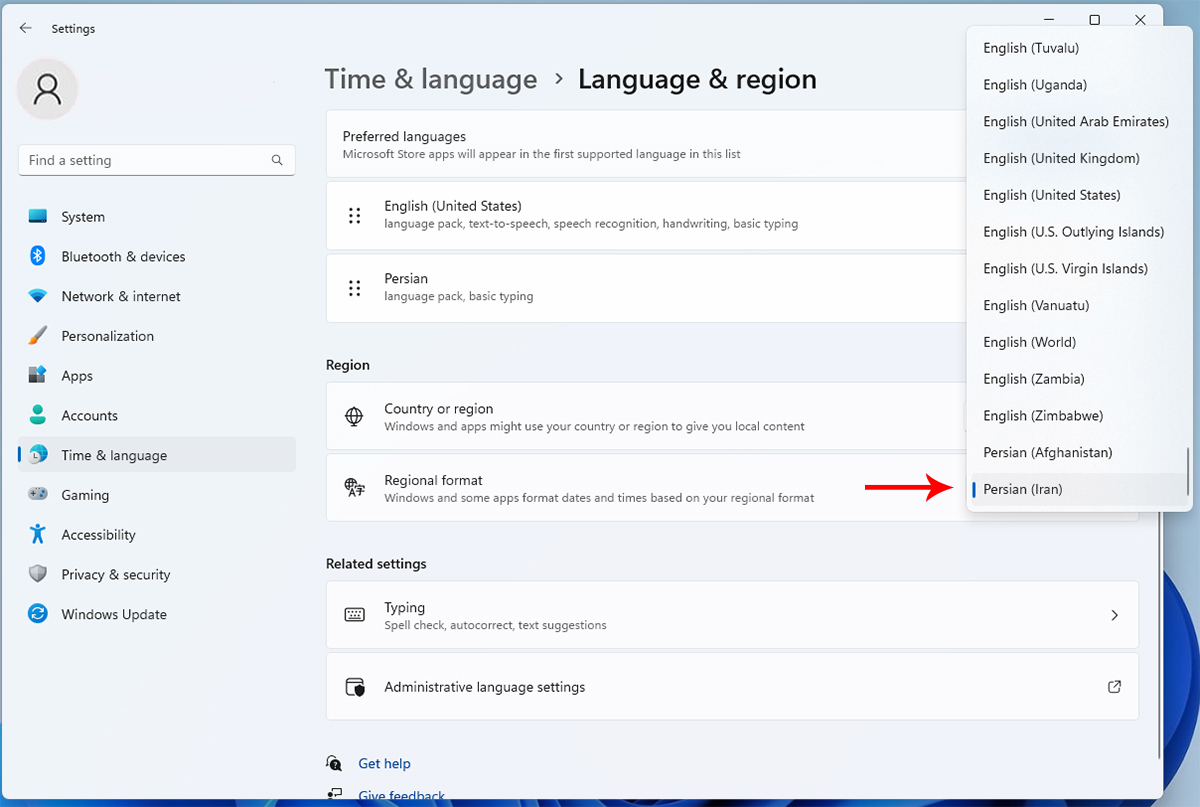
- Open the drop-down menu in Regional format and select Persian. The Windows calendar changes to Hijri. Note that you must have already added the Persian language to the Windows keyboard.
- If the solar Calendar is inactive, click Regional format and Change Arrangements.
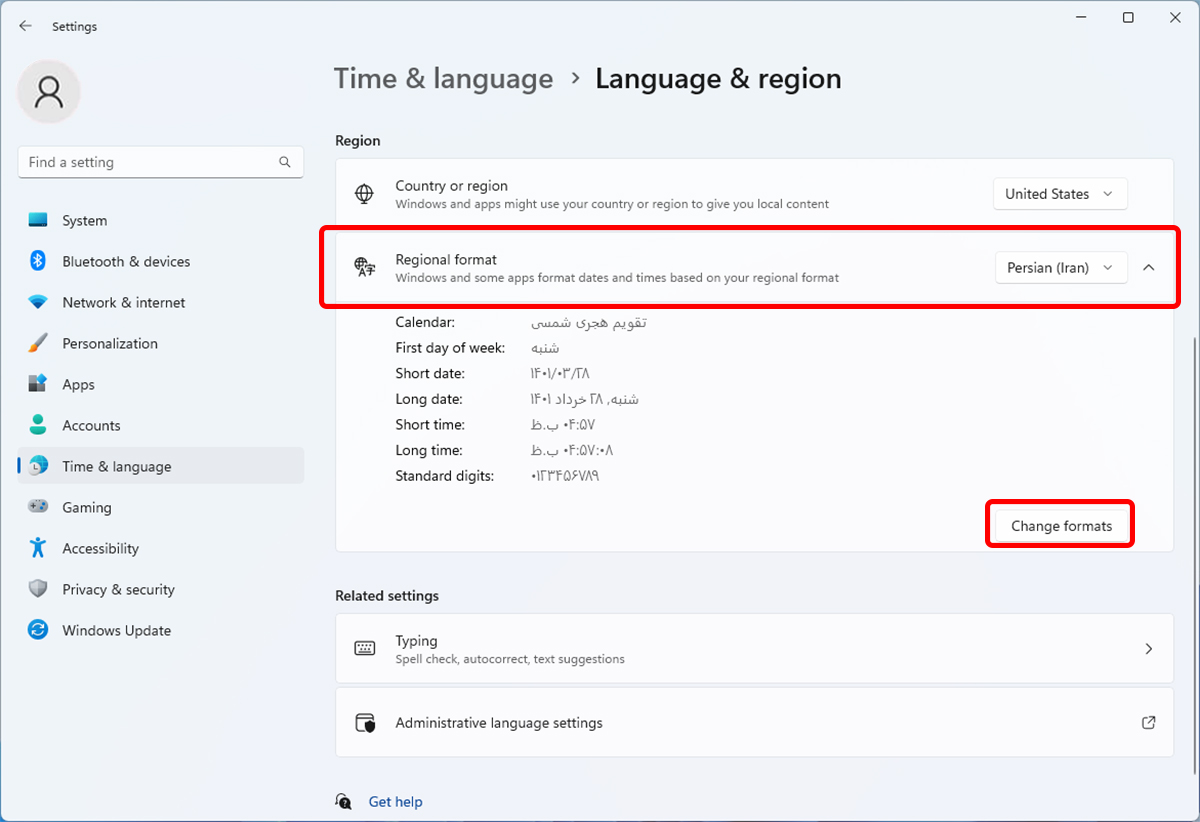
- Open the drop-down menu in front of Calendar and switch to Hijri Calendar.
***
We hope you find this helpful tutorial. If you have any questions about changing the Date and datemeDateWindows 11, fixing the inaccuracy, or setting the time with the world clock in Windows 11, please share them with users and us.
