How To Add A Printer To Windows 11
The Printer Can Be Added To Windows 11 Manually Or Automatically With A Wireless Or Wired Connection. Learn How To Add A Printer To Windows 11 In This Article.
If you’ve ever had to start a printer, you know how tedious this process can be. Microsoft has done its best to add a printer in Windows 11 as simply as possible.
Not all aspects of a printer startup can cover in one article; Because the method of adding a printer, depending on the features available, the underlying technologies, and the specific characteristics of the printer manufacturer, is far too extensive to go into detail.
This tutorial will discuss the most common ways to add a printer to Windows 11 after configuring it. Note that this process can vary slightly depending on the device and the brand of printer, but the initial steps are almost the same.
Automatically add printer in Windows 11 with ( wired connection )
- Connect the printer to your computer.
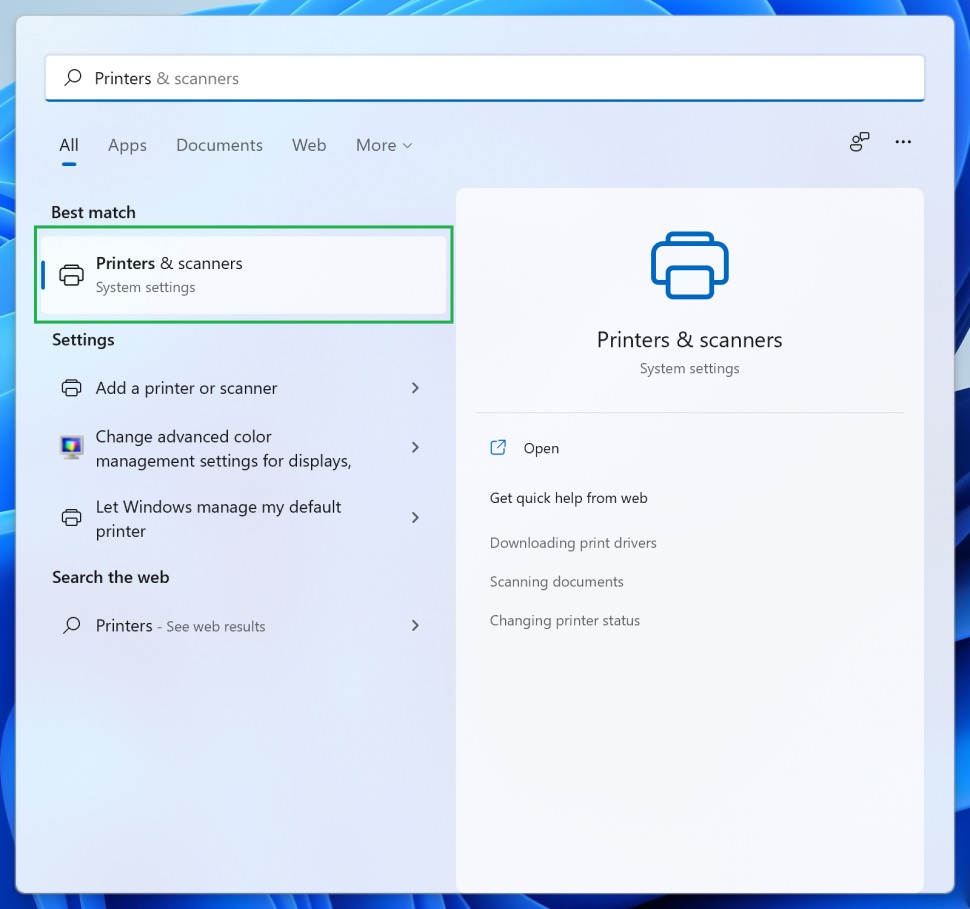
- In the Settings, open the Printers & scanners page :
1. The quickest way to do this is to open the Start menu, search for Printers, and click on Printers & Scanners among the results.
2. You can also open the Settings app, select Bluetooth & devices from the sidebar, and click on Printers & scanners from the options.
- On this page, a subset of the Add a printer or scanner section of the printer connected to the device is displayed, and if you see it in the list of pre-saved printers, it means that Windows has successfully detected the printer, you can use it.
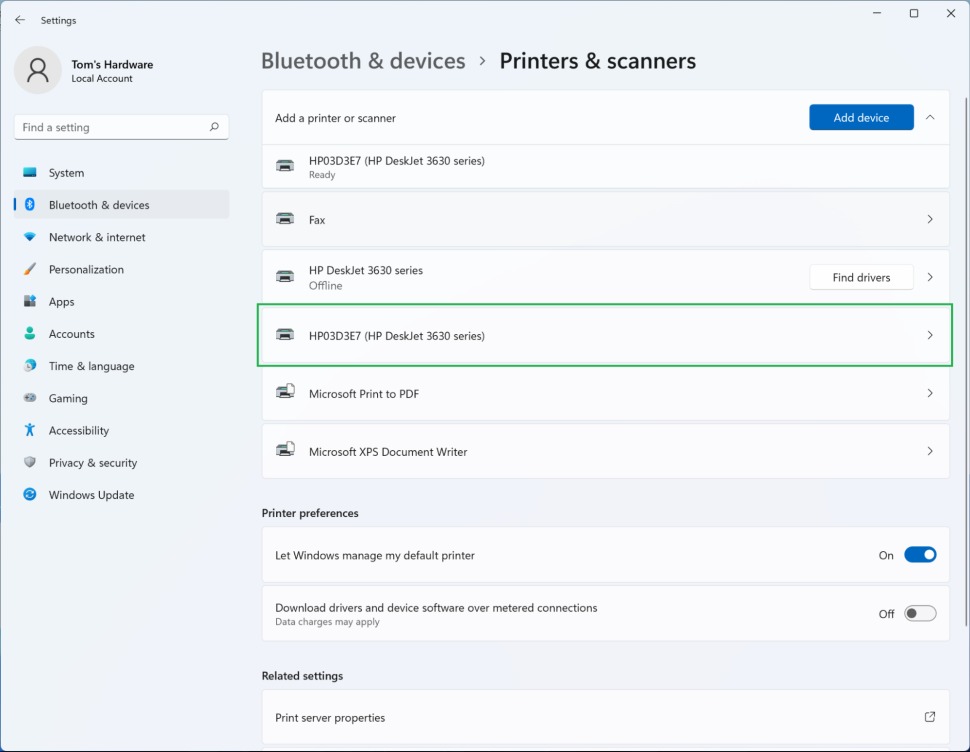
Sometimes it may take a few minutes to add a printer to Windows because of a Windows search for a driver. If the printer is old, you may need to download the driver from the Windows Update, so it’s a good idea to make sure you have an internet connection when connecting the printer to your laptop or case.
Also, make sure the cable is safe. If Windows has trouble identifying it, click the Find drivers option or use the Disk that came with the printer to install the driver. Then you can use the printer manually to add it in cases where you can not add it by connecting the cable directly.
Manually add a printer to Windows 11
If your computer does not detect the printer automatically, you can try adding it manually.
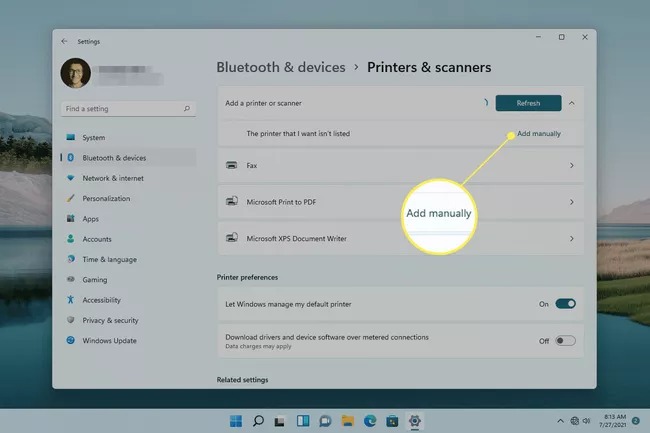
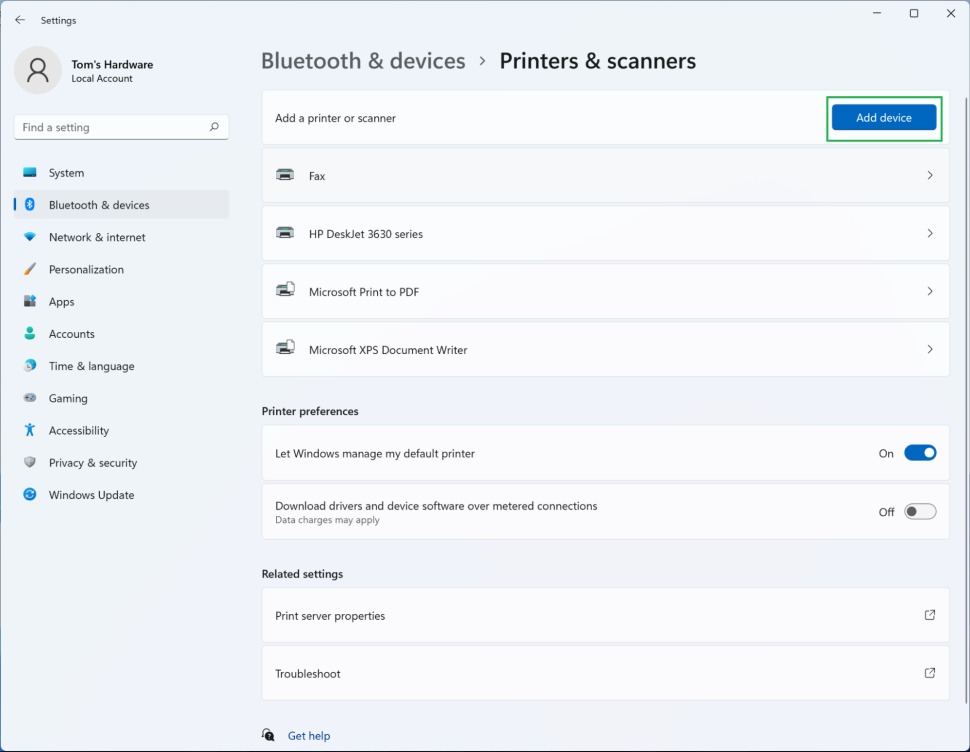
- Open Settings, go to Bluetooth & devices, select Printers & scanners, and click Add device.
- Please wait a few seconds after the search operation starts to find the printer, and when you see the Add manually option, select it.
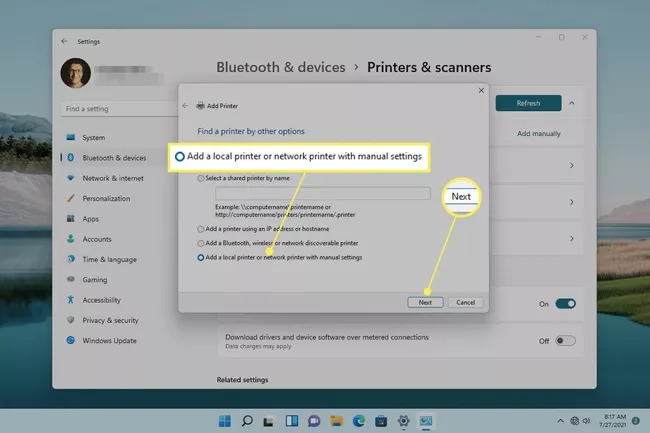
- Depending on your location and how you connect to the printer, several options are here. All five possibilities work for wireless or network-based printers. If your printer is connected locally / directly to the computer, select Add a local printer or network printer with manual settings, then select Next.
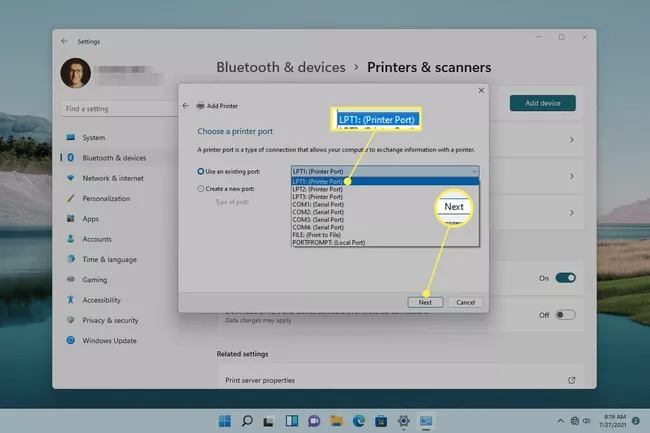
- Suppose the printer is connected via USB; select USB001 at the bottom of the list. Select the port to which the printer is connected and click Next. Note that for older printers that use serial or LPT ports, if there is a number from the input of these ports on your device, the printer will usually be identified and installed by selecting the first port, LPT1 or COM1. But if this does not happen, you can try the following ports or find the port number in the Device manager and Ports section.
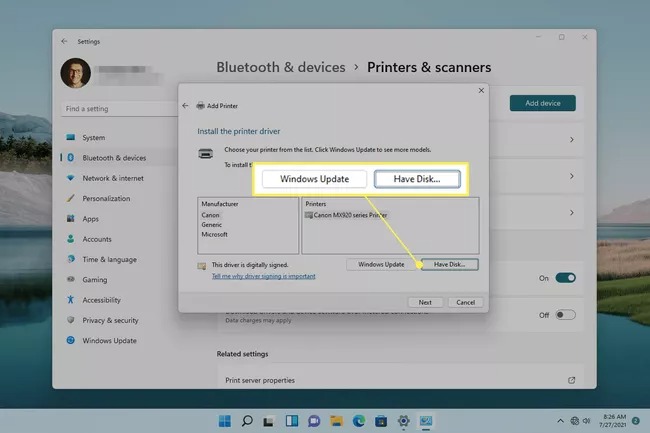
- The next step is to install the printer driver. If the printer has a disk containing the driver, select Have Disk to search for it. Otherwise, select Windows Update.
- Wait for Windows to display a list of options. You will see a page with the message “Windows is updating the list of printers.” It may take a few minutes.
- After updating the list of available printers, select the manufacturer from the left column and then the model from the right column. Click Next.

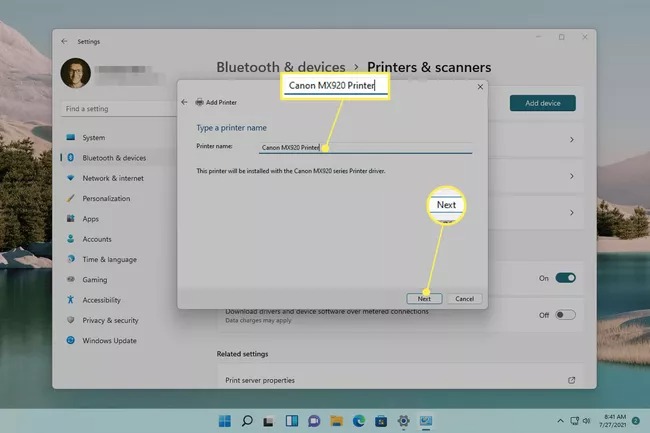
- Choose a custom name for the printer and click Next.
Note: If you see a page asking which version of the driver you are using, select Replace the current driver.
However, if you are sure that the driver installed is correct, select Use the currently installed driver.
- Wait for the printer to install on Windows 11.
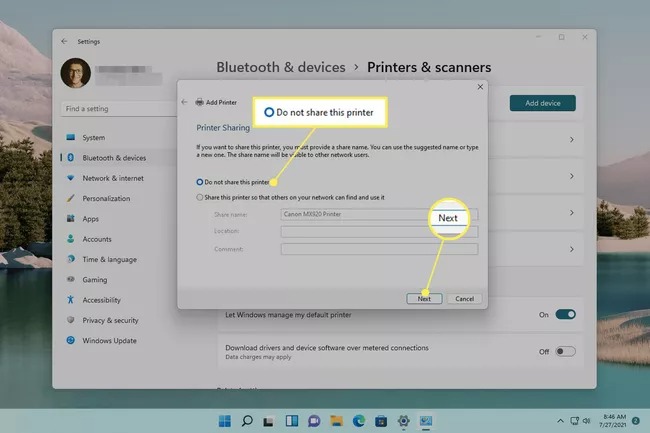
- Select the Do not share this printer option and then click Next. If you want to share the printer with other devices on your network, select Share this printer and complete the details.
- The work must now complete successfully. If you want to test the printer, select Print a test page; otherwise, select Finish to see the printer in your list of devices.
Add a printer in Windows 11 via wireless protocols
Few people like to have a lot of cables from different devices connected to their computers. If you do not want to add a printer to your computer with a wired connection, you should know that it is much easier to have a wireless connection, at least when the network itself is working correctly.
To do this, note that both your printer and your computer must support compatible versions of Bluetooth or WiFi before connecting the printer to your computer wirelessly. This tutorial will explain the steps to add a printer using WiFi, but the steps are similar for printers with Bluetooth.
- First, make sure your devices are on the same network.
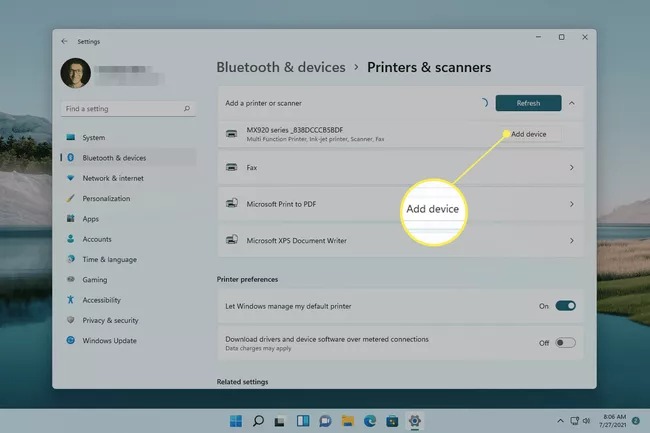
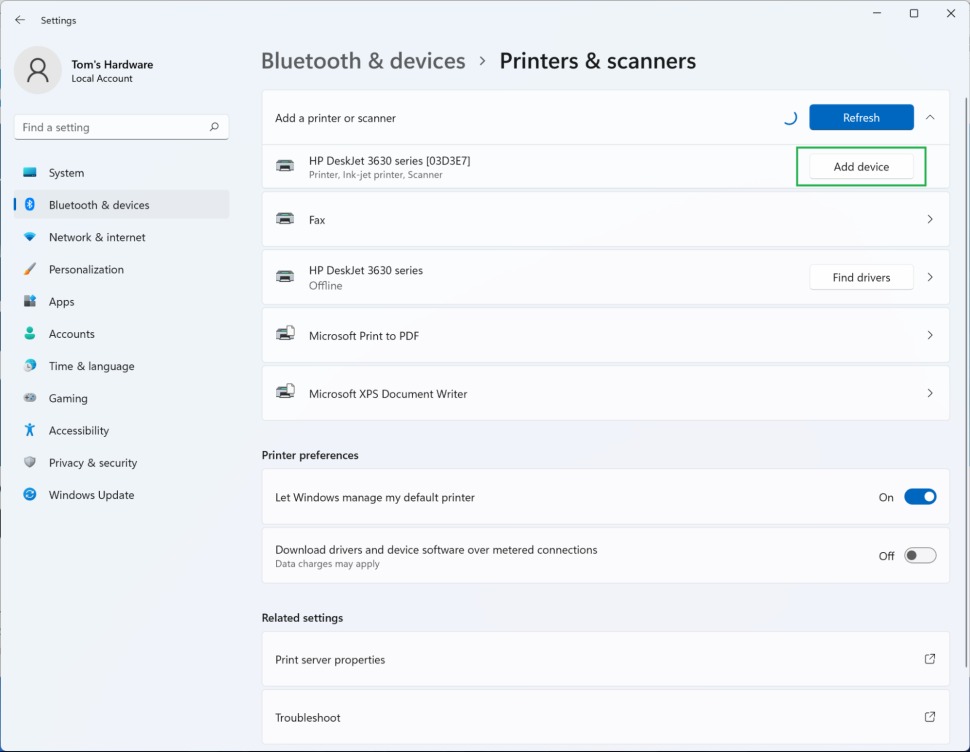
- From the Printers & Scanners page in Settings, click Add device.
- Click the Add device button next to your printer name; This will replace the main Add device button with the Refresh button. If your printer is found (it should be if you are on a network), you can click the Add device button that appears next to the list of detected devices.
- Some printers require authentication before connecting to devices on the same WiFi network. Upon request, you will need to enter a password, PIN, or another authentication method. The default information is usually somewhere in the box or manual that came with the printer.
- Verify that your printer has been added. The printer should now appear in the list of devices on the Printers & Scanners page in Settings.
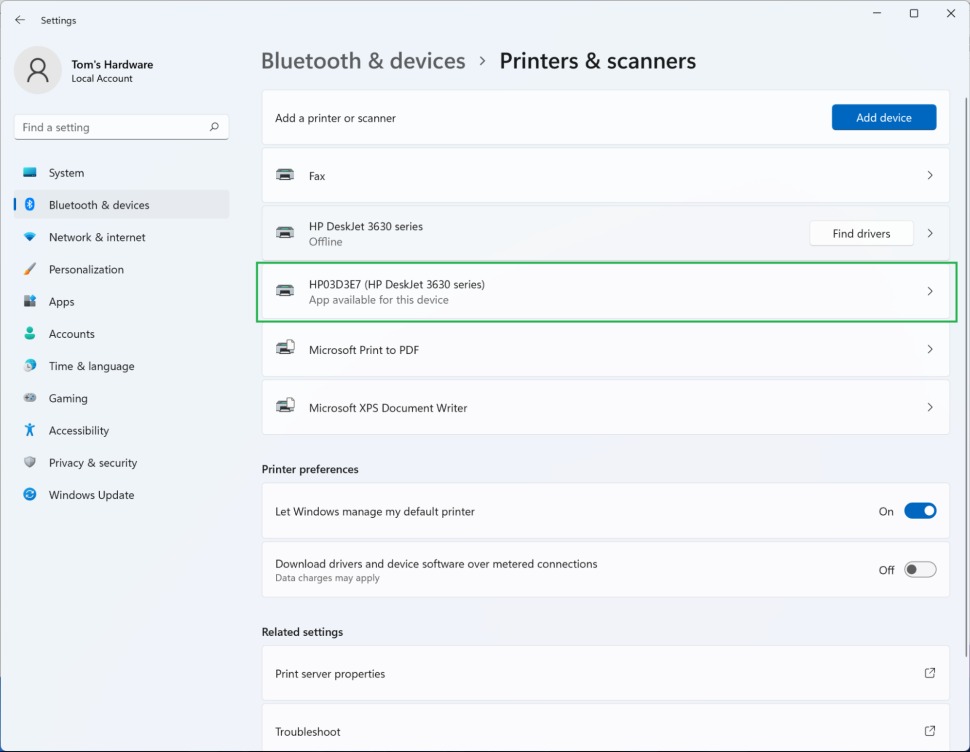
Your printer should now be available as a print destination if both devices are connected to the same network. Windows 11 can detect whether a developer has made a management application available in the Microsoft Store. If there is an application, Windows will notify you that “App available for this device” and a button that will take you to the application download page.
***