How To Install Windows 11 With Flash
Since Many Of Today’s Devices Do Not Use Cd And Dvd Drives And Windows Installation Files Can Be Easily Downloaded, In This Article, We Will Introduce You to How To Install Windows 11 With A Flash Memory.
Windows 11 is the latest version of Microsoft’s computer operating system, officially released to the public in October last year.
Although this operating system requires new prerequisites, including being equipped with a TPM hardware piece for installation on computers and laptops, nothing can replace the joy of being up-to-date and benefiting from Microsoft’s new features and design.
On the other hand, there are only three years left until the end of Microsoft’s support for Windows 10 in 2025, and users should gradually prepare themselves for migration.
Microsoft’s Windows 11 benefits from new features such as the redesign of the start menu and taskbar and different widgets and running Android applications, which are just some of the new features of Windows 11. Suppose you want to experience Microsoft’s latest operating system on your computer and laptop.
In the not-so-distant years, Iranian users used CDs available to install Windows. However, these CDs and DVDs have been out of business for several years now, and not only are many portable devices unable to play them; Also, but increasing the size of Windows installation files does not allow transferring all of them to a standard DVD.
Also, the increase in the volume and speed of the Internet in recent years has made it unnecessary for users to buy such tablets, and most of today’s users download the software they need, including the Windows operating system, from Internet sites; Therefore, in this article, we are going to teach how to install Windows 11 through a USB flash drive without the need for a DVD drive or CD.
Prerequisites for installing Windows 11 via flash memory
1. Make sure your system supports Windows 11 and has the minimum prerequisite features.
The most crucial hardware specifications required to run Windows 11 include the following:
- At least 4 GB of RAM
- 64 GB of storage memory
- Display with a resolution of 1366 x 768 pixels
- Support for UEFI, Secure Boot, and TPM 2.0
- DirectX 12 and WWWDM 2. x support
2. Prepare a USB flash drive with a minimum capacity of 8 GB.
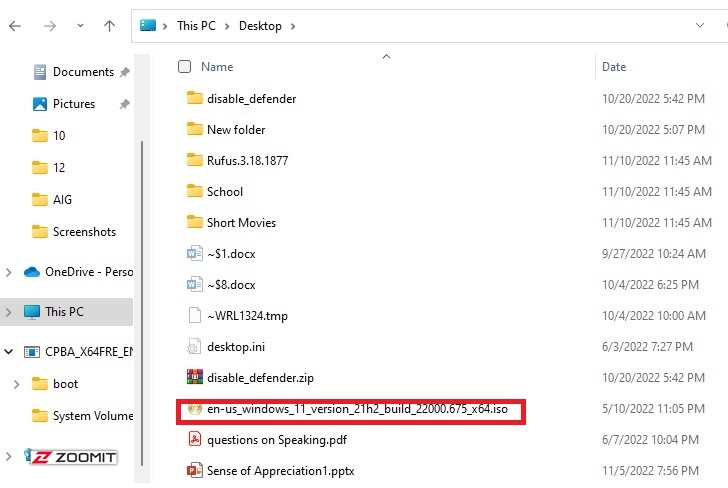
3. Download one of the editions of Windows 11 from the websites. If your computer or laptop has good specifications, we suggest you download the Pro edition, which has more complete features.
4. To create a bootable flash, download and install Rufus software or use its portable version.
Flash preparation for Windows 11 installation
- First, decompress the downloaded files of Windows 11 in a suitable place to obtain the iso format file.
- Connect the flash memory to the system.
- Run the Rufus software.
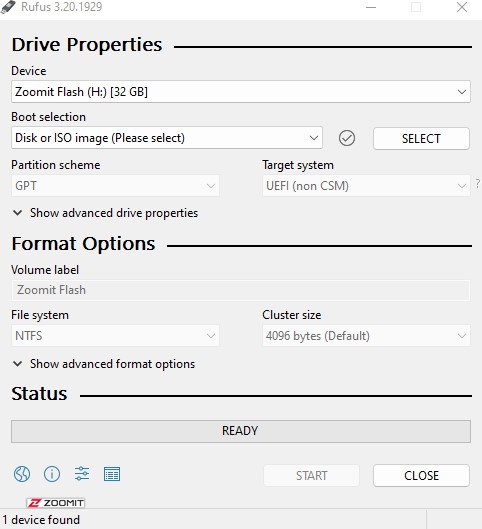
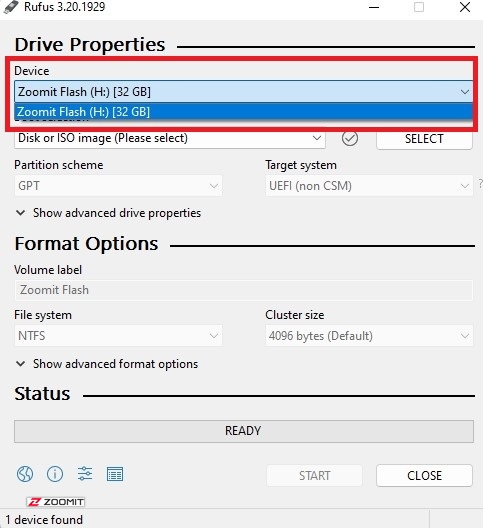
- Select the desired flash memory to create the bootable installation file by clicking on the bottom bar of the Device section.
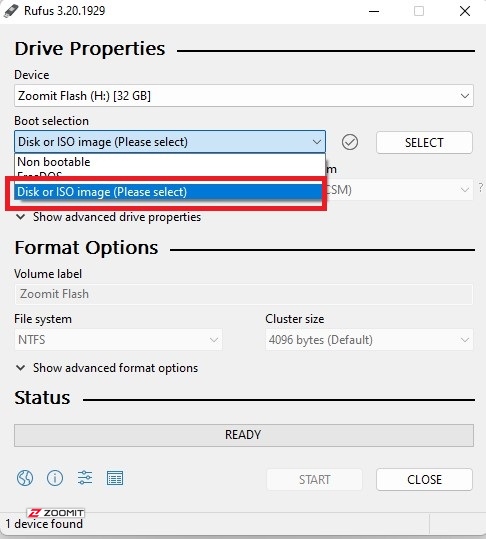
- Choose Disk or ISO image from the Boot Selection drop-down bar, then click the Select button.
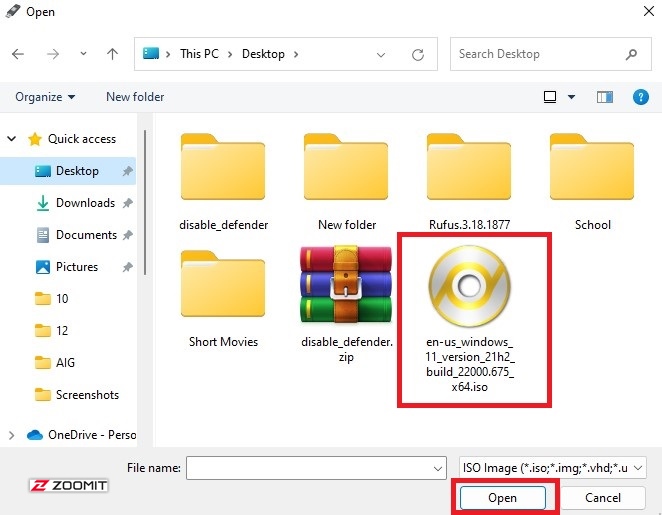
- In the opened window, go to the path where you placed the Windows iso file, select it, and click on open.
- Change the File System option to NTFS.
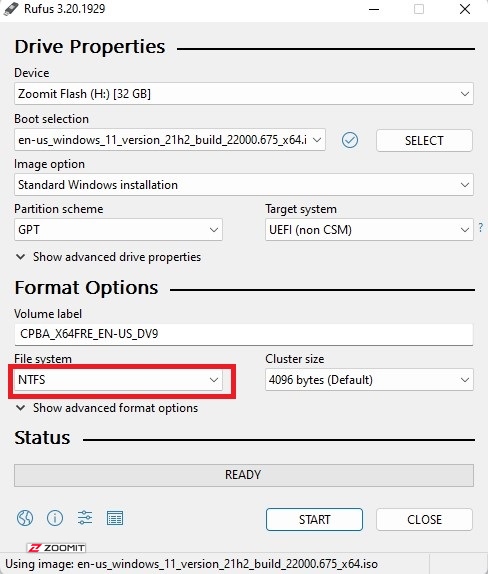
- Finally, click START to create the bootable flash.
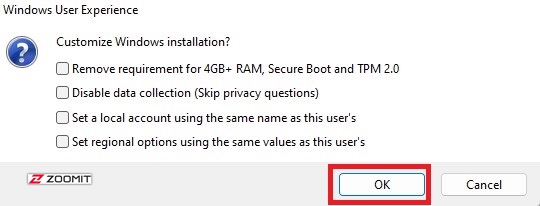
Now a new box will open that provides you with additional options.
Suppose your system does not have the minimum specifications required to install Windows 11. In that case, you can remove this limitation by activating the first option, i.e., Remove requirements for 4GB+ RAM, Secure Boot, and TPM 2.0. However, this is not recommended due to possible future problems.
- Click OK.
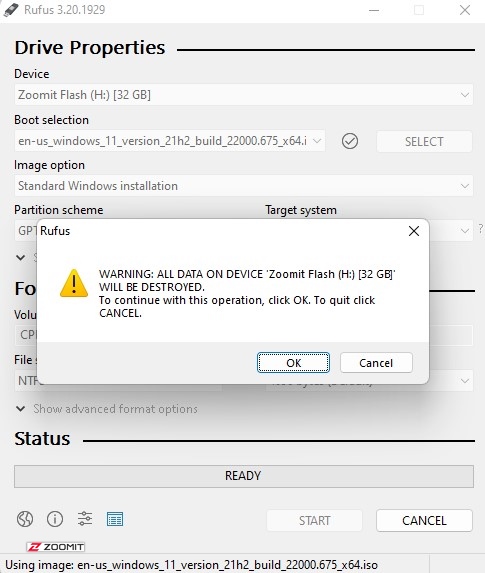
- A new box will warn you about erasing all the data on your flash memory. Go to the next step by clicking OK.
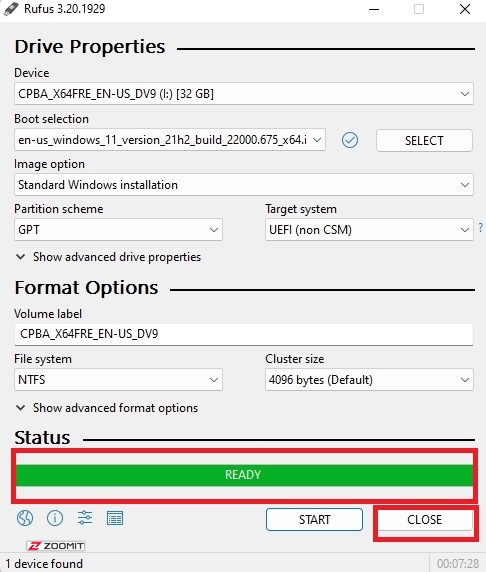
After a few minutes, the Windows 11 bootable flash creation will be completed by filling the green bar and displaying the word Ready. Close Rufus and prepare to install Windows 11.
Install Windows 11 with flash bootable
First, you need to enter the BIOS of your computer and laptop. Different motherboards and laptops have other ways to enter BIOS or UEFI, which can be F9 or F2 or F12 or F11 or Delete key. Therefore, before starting the installation process, find the corresponding key on your device. Usually, this key is displayed on the screen when the system is turned on. Also, by searching for the model of the laptop or computer motherboard on the Internet, you can find the unique key to enter BIOS and boot menu.
- Shut down your system.
- Connect the flash drive to the system.
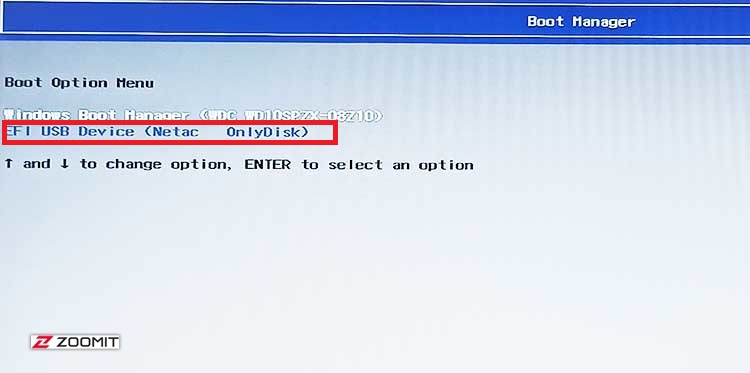
- Turn on the system and immediately press the boot menu key (probably F11 or F12) several times until the boot menu appears.
- After entering the boot menu, select the flash memory using the control keys of the keyboard and Enter.
- Wait for the flash to boot.

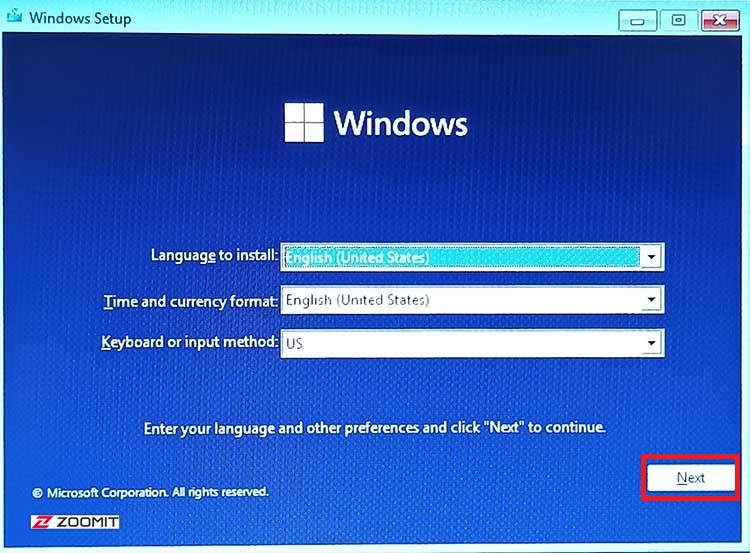
- Leave the Windows Setup window unchanged and click Next.
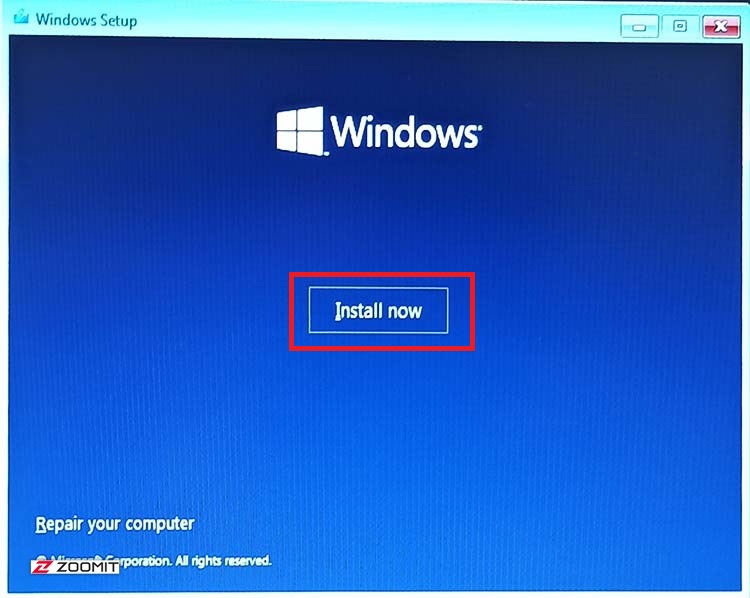
- Click Install Now.
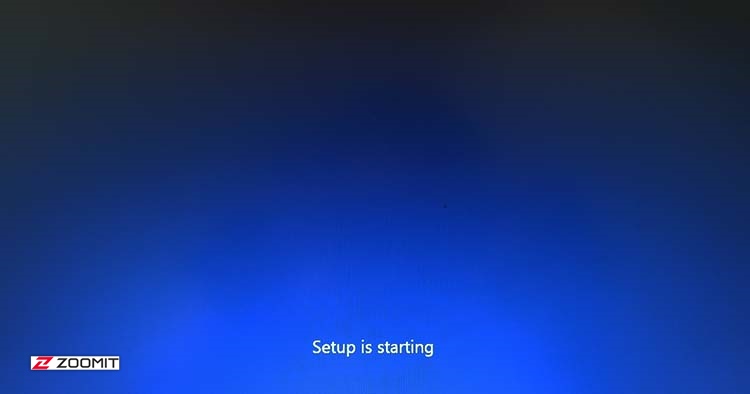
- Wait for the Windows 11 installation to start.
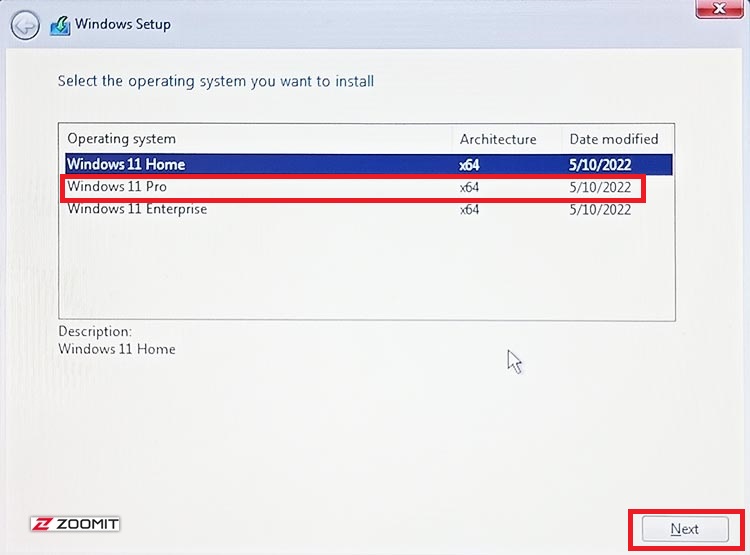
If your Windows download file is in the form of a package and contains different editions of Windows, you will see a window like an image below.
- We suggest you select Windows 11 Pro edition and click Next.
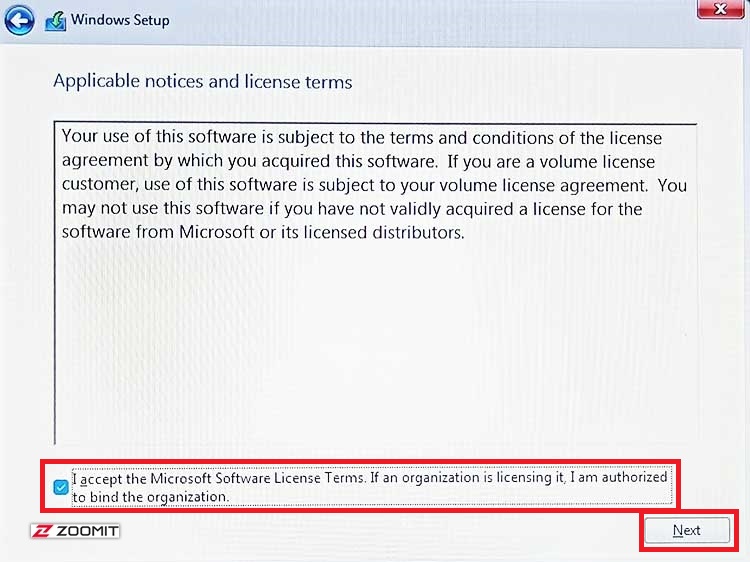
- If you agree to Microsoft’s terms and conditions, check the box at the bottom of the page and click Next.
- On the next page, select the Upgrade option if you plan to update your Windows or migrate from Windows 10 to 11. But if you want to install Windows on the device for the first time or delete the previous Windows and install a new Windows, select the Custom option.
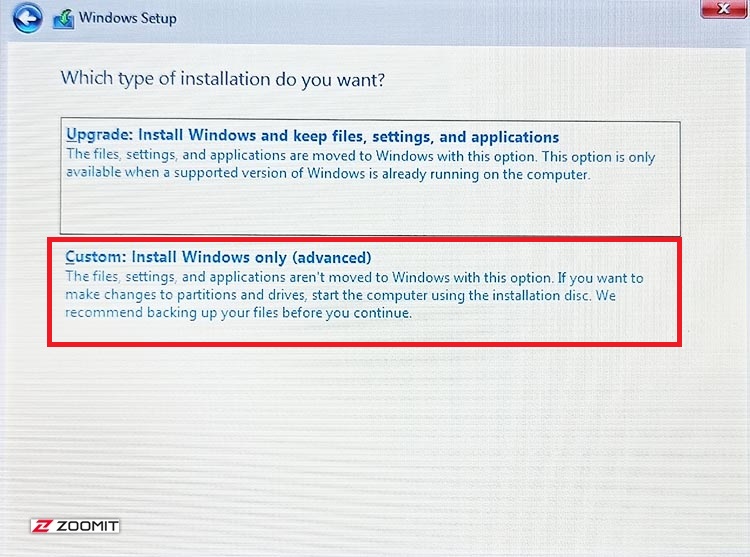
Since the Upgrade option is simple and does not require any particular explanation, we continue with the second method, Custom.
In the next step, you need to determine the installation location of the new Windows. If you’ve already had a defective Windows on the device, you’ll need to format the drive it’s installed on.
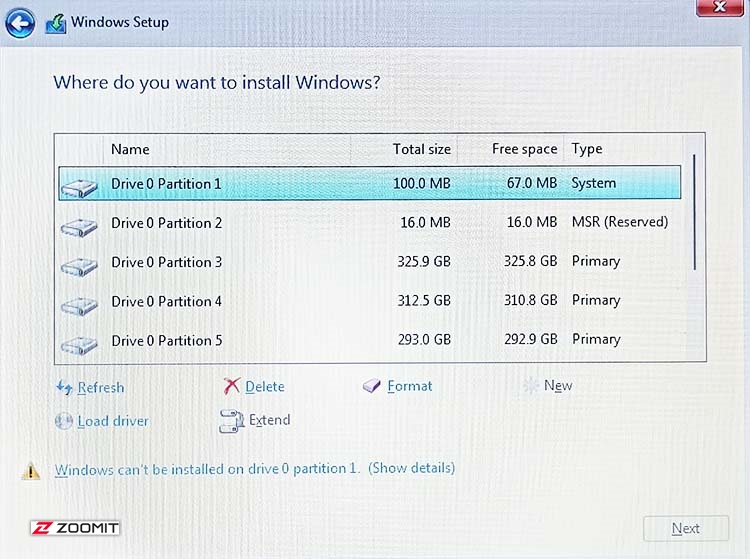
- By pressing the Format option, the selected drive will be formatted, and all its information will be deleted.
- By pressing the Delete option, the selected drive will be deleted, and you can add its capacity to another drive or create a new campaign.
- It is possible to create a new drive by clicking the New option.
Note: If your computer or laptop has SSD memory, install Windows on this drive. The speed of SSD drives is several times faster than ordinary memory and significantly increases the rate of running and working with Windows.
- After selecting the desired drive, click Next.
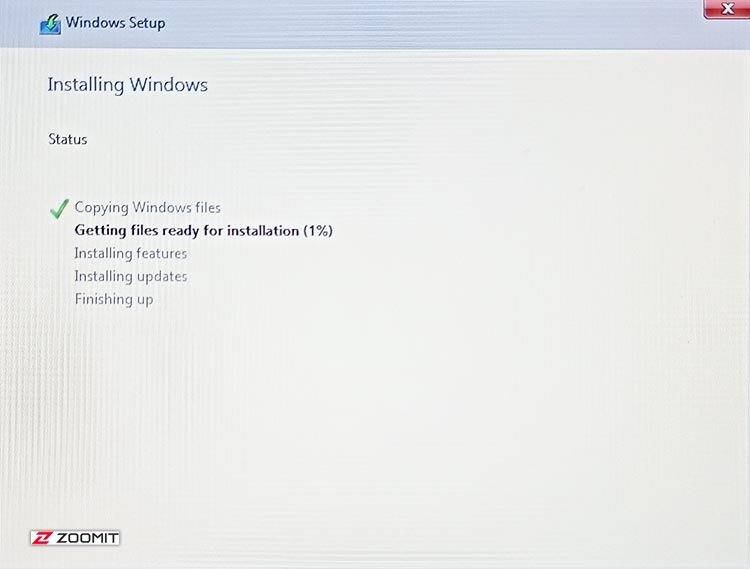
Now the process of installing Windows 11 with flash starts. The installation speed is different depending on your computer’s type of memory. If you use SSDs, this step takes about 10 minutes or less.
After the installation is complete, the system will restart automatically.
Wait for Windows to boot.

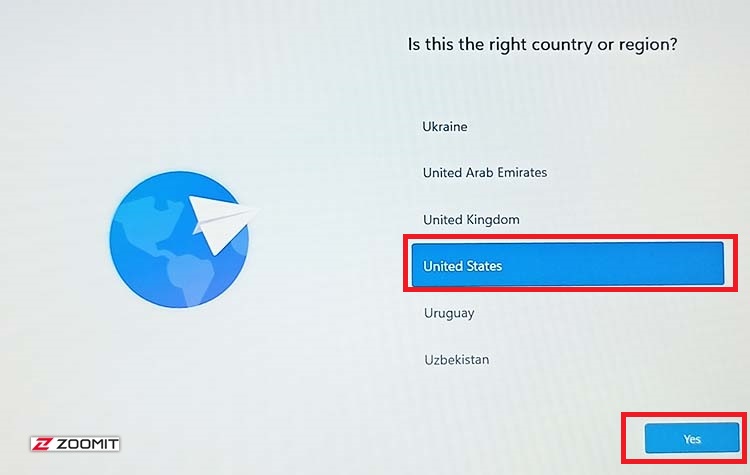
Now, on the new open page, you must select your region of residence.
- We suggest you set this region to the United States; Because if you change it to Iran, some Windows features, such as Microsoft Store, may not work correctly for you. Then click on Yes.
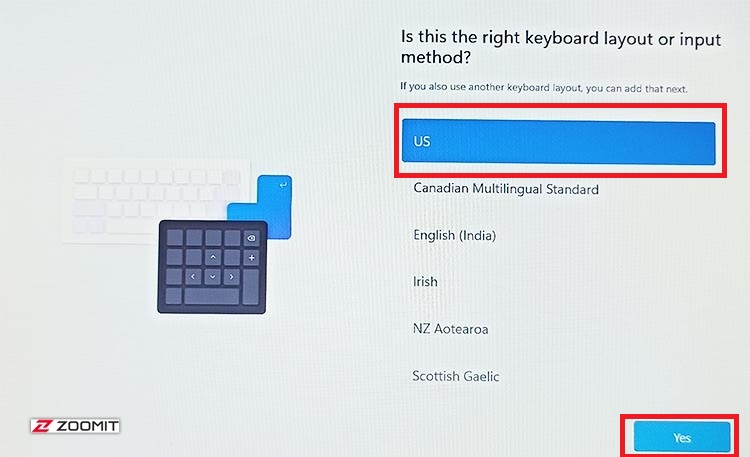
- On the next page, you must select the default keyboard language. Please set it to the US and hit the Yes button.
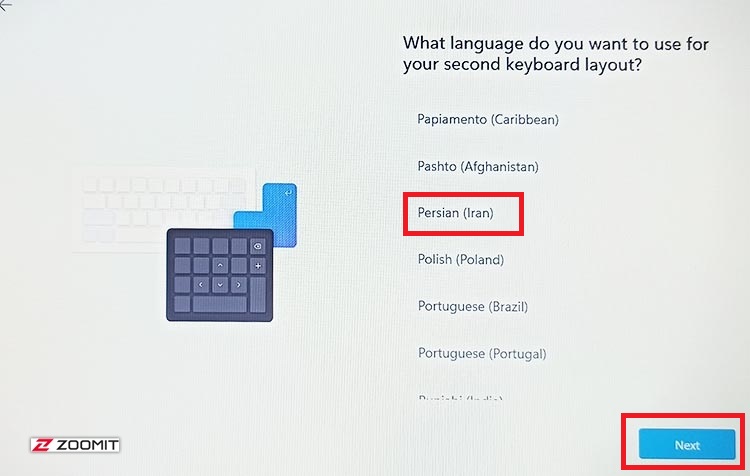
- You can choose a second language for the keyboard on the next page. To add the Persian language, click on Add Layout.
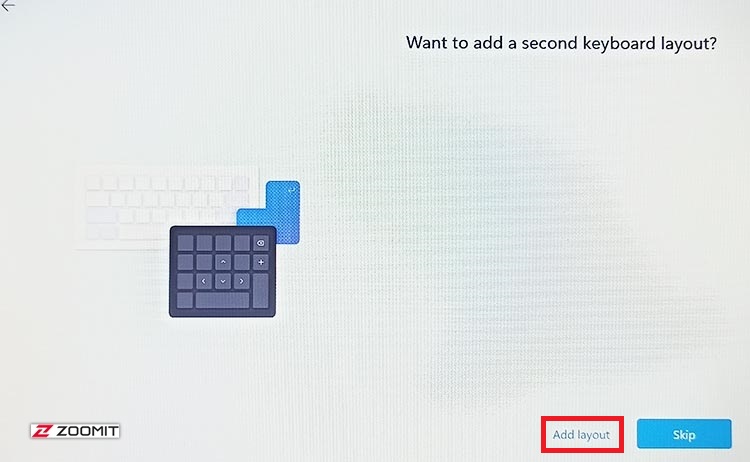
- Find the Persian (Iran) option and click Next after selecting it.
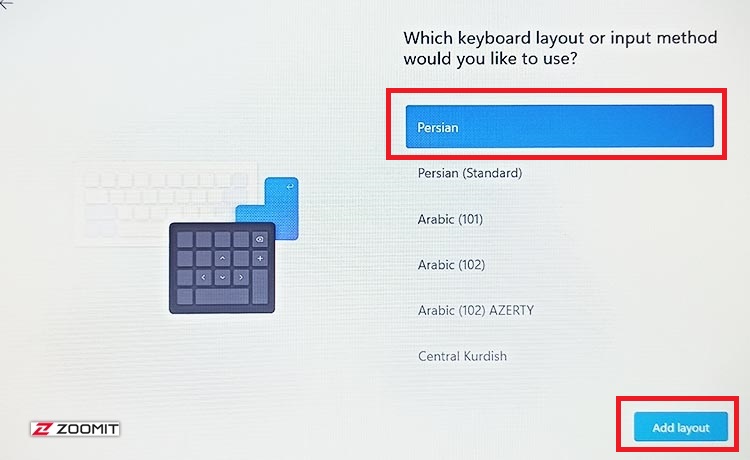
- Select Persian and click the Add layout button.
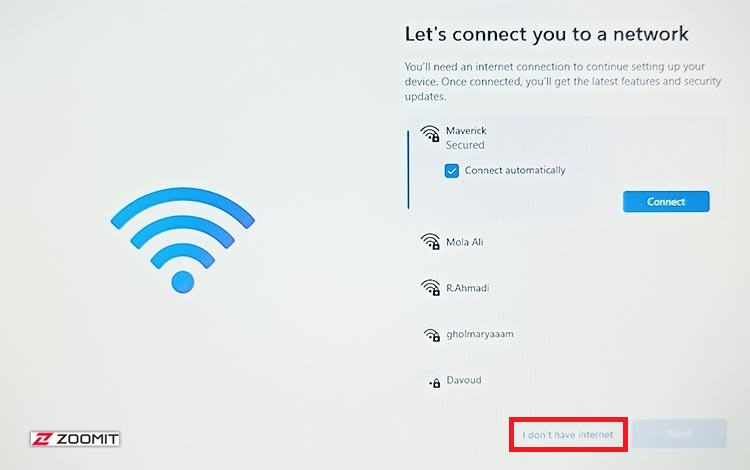
- On the next page, if you are using Wi-Fi internet, select it and connect to your network by clicking connect and entering the password. Otherwise, click on I dont have Internet.
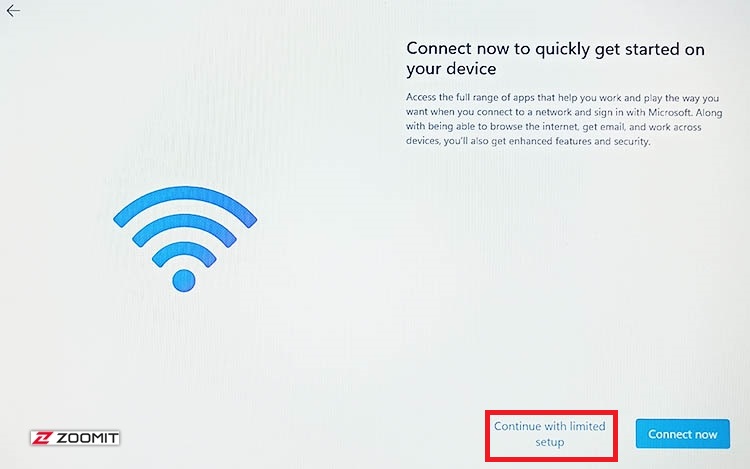
- You will be asked to connect to your Microsoft account on the next page. We suggest skipping this step by clicking Continue with limited setup.
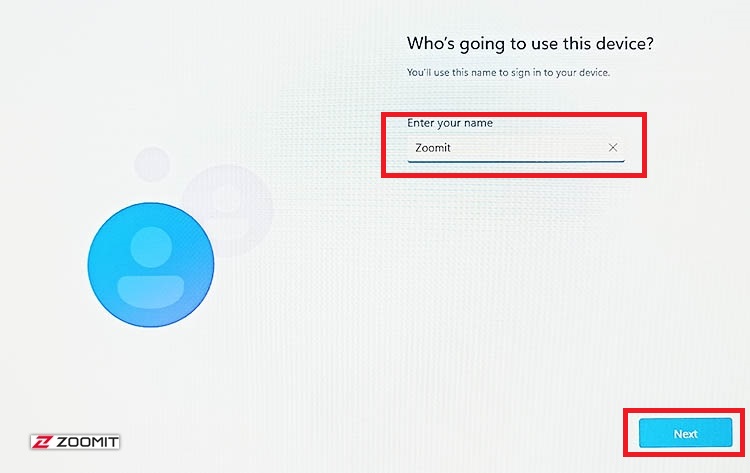
- In the next step, you need to enter your desired name for the computer or laptop. This name can be anything, including your real name.
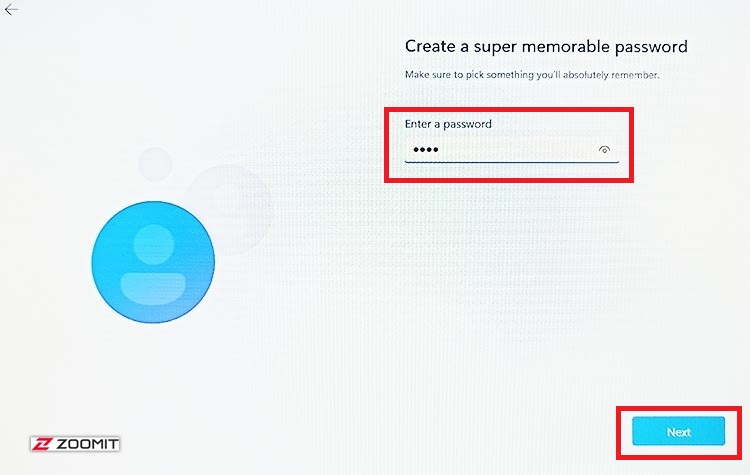
- In the next step, you need to set a password to enter Windows. Be sure to choose a password that you won’t forget later.
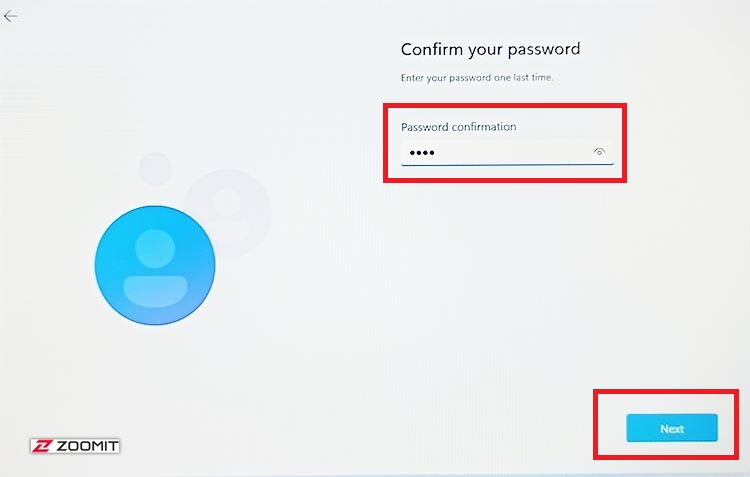
- Enter the password again and click Next.
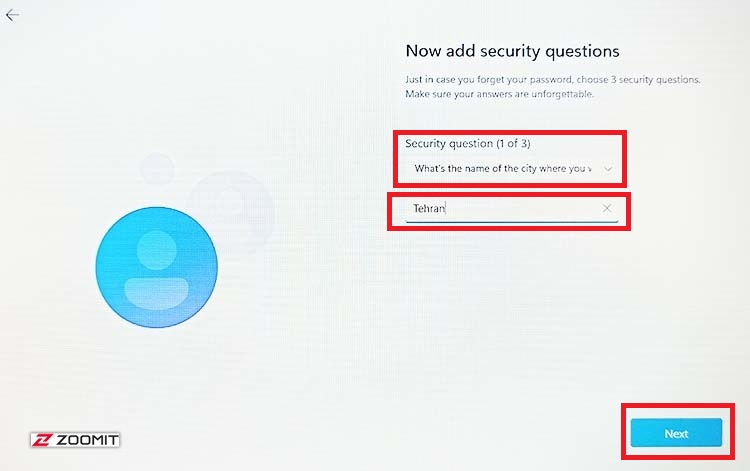
Now you have to choose three security questions for your system and write their answers. These questions can reset your password when you forget it and save you from reinstalling Windows.
- Choose a question from the drop-down menu, write the answer in one word, and click Next. You should repeat this two more times with other questions.
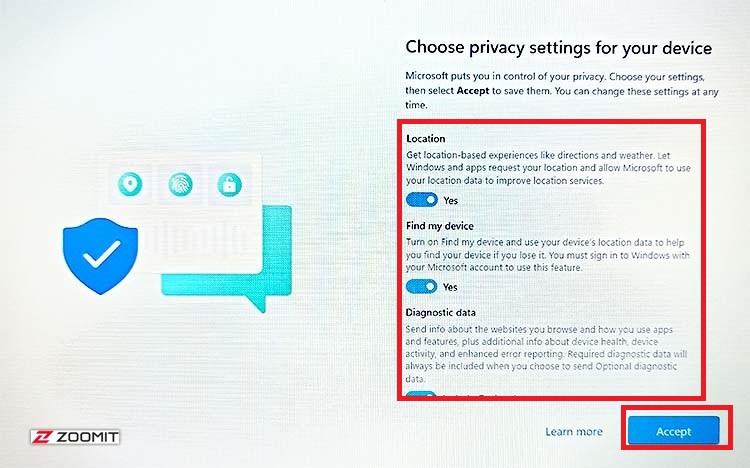
In the last step, you need to configure Windows privacy settings. Disable them if you don’t want to. In the window that opens, Windows will ask you to allow access to information such as your location or check your system data for troubleshooting.
- Finally, click on Accept.
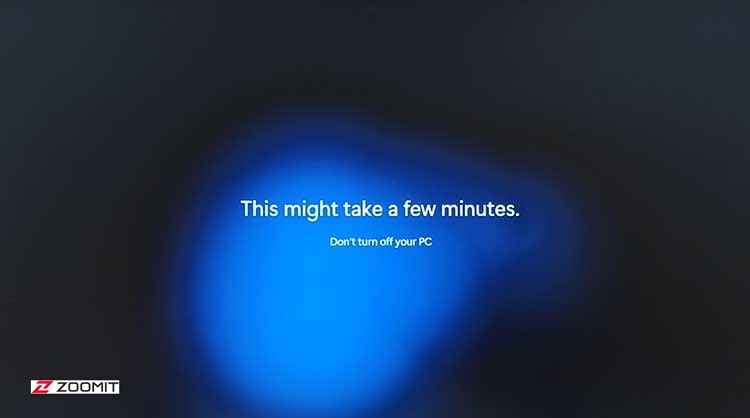
- Wait a while for Windows to start. This step may take some time.
Now Windows 11 is ready, and you can enjoy working with Microsoft’s new operating system.