


cPanel free SSL activation and automatic renewal
With the emergence of websites and expanding activities in the web space, Internet users are looking for websites that provide their security well. One of the ways that internet website owners can ensure the security of their website and customers is SSL activation. SSL is a security certificate that secures people by encrypting the data entered on the website. But the question that arises here is how to enable SSL. In this article, we decided to tell you how you can activate free SSL in the. If you are using a direct admin host, you can read the Direct admin SSL installation tutorial.
The topics covered in this article are as follows:
- SSL activation on the host
- The effect of SSL installation on website security
- How to activate automatic SSL in cPanel
Free SSL activation in cPanel
In general, website owners need to work on the security of their websites to gain the trust of Internet users. The best action that can be taken in this field is to install and activate the SSL certificate on the host. For this, you need to enter your host‘s control panel and apply the settings related to the installation of the SSL certificate. Of course, keep in mind that sometimes due to several reasons, we may need to disable SSL in cPanel, which we have provided you with the training.
One thing to keep in mind is that you may be using different control panels. Currently, cPanel and Direct Admin are two very popular user panels that are used by most hosting companies. You can first read the instructions for installing and activating SSL in cPanel and Direct Admin and proceed according to them. Then proceed with the automatic activation of SSL as described in this article so that you no longer have any problems with the security of your website.
The effect of SSL installation on website security
One of the ways to create a secure connection between the client and the server is to use SSL encryption. certificate SSL stands for Secure Layer which Socket is secure data transfer. For this reason, many users prefer to use websites that can ensure the security of their information.
To be able to determine whether SSL is enabled on a website or not, you need to look at the website’s URL,If the website link starts with https, you can find that the SSL activation process has been done for that website.
How to activate free SSL in cPanel hosting
You can make your website’s free SSL automatically activated in cPanel with a few simple steps. To do this, you can proceed as follows:
🟢🔵 Be careful, if you are using the WordPress content management system, after activating the SSL certificate in the cPanel host, you must go to your WordPress counter and, according to the tutorial mentioned in the green box at the beginning of the article, add the certificate in addition to the WordPress host. also, activate.
In the first step, you must enter your user panel in cPanel. Then scroll on the page and select SSL/TLS Status from the Security menu.
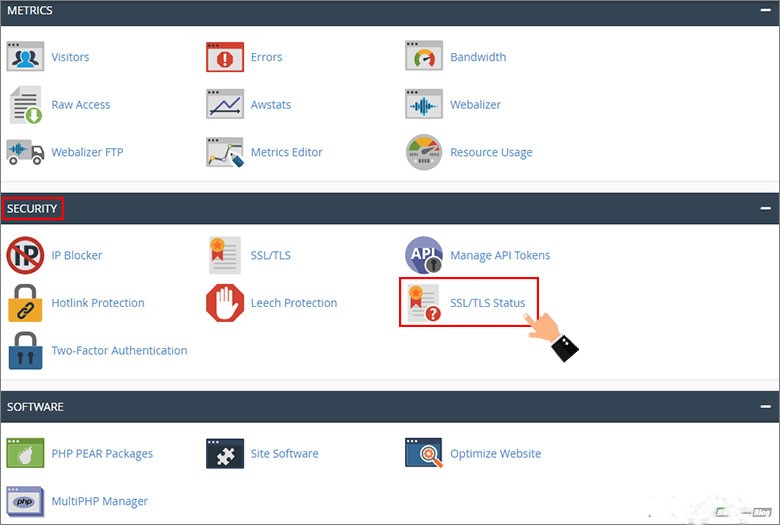
On this page, you will see a table that shows all the domains and their security certificate validity status. There is a box next to the name of each of the domains, by clicking on each of them, you can put the status of the domain you want in the selected state.
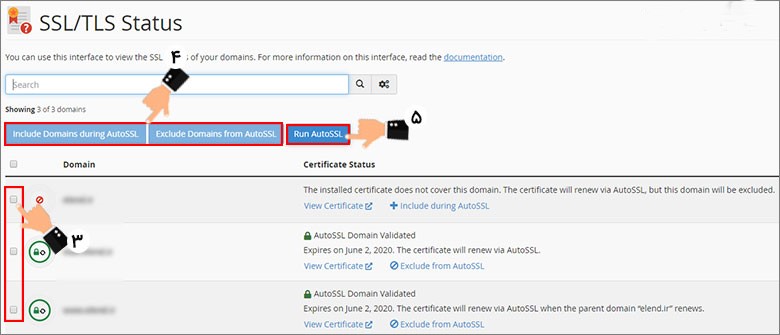
At the top of this table, you will see three buttons that you must use when activating SSL. These three buttons are:
- include Domain during AutoSSL: after activating the tick next to the desired domains, by clicking on this option, you determine that SSL activation will be done only for the selected domains.
- Exclude Domain from AutoSSL: If you click on this button even after activating the domain tick, you are sending this command to not install SSL for the selected domains.
- Run AutoSSL: After specifying the desired domains, you must use this button to complete the SSL activation process of your website.
![]() In the last step of cPanel free SSL installation, you need to click the Run AutoSSL button to complete the automatic SSL activation process for the specified domains successfully. You should pay attention to the point that if the ssl automatic activation operation is completed successfully, a gray mark is placed next to the domain, and the word “AutoSSL Domain Validated” is displayed in the Certificate Status section.
In the last step of cPanel free SSL installation, you need to click the Run AutoSSL button to complete the automatic SSL activation process for the specified domains successfully. You should pay attention to the point that if the ssl automatic activation operation is completed successfully, a gray mark is placed next to the domain, and the word “AutoSSL Domain Validated” is displayed in the Certificate Status section.

How to detect the installation of an SSL certificate
- Be careful, after installing the SSL certificate, and the HTTPS protocol will be displayed instead of the HTTP protocol at the beginning of all the links on your website.
- In new browsers, the lock icon is gray in shape
 It is displayed next to the address bar.
You may have defined several domains on your host and each has its own SSL certificate. It is very smart to apply the Let’s Encrypt certificate on which domain and renew it in a certain period of time, i.e. 3 months. In this way, the free SSL certificate of cPanel is applied to the desired domains, and you will no longer need to renew them manually.
Now the question that may be raised is, what will be the status of SSL expiration of cPanel hosting? Do you have to extend it after the set date?! In answer to this question, it should be said that the policy adopted by Cpanel to provide SSL is that the provided SSL will be renewed automatically and you don’t need to do anything else.
A very important point of WordPress SSL installation: after activating the free SSL certificate and finishing this tutorial, if you are using the WordPress content management system, you can also follow the tutorial below to activate the SSL certificate in WordPress and change the HTTP protocol to HTTPS.
Enable SSL on WordPress
In the previous versions of cPanel, we went through the steps of installing free SSL in cPanel separately, but now you can simply activate or deactivate free SSL hosting in cPanel with one click. If for any reason you decide to delete your free or commercial SSL certificate, get help from the following tutorial.
How to disable SSL in cPanel, how to disable SSL in WordPress
Disabling SSL in cPanel
Sometimes, due to various reasons, such as preparing a commercial certificate, installing CDN, technical problems, etc., we may have to remove and disable SSL from cPanel. In this case, you should go to the display section of installed certificates and click on the uninstall link in front of ssl. Due to the importance and sensitivity of deactivating SSL tutorial has been prepared in this regard, by reading it you will be able to manage the certificates installed on your host properly.
Fixed displaying SSL with error
Note that all addresses, files, etc., must be on the page. Otherwise, the lock icon in the address bar of the browser will be associated with an error. To solve this problem, just check the elements of your page, such as images and other files, and if they exist, change them from http to https so that the error related to SSL disappears