


Training on how to fix the Optimize images error in GTmetrix
The use of images on the website make up the majority of the files uploaded on a site and have a great impact on creating changes in the appearance of the site. All of us use at least one image on our site and in every article so that we can get higher in Google image search. In the meantime, we always try to use high-quality and beautiful images to make the visitor follow the content of your site to the end by reading the visual message at the first glance. But an important condition for using images on the site is unfortunately ignored, which is nothing but Optimize images or optimizing site images. This optimization is examined from two aspects, the first part includes the size of the images and the second part includes the size of the images, where we mean the size of the images.
In this tutorial from Hostfa’s knowledge base, going to address how to fix the Optimize images error in GTMetrix, in which I will introduce several different solutions so that you can reduce the size of images as much as possible. So, if the images you use on the site are too large, stay with us until the end of this tutorial.
Training on how to fix the Optimize images error in GT Matrix
As I mentioned, optimizing the images of a site includes two parts, each of which is related to the things that I will explain below.
- Optimizing the size of images: In this section, we have to make sure that the size of the images we use on the site pages, while having the maximum quality, have the minimum possible size. The options that can affect the increase in the size of images include ALT images, image titles, image details, image resolution, size, file format, etc.
- Optimizing the size of the images (Serve scaled images): This option is only related to the size and resolution of the images.
By default, content management systems such as WordPress have the ability to reduce the image size to some extent when you upload an image. But this amount is not in such a way that you can set it as desired and for this you have to use plugins. So, when you upload an image that has a large volume, you should use every possible tool to reduce its size while maintaining the quality.
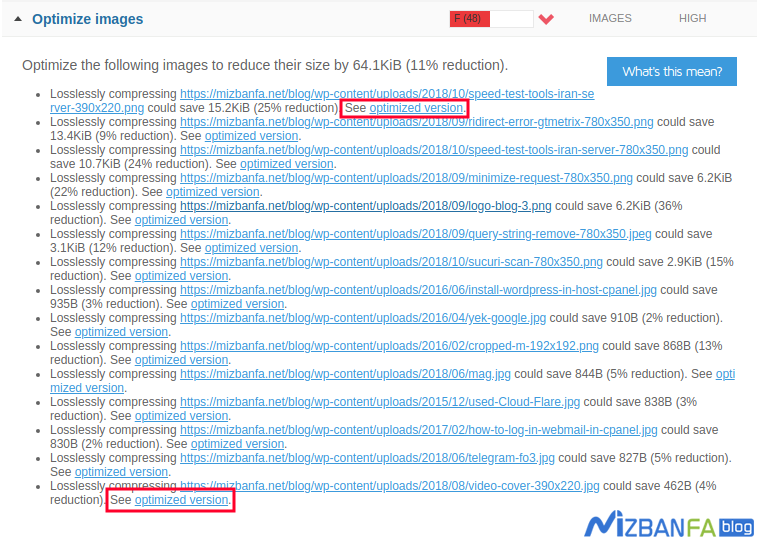
When you encounter an increase in the size of images on the site, this error will be displayed as above in GT Matrix, which you can fix by reducing the size of the images. There are several solutions for this, which I will examine each one.
1. Using image editor programs
The first and best way to reduce the size of site images is to prepare the output file so that it has the minimum size when we create our own image for uploading to the site. For example, in the Photoshop program, we can optimize the image for use on the website by using the save for web feature when saving and outputting the final image. Or to reduce the size of the image by changing the resolution of the photo and reducing the quality of the image to an acceptable level.
Another one of these methods is to delete the information stored in the image when outputting. For example, when you take a picture with your smartphone and intend to use it on the website, information such as the geographic location of the picture taken, the phone model, the date the picture was taken, etc. is saved, which we do not need to use the site. So it is better to remove these options from the image when outputting the final image.
2. Use the correct format selection
between two png formats. and jpg. which have the most formats of images, PNG images. They are of high quality and therefore the volume of these images will be high. But images that output as jpg. They have relatively lower quality and in addition, you can specify their resolution in three levels. If they are on medium or low resolution, they will be smaller.
So, in order to have a smaller size, I suggest that you use an image format that has the smallest possible size while not affecting the quality of the image.
3. Choose the right size
Unfortunately, the biggest mistake that causes images to be used in a non-standard way is that site managers do not use the correct size. This option is visible even when the index image is specified for the text. When you choose an image as the index image, if it is larger than the size specified for the format, it will be cut, and this cutting will make you not use the image with the original size at all and host fill On the other hand, cutting is done on the site and therefore you don’t have a choice to specify the size and percentage of volume reduction. So, your image will take up a large volume and the size of the image will be added to the end of the file name, which will add image data and increase the size of the image.
In the first step, you should see what standard size your template uses for images, so that you consider the same size when creating the image. The images that are placed inside the writings must follow the same rule and by knowing the standard size for the width of the image, specify the height based on the width to the standard size.
4. Using online tools
In the next step, before you upload the image, you can make a general change on the final size of the image using online sites that allow you to reduce the size of images. The site imagecompressor.com one of the best online tools for reducing the size of images, which you can determine the amount of quality change after uploading the photo and determine it online. After specifying the desired quality, take an output from the image and compare the size of the original version with the size of the image that this site gives you. You will see that the results are at a very good level.
5. Using extensions and plugins
After you have reduced the size of the images with the editor program and online tools, finally it is the turn of the site content management system to reduce the size of the images. In WordPress , there are many plugins to reduce the size of images in WordPress, one of the best of them is the smush it plugin, which I introduced in the article on optimizing images in WordPress . In addition, in the article on the best plugins for reducing the size of WordPress images , some good plugins for this work are introduced that you can use.