


How to fix serve scaled images error in GTmetrix
The use of images on the website make up the majority of the files uploaded on a site and have a great impact on creating changes in the appearance of the site. We all use a few images on our site and in each article so that we can get higher in Google image search. In the meantime, we always try to use high-quality and beautiful images to make the visitor follow the content of your site to the end by reading the visual message at first glance. But an important condition for using images on the site is unfortunately ignored, which is nothing but optimizing the site’s images in terms of size, which we learn about in the topic of site optimization test called serve scaled images. This optimization is examined from two aspects, the first part includes the size of the images and the second part includes the size of the images, where we mean the size of the images.
In this tutorial from Hostfa’s knowledge base, going to address how to fix the serve scaled images error in GT Matrix, in which I will introduce several different solutions so that you can determine the size of the images in a standard way. So, if the images you use on the site are large, stay with us until the end of this tutorial to discuss image optimization.
How to fix serve scaled images error in GTmetrix
When you encounter the serve scaled images error while testing the site speed with GT Metrics, you will encounter an image similar to the one below. The problem of serving scaled images means that the images are not in the correct and standard size.
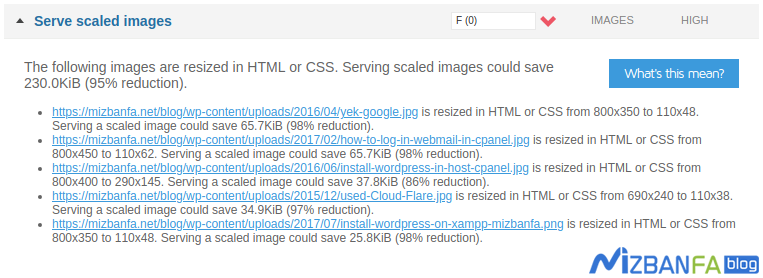
Any image that is not placed optimally, in front of it, the standard size that you can use is shown along with its compression rate, which if you can get close to this number, it will have a great impact on the loading speed of your site pages. Now that we are familiar with this error, let’s see what is the cause of this error.
When you use a template where the standard size of index images for posts is set to 350×800, you must use the same size in all posts so that based on the features of the template for other sections such as related posts, displaying content in the sidebar, etc. Use image cropping. So, when you upload the image, WordPress comes and cuts the 350×800 pixel image that you upload in several different sizes, each of which is to display the text in a different part of the site. As an example, an image with a size of 110*48 may be used for the sidebar. If we assume that our original image, which is 350 x 800, has a size of 600 KB, then when it is cut, it may reach 60 KB, which is a very good number.
But there are some templates that don’t have this feature and they don’t cut images in different sizes. This is where the size of the images is changed using CSS, and it is said in the template that to display the latest content in the sidebar, use CSS to display the image size, for example, on 48*110. The bad thing happens right here and the main image is displayed with the same size of 600 kilobytes. In this case, 600 kb of your host traffic is used to load this image. If we assume that this image is loaded for 1000 visitors per day, In this case, you have to lose 600 MB of bandwidth for this number of visits, if you cut the image and its size reaches 60 KB, you will only use 60 MB of bandwidth per day for this number of visits.
Method 1: Using a photo editor (recommended)
In this method, you should be familiar with your format and make the images that you intend to use in the articles with a standard size. As an example, in the standard format for index images taken on 405×780 pixels, when you use this size, the images that are cut in other sizes are also standard. So, when you are creating an image for text, you should use this size so that there is no need for a template, and use CSS to make the image size smaller. Although this option is not used in WordPress and WordPress itself performs this cut depending on the possibility of the format, but if you use a very large image, it may lose its standard size when it is cut.
The second method: using an online tool
One of the online sites that you can use to change the size of your images is Imageresize, which allows you to upload images from your computer and upload them from an address. Just click on the button below to go to the desired site.
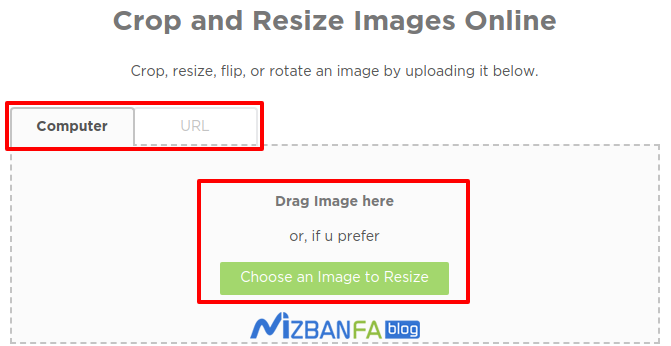
After entering the site, you can upload the image or enter the image address from a site. Then this image is placed on the site’s servers, and with the tool it provides, you can create the desired size for the image and finally prepare an output from it. Now, if you upload the image on the site with the standard size, the error “serve scaled images” will be resolved.
The third method: cutting images by the site builder
WordPress gives you the option of cropping images in three levels: large, medium, and small. But there is no way you can do more than this number on cutting images and you have to use the plugin for this. One of the good and at the same time plugins in WordPress is named Imsanity in the WordPress repository, which allows you to consider different sizes based on your template settings for images that when you are uploading, in addition to WordPress’ own sizes, with this The sizes of the images are also cut