How to Fix Hard Drive Not Detected During Windows Installation
If you are one of the users who encountered a space when choosing a drive or hard partition to install Windows, and the message “no drives were found” caused you concern, we have good news for you. The problem of not recognizing the hard drive when installing Windows has many reasons; fortunately, all of these have their own solutions. You can identify the hard drive partitions by implementing them and continue installing Windows.
Incompatible drivers, incorrect BIOS or UEFI settings, partition format incompatibility, and other reasons are among the most important reasons why the hard drive does not recognize it when installing Windows. Find specific solutions for each, try them, and get your desired result.
Of course, suppose you are planning to install a Windows server, and you don’t want to face such issues. In that case, we must say that you are very lucky because by purchasing a Windows virtual server, you will be the owner of a server with Windows, which, if its features are suitable for your needs. Choose, be sure that with your Windows virtual server, you can focus on your main goals and continue on the path without worrying about the edges, such as the hard drive not being recognized when installing Windows.
Now it’s time to get to know the reasons and effective solutions to solve the problem of not recognizing the hard drive when installing Windows, and go through this daunting process safely:
Reasons for the problem of not recognizing the hard drive inthe Windows installation
This error occurs when the Windows installation tool is unable to identify the drive or hard disk partition of your system, and in this case, you cannot actually select the desired partition to install Windows and enter the next step.

But what is the reason for this problem?
This problem has many reasons, the most important of which are the following:
- Hard disk failure
- Loose or improperly connected SATA cable
- Defective SATA cables
- Incorrect BIOS/UEFI settings
- Improper partitioning or formatting of the hard drive
- Failure to install, incomplete, or outdated hard disk drivers
- Windows system file corruption
Failure of connections on the motherboard - Incorrect connection protocol of the motherboard andthe hard disk
- Hardware interference
- Software issues
The above cases are among the most important reasons for the problem of not recognizing the hard drive, and if you are ready, we will provide you with the solutions for each of them so that you can get started and solve this problem as quickly as possible.
Method 1. Restart your system.
Restarting the system is one of the first solutions to most problems. Of course, this method works only for solving software problems; hardware problems, including the hard drive, cannot be solved with this method.
In general, it is recommended that you try this method at the very beginning to ensure that there are no software issues and interactions. After you see that the problem is not solved easily, try the following methods.
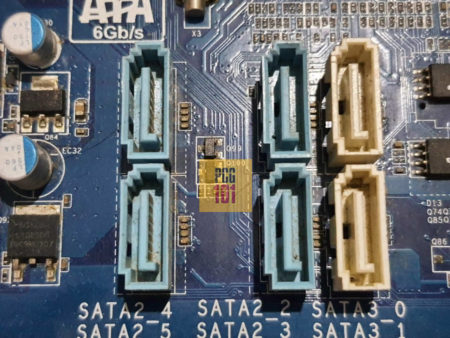
Method 2. Try another SATA port.
The SATA port is the physical interface between the motherboard and the hard disk, and the defective cable or the port where the SATA cable is connected causes the hard disk not to be recognized when installing Windows.
Also, because the system’s motherboard has several SATA ports, signal interference or the incompatibility of the SATA Mode settings with the hard drive settings can be the reason the hard drive is not found when installing Windows.
It is better to point out that this solution is suitable for solving the problem of not finding the hard drive in desktop computers, and changing the SATA port in laptops does not help to solve the problem of not recognizing the hard drive, because in most laptops, the SATA port is built in and does not have an independent structure.
So changing the SATA port can be a good solution to solve this problem in desktop computers. Of course, before doing this, it is better to make sure that the SATA cable is healthy and then go through the following steps.
1. Turn off your system and unplug it.
2. Open the computer case and find the SATA hard disk cable.
3. Check if the SATA cable is firmly connected to the hard drive and the motherboard.
4. Press the side part of the cable and disconnect it from the port.
5. Connect the cable to another SATA port.
Usually, motherboards have 2 to 6 SATA ports that are numbered, and you can find them by looking closely.
6. After ensuring the cable is firmly connected to the SATA port, close the system case again.
7. Turn on the system and enter BIOS/UEFI by repeatedly pressing the DEL, F2, ESC, or … button.
8. Go to the SATA Mode section through the Storage or SATA Configuration section and set it to AHCI or IDE (preferably AHCI).
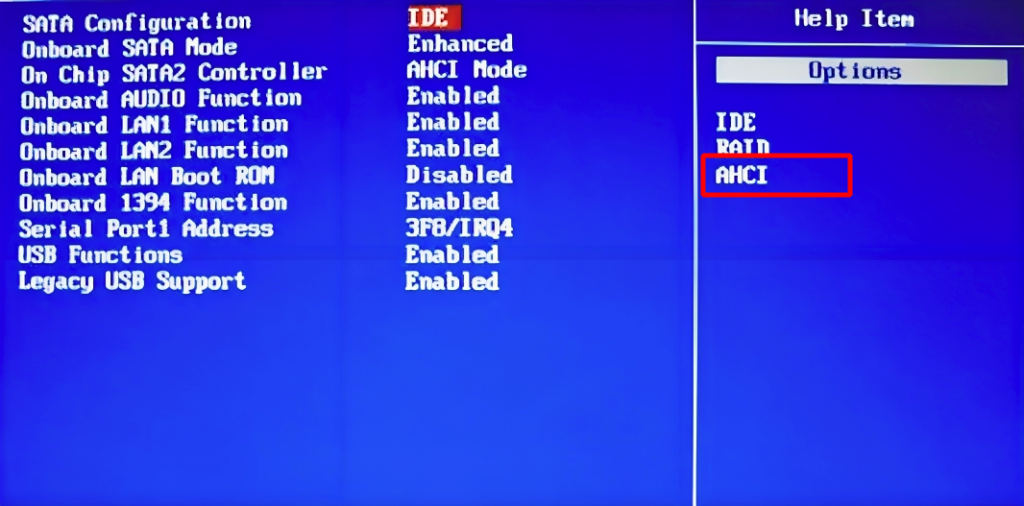
AHCI is suitable for most new versions of Windows (7 and later) and has better performance in addition to providing more advanced features.
9. Save changes and exit BIOS/UEFI.
10. Turn on your system.
11. Start the installation process and see if the problem of not recognizing the Windows hard drive is solved or not.
Method 3. Update the RAID hard drive driver.
To implement this method, you must first download the new Raid Controller driver compatible with the system motherboard manufacturer and put it in a USB flash drive. So follow the steps below:
1. Using another system, download and save the appropriate RAID controller driver from the manufacturer’s website (e.g., Intel).
2. Connect the USB flash drive to the system, unzip the driver file, and extract its contents to the flash drive.
3. Connect the bootable flash containing the Windows installation file and the flash driver to the system where you intend to install Windows.
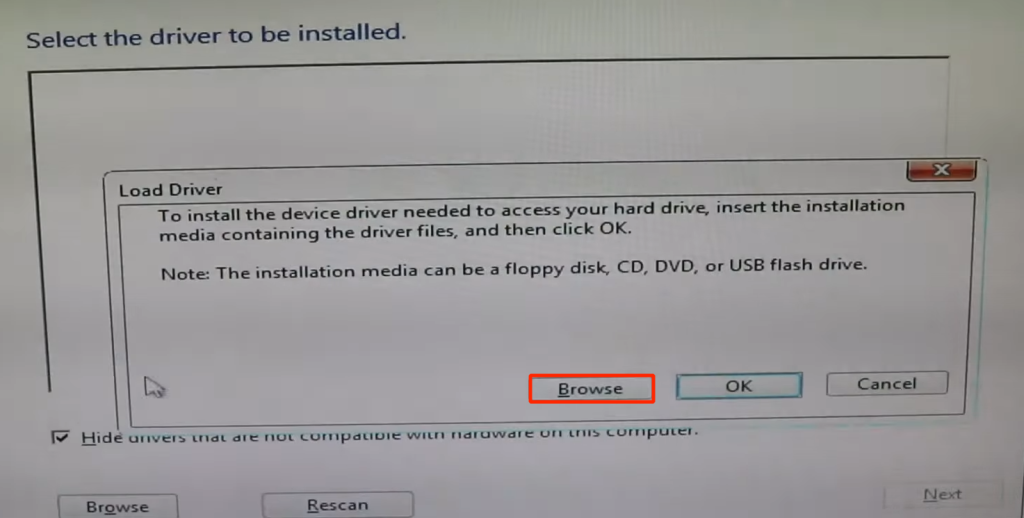
4. Start the Windows installation process with a bootable flash, and when you get to the partition selection stage (an empty window without a hard partition), click on the Load Driver option.
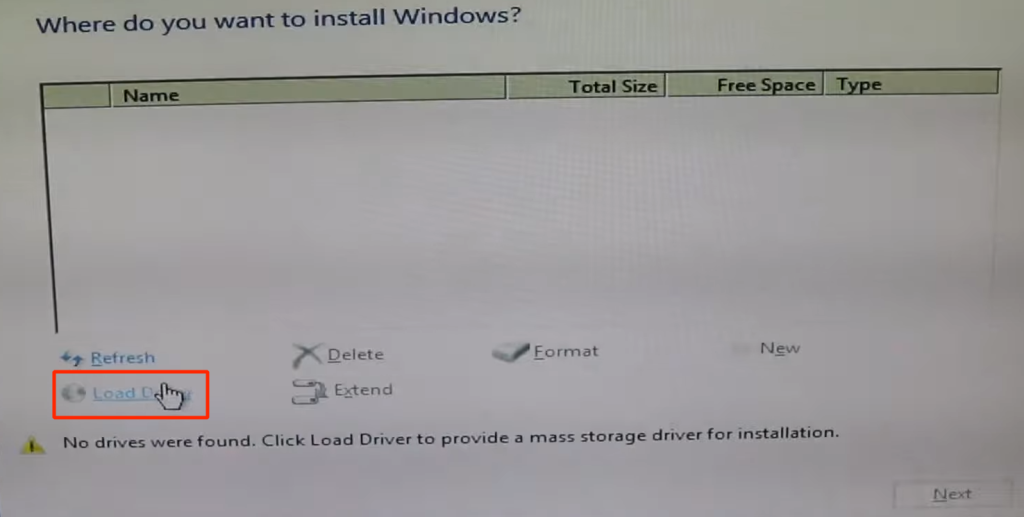
5. From the Load Driver window, click Browse.
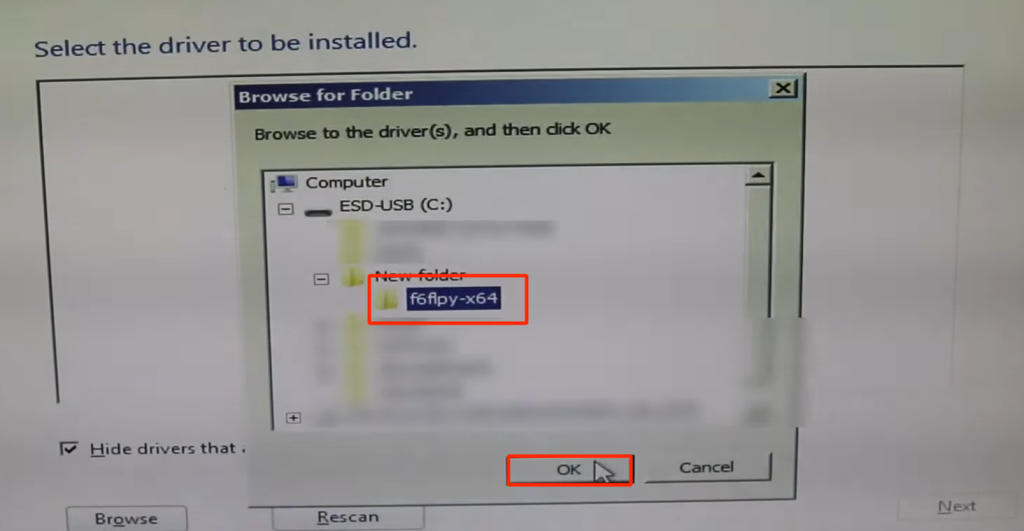
6. Find the controller driver folder and click ok.
7. Select the found driver from the list of drivers and click Next.
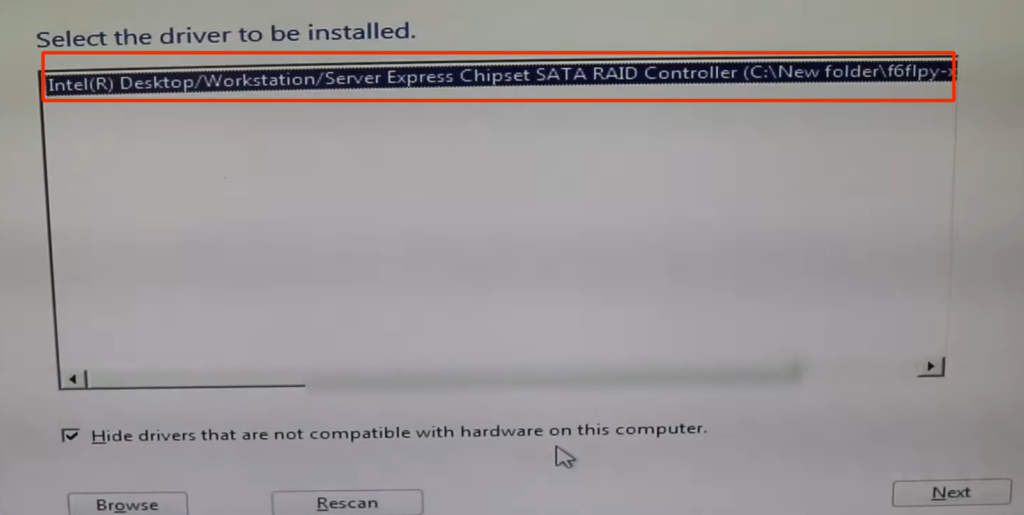
If you do not see a driver in the list, uncheck the Hide option to display the drivers.
8. Click refresh once.
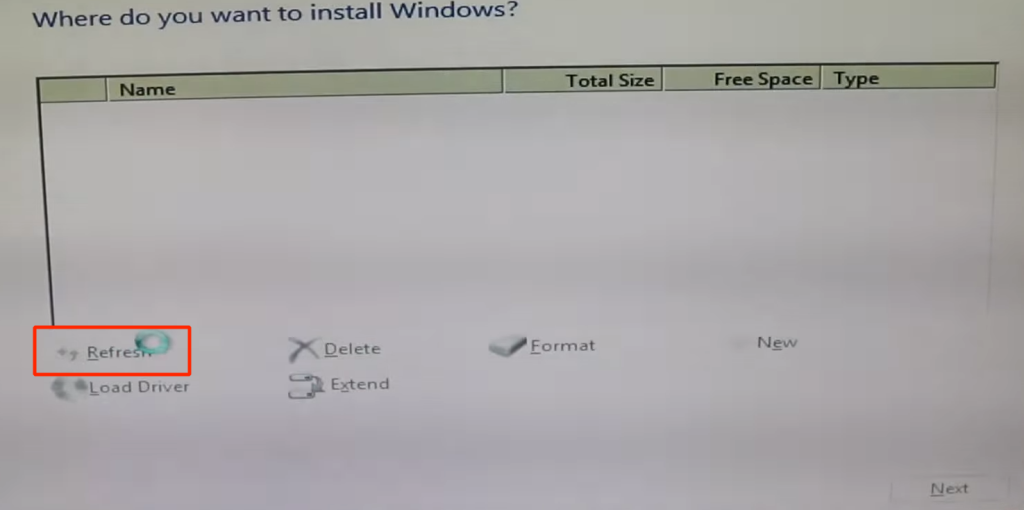
Most likely, after doing this, you will come across your hard drive partitions. You just need to select the desired partition to install Windows and enter the next step.
Method 4. Check BIOS or UEFI settings.
To resolve the issue of Windows not recognizing the hard drive during installation, check the BIOS settings to ensure the drive is configured to be recognized.
So follow the steps below:
1. Restart your system and before booting up, press the Del button, F, or the appropriate BIOS button several times to enter the BIOS settings section.
2. Open the Advanced tab with the arrow keys and go to the SATA Configuration section.
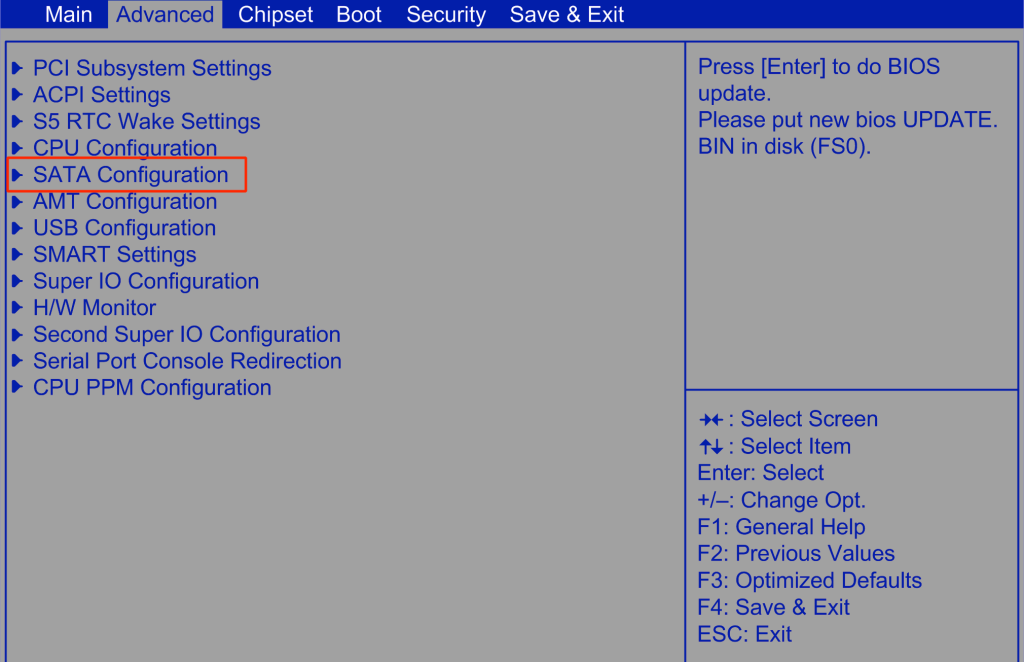
3. Now that you have found SATA Mode, hit enter and choose one of the 4 modes: RAID, IDE, AHCI, and ATA (preferably AHCI).
4. Save the changes and exit the BIOS.
5. Restart the system and check if the problem of the hard drive not being recognized during Windows installation is solved.
Method 5. Reset the BIOS.
If updating the controller and adjusting the BIOS settings did not resolve the hard disk not being recognized, you can also try a BIOS reset.
1. Restart your system and before booting up, press the Del button, F, or the appropriate BIOS button several times to enter the BIOS settings section.
2. Go to the exit tab and select Restore Defaults.
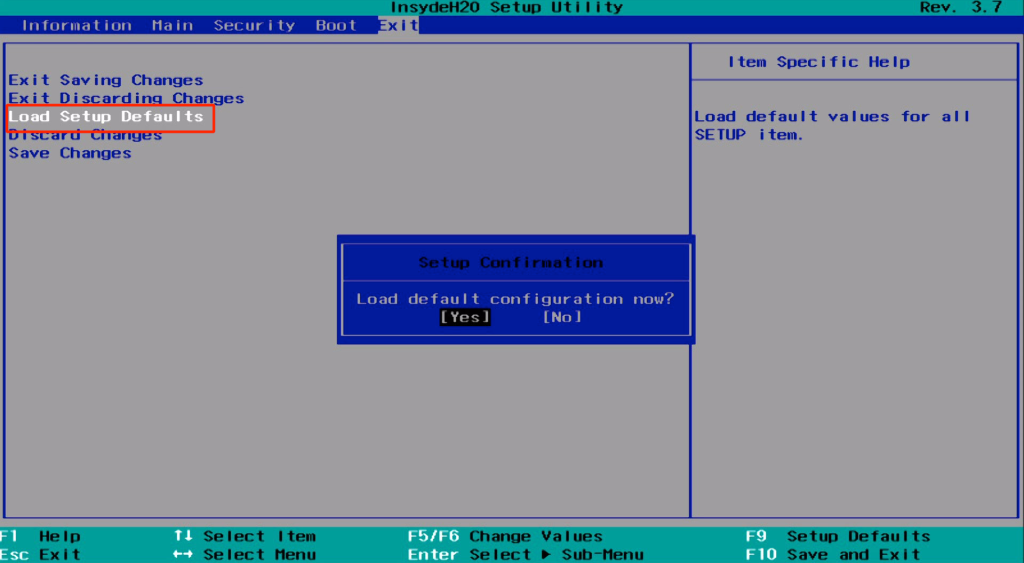
3. Select yes and press Enter to restore the BIOS.
4. Save the changes and exit the BIOS.
Check if the problem of partitions disappearing during Windows installation is solved or not.
Method 6. Format the system hard disk.
If you have backed up your important system data, you don’t have to worry about deleting the hard disk partitions. We recommend that you format the system hard disk by following the steps below:
1. When selecting the partition to install Windows, press Shift + F10 to open the command prompt.
2. Run the following command to open the Disk Partitioning utility:
diskpart
3. Check the list of hard disk partitions with the following command:
listdisk
4. Select the desired disk and put its number instead of x in the following command and run it:
select disk x
5. Run the following command to delete the desired disk:
clean
6. Run the following command to create a primary partition:
create partition primary
7. Set the format of this partition with the following command:
format fs=ntfs quick
8. Run the exit command to exit this tool:
exit
These commands delete the selected disk or disks and create a primary partition with the NTFS file system format that you can use to install Windows.
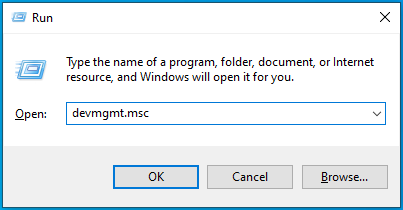
Method 8. Check the status of the hard disk.
If you are still unable to solve the problem of the hard drive not being recognized during installation by implementing the above methods, we recommend that you check the status of the hard drive and see if the hard drive itself is working properly or not! If the hard drive is damaged or defective, it is clear that the above settings or changes will not be able to repair a damaged hard drive.
So follow the steps below:
1. Press the Win + R key combination to bring up the run window.
2. Type devmgmt.msc and press Enter.
3. Click on the arrow next to the Disk Drives category to open the corresponding list.
4. Right-click on the hard drive and select Properties.
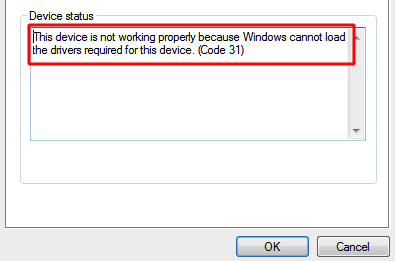
5. Go to the General or Driver tab and check the device status section.
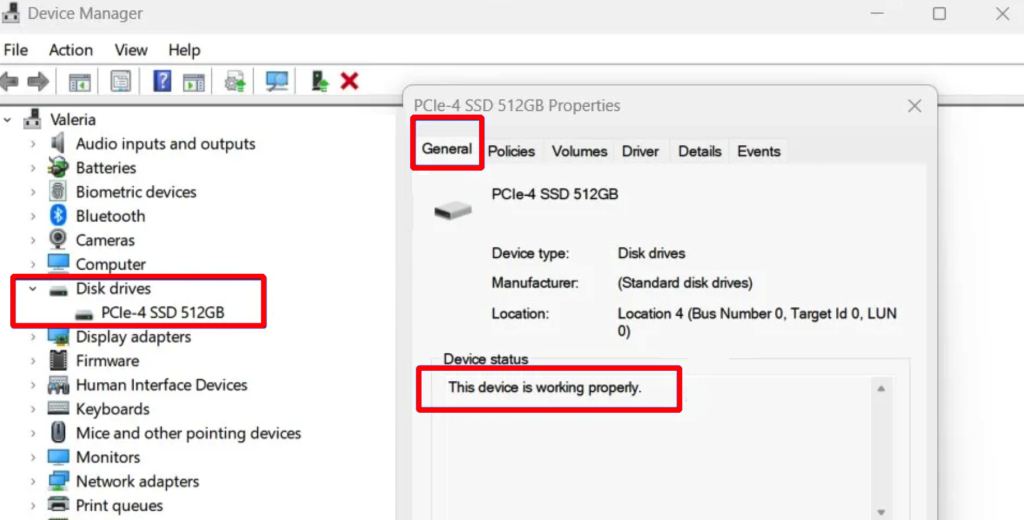
The above message indicates that your hard drive is working properly.
But when you see the following message, you should be a little worried because it shows that your hard drive is not working properly and needs to be repaired or replaced.
Method 9. Change your system’s hard disk.
If you find that the problem is with your hard drive and its failure or failure caused the problem of not recognizing the hard drive when installing Windows, it is time to repair it or, if necessary, replace it with a healthy hard drive.
If you are not an expert in this field, we recommend that you seek the help of an expert to buy a new hard drive and replace the defective hard drive in your system.
Conclusion
The problem of not recognizing the hard drive when installing Windows has many reasons, the most important of which are incorrect BIOS settings, hard drive drivers not being updated, and a defective sata port. If you do not know what is the reason for this problem, just keep calm and try to remove this problem by implementing the above methods. If your system’s hard drive is damaged, you can make a new start by buying and replacing it with a healthy hard drive. After installing Windows, you can provide the conditions for the optimal and trouble-free operation of the hard drive with solutions such as freeing up the hard drive space in Windows.
Thank you for staying with us until the end of the article. We hope that reading this article was useful for you. If you have any questions or requests and need guidance, you can contact us by registering your opinion so that we can answer you as soon as possible.
FAQ
Why isn’t my hard drive showing during Windows installation?
The drive may not appear if BIOS/UEFI settings are incorrect, SATA mode is unsupported, or necessary drivers aren’t loaded.
How can I make the installer detect my hard drive?
Check BIOS/UEFI for correct storage mode (AHCI/RAID), enable the drive, and load appropriate storage drivers in the Windows setup.
Do cables or ports affect drive detection?
Yes — faulty SATA/ power cables or using the wrong port on the motherboard can prevent the installer from seeing the hard drive.