


How to Move a WordPress Site to a New Host
How to Move a WordPress Site to a New Host
How to move WordPress to a new host and server. The biggest risk in moving WordPress to a new server is data loss or possible corruption. In this article from the series of WordPress pieces of training for the Ded9.com blog, we will introduce you to how to transfer WordPress to your new host or server.
If you need a fast and suitable WordPress host to host your WordPress site, I suggest you visit our WordPress hosting plans.
Step 1: Choose your new WordPress website host
When looking for a new WordPress host, you must choose carefully. Because if you make the wrong choice, you still have to move WordPress to other hosts.
After buying a new host, your hosting account must be empty of any files and folders in the main directory.
Step 2: Install the Duplicator plugin to transfer WordPress
You first need to install and activate the free Duplicator plugin on the website you want to transfer.
Duplicator is a free plugin that we highly recommend. This plugin can also move your site to another domain without worrying about SEO ranking.
However, in this tutorial, we will discuss moving your site to another host without losing any data.
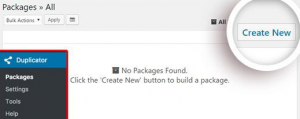
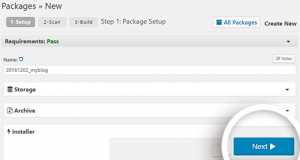
After installing and activating the Duplicator plugin, go to the Duplicator >> packages section in the WordPress admin dashboard. Then click on the “Create New” option in the upper right corner of the screen.
After that, click on Next and continue the process of creating your package.
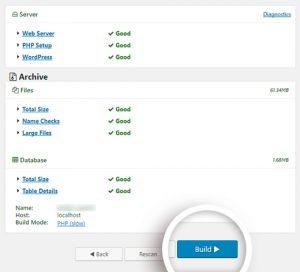
Make sure all your scan results are correct, and everything is in good condition, then click the “Build” button. This process may take a few minutes, so do not close the screen to complete the process.
After completing the process, you need to click the “Installer” and “Archive” buttons to download both files. Remember that you need both files.
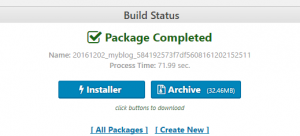
The “archive” file is a copy of your site, and the “installer” file performs the installation process automatically for you.
Step 3: Import the WordPress site to the new host
Now that you have downloaded the archive and installer files, the next step is to upload these two files to your new host. You can do this using FTP. (Introducing 5 of the best FTP clients for WordPress users)
Upload both “installer.php” and “archive.php” to your website’s root directory using your FTP client or file manager. This directory on the host is usually: / username / public_html / or /username/public_html/example.com, which, as you know, example.com will be your domain name.
Make sure this directory is empty and contains no files. If you already have default files or even WordPress installed, remove them.
Step 4: Modify the hosts’ files to prevent corruption
After you have uploaded the files to your new host, you should be able to access the installer.php File from your browser. This File can be accessed through the following address:
http://www.example.com/installer.php
If you get a new domain and your hosting is set up, it’s easy to run through the setup page, and you should move on to the next step.
But if you try to connect your previous domain with another host that is now set to this host, it will redirect you to a 404 error page. Because your domain still points to the old host.
Host files point a domain name to a specific IP address.
This step will show you how to write a new line in these files to transfer the domain to the new IP host. However, only when requests are sent from your computer.
You can access the new host through your domain by making these changes.
Other users will still be redirected to your old host. This is a 100% uptime guarantee.
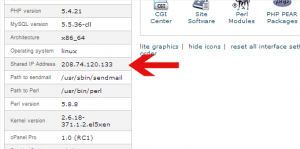
The first thing you need to do is get your new hosting IP address.
To find it, go to your cPanel dashboard and click on “expand stats” in the left sidebar. You will see information about the status of your server.
Next, Windows users should go to Programs >> All Programs >> Accessories. Then right-click on Notepad and select Run as Administrator.
Wait for UAC to ask for permission to run it. Then, by clicking Yes, Notepad software will be run with Administrator access.
Go to the File>> Open tab on the Notepad page and navigate to C:\Windows\System32\drivers\etc. Select the hosts’ File and open it.
Linux users should also open their terminal program and run the following command to change the hosts’ File:
sudo nano /private/etc/hosts
At the bottom of the host files, they should enter the IP address they copied along with the domain of their site as follows:
192.168.1.22 www.example.com
Save the changes, and you can now access your files on the new host using your site’s domain name.
Important: Don’t forget to uninstall these changes and delete the last row after the WordPress site migration is complete.
How to move WordPress to a new host and server
Step 5: Start the WordPress migration process with Duplicator
Now we are ready to run the “installer” file. Go to the following address in your browser and replace example.com with your domain name.
http://www.example.com/installer.php
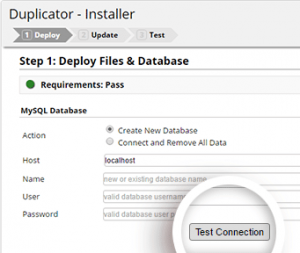
If you have never created a database for your new host, you must create one in cPanel.
After creating the database, you must enter its information in the following fields and then click the “Test Connection” button to test the connection.
After successfully connecting to the database, scroll to the bottom of the page and read the Warnings and Notices section. Then check the “I have read all the warnings & notes” checkbox and click the “Run Deployment” button.
Here the installer starts importing your database. It may take a while.
Step 2 of the installer script will ask you to confirm your old and new URL paths. Once you are sure that this information is correct, click Run Update to update the URLs.
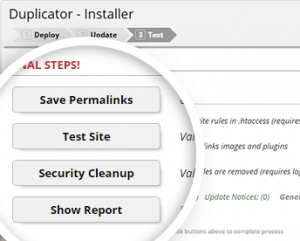
Finally, you can finish the transfer process by clicking the indicated buttons in order and testing that everything is working properly.
After successfully connecting to the database, scroll to the bottom of the page and read the Warnings and Notices section. Then check the “I have read all the warnings & notes” checkbox and click the “Run Deployment” button.
Here the installer starts importing your database. It may take a while.
Step 2 of the installer script will ask you to confirm your old and new URL paths. Once you are sure that this information is correct, click Run Update to update the URLs.
Finally, you can finish the transfer process by clicking the indicated buttons in order and testing that everything is working properly.