


Flash partitioning tutorial (3 easier methods)
Flash partitioning tutorial (3 easier methods)
There are several ways to ensure flash partitioning and even its proper organization. Drive partitioning has several advantages. For example, some advanced programs that need to be booted via Flash can be installed in separate sections on the flash.
By partitioning the flash drive, people who use it to install Windows, and after ensuring the selection of the system boot via flash, can install two different compressed versions of the operating system. This ensures that one is installed at the user’s choice. Otherwise, it is not possible if the USB is not partitioned.
USB partitions should be named to make accessing folders with a specific name easier.
Flash partitioning is especially important for those who work with it differently.
The topics that we will examine in this tutorial are:
- Flash pre-partitioning tasks
- Step-by-step tutorial on how to partition Flash
- How to create multiple partitions in Flash
- Check the success of Flash partitioning
- Flash partitioning with AOMEI Partition Assistant
Flash pre-partitioning tasks
You need to make sure you do a few things before USB partitioning. As a result, if something goes wrong, you can easily restore the previous version.
1- Supporting information (copy flash information)
It’s one of the first things you need to do. If the flash partition crashes, you do not lose your data by backing up your USB drive data. Also, go back to the previous version quickly.
2- Partitioning software for flash partitioning
It would be best to use good partitioning software to ensure that partitioning is done in the best way. In addition, You need to choose software that provides good support for the features you want and does the job easily.
Method 1: Flash partitioning without software
After installing the required tools, follow the steps below carefully so that the process can be done properly and without data loss.
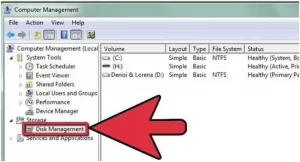
Step 1: Open the Disk Management tool. To do this, right-click on the My Computer icon and then select Manage.
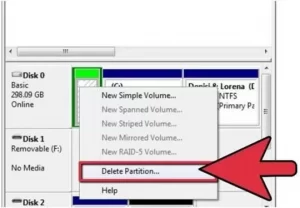
Step 2: Delete the current partition completely.
Step 3: Finally, create a new partition. The process ends.
Now create as many partitions as you want
Yes, that’s right! It is possible to have not only one but several partitions in Flash. Windows 10 supports multiple partitions on removable disks. So if you want to do this, the Mini tool partition Wizard software (download link) is the best recommendation. This tool can divide any partition into different parts by providing the partition splitting feature.
Apart from this tool, two other methods can help create multiple partitions on the flash:
Method 1: Disk management tool
Step 1. Right-click on “This PC” and select “Manage” from the popup menu.
Step 2. Double click on “Storage” to display “Disk management.”
Step 3. Find your disk and select “New simple volume.”
Step 4. Click “Next,” assign a letter to the drive on the next screen.
Step 5: Click “Next” to see a preview of the settings and click “Finish” to finish the process.
Method 2: Resize and create a new partition
You can also create a suitable space for the new partition by shrinking the current partition.
- Select the partition and right-click on it to select Shrink.
- Enter the size of the space you want to create the new partition.
- Click Ok and then return to the main interface.
- Tap the unallocated space and convert it to a new partition by creating it. Finally, click Apply.
Check the success of Flash partitioning.
- It would help if you ensured that the process was done in the best way. To do this, disconnect the flash drive and reconnect it to the system. Now several drives should be displayed on the My Computer screen.
- You should also make sure that the data transfer to the drive is possible without any problems. If the partitioning is done correctly, you can use your drive.
If you can not do any of the above, the partitioning process has failed. Do the following to solve this problem:
- You need to update Lexar Boot according to the website instructions and try to partition the drive again.
- Reconnect the flash and repeat the process.
- Make sure there are no viruses or malware on the flash.
If you have lost Flash data, you still have a chance to recover the lost data using data recovery tools.
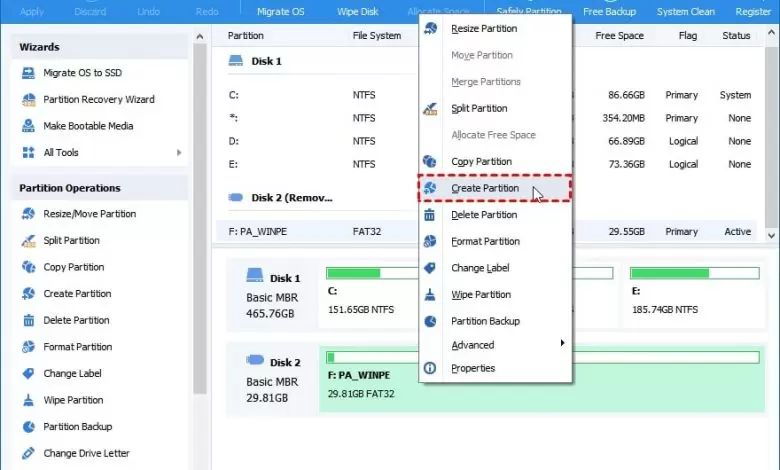
Method 2: Flash partitioning with AOMEI Partition Assistant
This section will teach you how to partition a flash drive in Windows 10 with the AOMEI Partition Assistant program.
Step 1. Install AOMEI Partition Assistant. Right-click on the USB drive and select “Create Partition.” So You can select the flash drive and click on the “Create Partition” option in the left panel.

Step 2. Specify the partition size and a letter for the drive name for the new partition. You can also edit the partition tag and the file system in the Advanced tab.
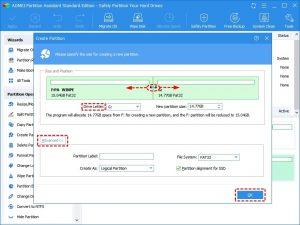
Step 3. A new partition (here called G) is created in Flash. Finally, click on “Apply.”
So By repeating the above steps, you can create multiple partitions for your flash drive with AOMEI Partition Assistant.