


AssistiveTouch training on iPhone is reviewed step by step in this article
AssistiveTouch training on iPhone is reviewed step by step in this article
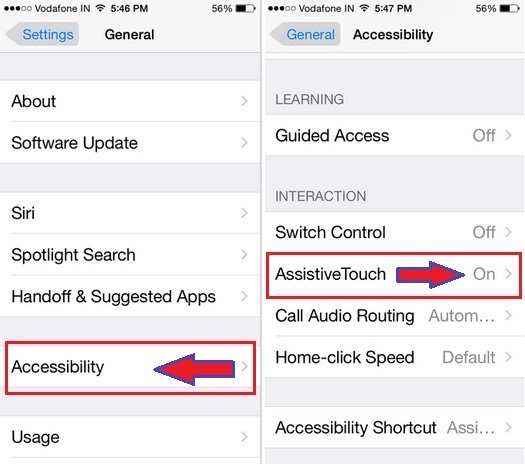
AssistiveTouch helps iPhone and iPad users to use their iPhone when the phone has a touch problem or a problem with the home button or other buttons. iPhone users can use AssistiveTouch without any accessories and to perform complex commands and gestures. It is also possible to control the iPhone and the phone’s operating system using an iPhone-compatible accessory (such as a joystick compatible with Apple devices) along with AssistiveTouch. To configure the AssistiveTouch menu, go to Settings > General > Accessibility > AssistiveTouch.
AssistiveTouch tutorial on iPhone
AssistiveTouch allows you to perform the following actions. The more you tap, the more tasks you can arrange on your operating system. The way to control the phone will be different depending on the type of accessory you connect to the phone and run AssistiveTouch on.
Open the AssistiveTouch menu:
Go to the home page of the phone (the home page on which the programs are placed.)
double tap
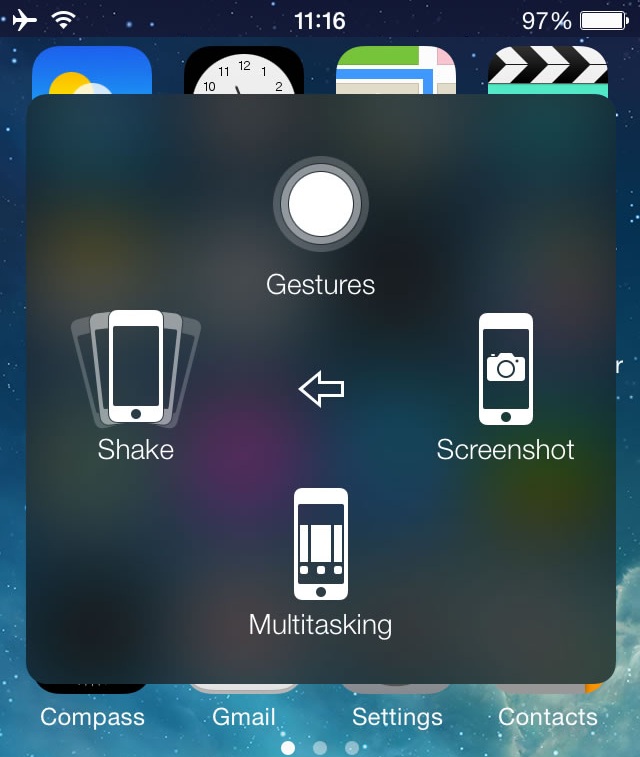
Perform multiple movements and gestures
Summoning and summoning Siri
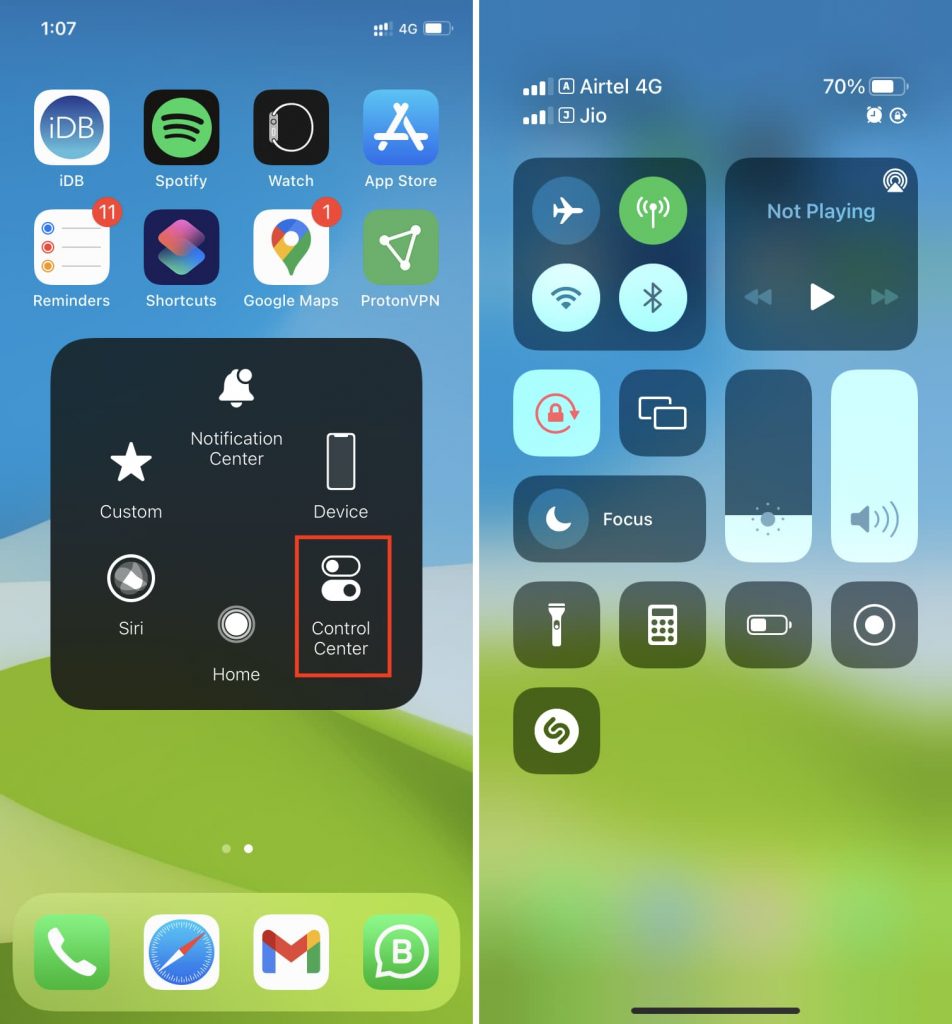
Access to control center, notifications screen, lock screen or any application
Adjust volume on iPhone
Shaking the iPhone
taking photo
Using 3D touch to view previews and open various items (in models that support 3D touch.)
Using Apple Pay (in countries and models of Apple devices that support Apple Pay.)
Make an SOS call
Read the contents on the screen
Control analytics
Restart the iPhone (restart the phone again)

Enable AssistiveTouch
You can simply say “turn on AssistiveTouch” after calling Siri. Go to Settings > General > Accessibility > AssistiveTouch or use the iPhone accessibility shortcuts. With AssistiveTouch turned on, you’ll see a floating menu button appear on the screen.
Add more features to the AssistiveTouch menu
Go to Settings > General > Accessibility > AssistiveTouch > Customize Top Level Menu. The phone’s touch assistant menu can have up to eight different activities.
Show or hide the AssistiveTouch menu
Press the floating menu button or press the secondary button on your accessory to show or hide the phone’s touch assistant menu.
Display the main screen (home page of the phone)
Tap on the menu button and then tap on the word Home.
Lock or rotate the screen, adjust the volume and volume of the iPhone, or simulate shaking the iPhone
Tap on the menu button and then tap on Device option.
Perform a 2, 3, 4 or 5 finger swipe using AssistiveTouch
First, tap on the menu button and then tap the number of digits required to perform the desired gesture through Device > More > Gestures. When the corresponding cycles appear on the screen, define the gesture for the operating system by dragging in the desired direction of the gesture. Tap on the menu button to fix the introduced gesture.
Perform a gesture related to zooming in and out (pinch)
Tap the Menu button, tap Custom, then tap Pinch. With the pinch rings appearing, touch anywhere on the screen to move the rings, then drag them in or out to perform the gesture. Tap on the menu button to fix the introduced gesture.
Create a new and desired pose
You can add your favorite movements and gestures to the control menu (for example, a gesture that involves touching the screen and holding a finger, or involving two-finger rotation). For this purpose, you should tap on the menu button and then tap on the Custom option. Now you need to tap on an empty space associated with the gesture.
In another way to create your own new gesture, you can go to Settings > General > Accessibility > AssistiveTouch > Create New Gesture. In the following, we will teach 2 examples of creating new gestures for Apple’s touch assistant.
Example 1:
To create a rotation gesture, go to Settings > General > Accessibility > AssistiveTouch > Create New Gesture. Now on the Gesture Capture screen that asks you to touch it to create a Gesture, place two fingers on the iPhone screen and rotate them around a point between them. (This can be done using one of your fingers or a pen) The only important thing is that you have to create each arc and sector separately and one after the other. If you can’t make the desired pose correctly, tap on the Cancel option and try again to create the desired pose. Once you’ve created the pose correctly, tap Save and give the created pose a name – for example, “Rotate 90”. For example, to rotate the view in the Maps app, open the Maps app, tap the AssistiveTouch menu button, and select the “Rotate 90” option from the Custom section. With the blue rings representing the position of your finger, drag the rings to the point where you want to rotate the map, then release them. You may like to create different movements and gestures with different degrees of finger rotation on the screen.
Example 2:
Now it is possible to create the gesture of touching and holding icons that we use to start running programs on the phone’s main screen. This time, on the gesture recording screen, put your finger on a point, touch it, and hold your finger on the screen until the recording progress bar reaches half way, and then, release your finger from the long screen. do. Be careful not to move your finger while recording the gesture, as this will record the swipe gesture instead of keeping the finger on the screen. Now tap on the Save option and then write the desired name for the new gesture. To use the gesture, press the AssistiveTouch menu button and then select your desired and new gesture from the Custom section. By displaying the blue circle that represents your touch on the screen, hold it and drag it on one of the icons on the home screen of the phone and finally release the circle on the desired item.
If you record a sequence of swipes and taps, they will all be executed at the same time. For example, using one finger or a stylus to record four separate, consecutive swipes at four locations on the screen, using successive finger taps simultaneously on four points creates a simultaneous four-finger tap. will do.
Exit the menu without performing the gesture
Tap anywhere on the screen outside of the menu. To return to the previous menu, tap on the arrow in the middle of the menu.
Assign custom actions to the menu button
Each single tap on the menu button opens the menu by default. To assign other actions to the menu button, go to Settings > General > Accessibility > AssistiveTouch. Under the Custom Actions option, you can assign all actions including single tap, double tap, long press, or 3D Touch.
Decrease the color of the menu button when it is not used.
Go to Settings > General > Accessibility > AssistiveTouch > Idle Opacity and then drag the slider to the left.
Move and move the menu button
Hold the menu button and drag it anywhere on the edge of the screen.