


What is a Tooltip? Design tricks like a pro!
How do you know how to drive on the roads of a country? Think about cars that move very unusually, pedestrians who accidentally cross the road, bicycles everywhere, tangled roads, and so on.
At the moment, this description sounds like a chaotic scene in an apocalyptic movie, doesn’t it?
We believe it does not take long for any of us who know the signs of traffic to crash into such a place.
We, like many other people, stop driving in that country or go to another country where there are traffic signs that make us feel safe.
Now, what if tooltips for users are like traffic signs for drivers?
Given this analogy, know that without tooltips, users will be left alone on the road without road signs.
They feel confused at a certain point and no longer use your program and look for other alternatives.
In the following, we will further examine what the tooltTooltipnd its uses.
What is a Tooltip?
Tooltips are small elements of the user interface that users encounter when they appear on a web page or application when they appear on other elements. As the name implies, Tooltips provide tips about an element or process in applications or web pages. In other words, tooltips are text boxes that provide a brief description of the elements in an application or webpage.
By looking at the example we used in the introduction to the article, you can be sure that the lack of a tooltip will confuse users.
When the tooltTooltipell is designed and used in the most appropriate place without disturbing the users, it can be useful in increasing the acceptance rate of the product and providing a better user experience.
Is tooltTooltipod user experience?
The answer is simply how to build it.
It is a mistake to say that tooltTooltipad for the user experience. Perhaps we can better explain with the following image:
Do’s and Don’ts for UX or a good user experience when using the tooltTooltipive value to the customer
Some tooltips are used in vain. When the user interface elements are clear enough, using the tool tooltip has no value to users.
If you do not pay attention to this, your users will ignore the tooltips and lose even the most important ones.
You’re not just using tooltips to increase interaction; you’re using them to provide a better user experience.
2. Use clear and concise explanations
Keep in mind that users easily ignore vague sentences with many words.
You are trying to help your users do their job well. So you have to be the one to do things effectively first.
3- Do not stop your users
You have to be careful not to interrupt users while working.
For example, if TooltTooltip does not help users while using the product, you should avoid interrupting your users.
4- Do not attack the page
Some tooltips attack the entire screen, causing users to lose important information or elements.
When you use tooltips, you want to provide a better user experience. So if using the TooltTooltiptes a bad user experience, then you better not do it.
A bad example:
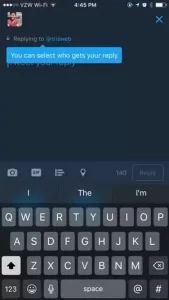
In the example above, you can see that TooltTooltipblocked the area where users need to write text.
As we said, Tooltips are used to provide better UX, so avoid anything that prevents this from happening.
What is the TooltTooltip for?
The tooltip has many uses and can be customized for each user depending on the purpose.
Considering all its uses, we can say that they support the idea that TooltTooltipsed enhances the user experience.
Tooltips are used to make it easier for users to use the program. Therefore, they should be treated accordingly.
Tooltips can be added to elements such as the following:
- Click on elements or click event
- Hotspots or hotspots
- Floating texts
The best exercises and examples of tooltips
As we said before, the tooltTooltipbe added various elements necessary to provide a better user experience.
In this section of the article, we will show you some good uses of tooltips that are added to the click event, highlights, and floating texts.
The further we go, the more we try to convince you that tooltips are not a bad user experience.
Knowing where and how to use the tool tooltip can help you create magic for your product.
User Onboarding
A good User Onboarding process involves a good product tour.
Using the tool tooltip to the click event in product tours is essential because product tours show the product and explain it.
Texts created with exact words will help you better describe the product and its features.
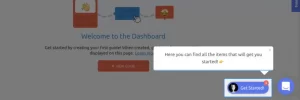
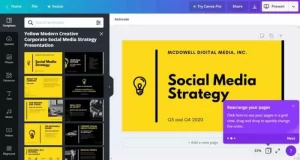
Take a look at the Zakeke product tour created with UserGuiding:
Thanks to the tooltTooltipeke can greet its users with an interactive message and briefly explain what to do to accept the product.
Let me tell you a secret:
User onboarding does not end with a product tour!
To increase product acceptance and feature acceptance, you need to make product features available to your users.
To provide a good onboarding user experience, step-by-step features must be well prepared.
A product training tour is one of the process’s most important parts.
Guiding users through the product helps increase product acceptance rates and features.
To do this, you need to create an interactive guide for your product. It would help if you talked to your users through the tooltTooltipelp, so they understand the whole process.
Using a click event helps users better interact with your product and thus better understand how to use the product.
Adding tooltips to the click event provides a better experience because you can better explain what to do and how to do it to your users.
Consider the following example:
Updates and reminders
Tooltips can help you announce new features correctly and at the most convenient point of users’ browsing.
Take a look at the example below to talk about why it’s good later:
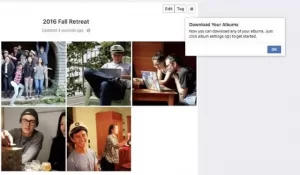
First of all, you can guess that Facebook is constantly updating its features, and if it wants to announce any updates with pop-ups, users will get tired of notifications.
The result is that users begin to ignore notifications and eventually lose important items.
That’s why it’s important to announce a feature update where users benefit most.
In this example, you can see that when the user moves the buttons on Facebook albums, they are faced with a tooltip that informs about the update.
Take another example of a tooltip that is activated when a user can use a feature they have never used:
Here are the tooltTooltipnds users can use a feature.
You can also see that the tooltTooltipriefly explained and presented to the user at the most appropriate moment.
Highlights are one of the most eye-catching elements in a program.
As you can see, hotspots or important points attract users’ attention and make users aware of important information.
Because the tool tooltip is an important piece of information, it should always be there instead of the pop-up messages that users see during a product tour or various features.
Instead of opening text, add a tooltip to an important point because you should not interfere with your users.
In this regard, the tool tooltip solves the problem that users often face. With the help of the tool, the tooltip has been added to an important point, and you will no longer have to worry about answering individual questions.
Thanks to the tool tooltip will save time, resources, and energy!
How to create a tooltip?
You can create tooltips for websites, web products, and mobile apps.
Here are some ways you can create a tooltip.
tooltip for websites and web products
There are three common ways to create a tooltip. We have categorized them from the most convenient to the most complex:
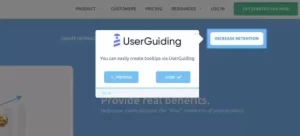
1- Codeless method: UserGuiding
UserGuiding is an easy, code-free tool you can use to create a tooltip, among many other elements.
With UserGuiding, you can easily create and add tooltips to your product’s most important elements or parts.
Suppose you have no technical background and want to create a tooltip in a few steps. You can take a few steps and easily create a tooltip using the Chrome UserGuiding plugin.
You can customize the tooltips for your users and create them for any use.
2- Low code method: Bootstrap and Jquery
If you want to use another method that is not too difficult to create tooltips, you can try Bootstrap and Jquery.
They require some technical knowledge, but if you look at the examples and follow the steps provided, both will help you create tooltips for different uses.
You can create, customize and place them wherever you want.
3- DIY method: JavaScript, HTML, CSS
Of all the three methods, JavaScript is the most complex. However, if you are a developer or there is a developer who can help you with this, JavaScript gives you more freedom in creating and customizing tooltips.
You should also remember that if you want to use JavaScript to create tooltips, you must be able to update and maintain them everywhere.
Compared to JavaScript, HTML and CSS are less complex but still similar to JavaScript.
Like JavaScript, you need to take the time to create, maintain, and update when using HTML and CSS.
Conclusion
It is a mistake to say that tooltips spoil the UX or user experience. If you know how and where to use tooltips, they will help you to have a great user experience.
Keep in mind that the tooltTooltipore is about performance. They should be in your application or website to make things easier for users.
We have introduced the UserGuiding tool to you because it allows you to create and customize the tooltTooltiprally for any application.