
How to Set Mikrotik Date and Time Using NTP: Step-by-Step Guide
Maybe setting the time and date in Mikrotik is one of the easiest things you can do with the Winbox tool, but the importance of this issue is very high for the proper functioning of the network.
It is possible to set the time and date in Mikrotik using the NTP tool and the terminal, and thanks to Winbox, accessing each of these sections is very easy. By setting the correct time and date, you help improve your network’s efficiency, security, and performance.
Operations such as running programs or services, traffic settings, and transactions need correct and synchronized time, and the proper location of time and date guarantees timely execution.
Also, look at the issue from a security point of view. Some cyber-attacks may take advantage of the same time and date not being set and advance their work in a way that makes analyzing and detecting security issues more difficult. Also, the events and logs used to analyze and monitor network activities are categorized by time and clock. If the Mikrotik clock is not set correctly, it becomes difficult to examine it.
These things are only a part of the importance of setting the time and date in Mikrotik.
Suppose you want more security and stability and want to own a great Mikrotik server at an affordable cost that will significantly increase the potential of your network. In that case, you can visit the Mikrotik virtual server purchase page and choose the right plan.
It’s time to learn how to set the time and date in Mikrotik:
Table of Contents
- The importance of setting the correct time and date in Mikrotik
- Method 1. Setting the time and date in Mikrotik with Clock
- Method 2. Use an NTP client.
The importance of setting the correct time and date in Mikrotik
You may not realize the importance of this issue at the beginning of your work, but over time, as you gain more experience in this field, you will realize that time and date are the most critical factors of any system. Let’s mention some examples of the effects of the correct time and date, which are among the products of setting the time and date in Windows Server:
1. Time coordination in the network
Modern networks make extensive use of time to coordinate various operations. Performing scheduled tasks or recording logs are among the most critical functions that require the correct time and clock. The fact that protocols such as NTP have been developed for time coordination in the network shows how important this issue is in Mikrotik.
2. Security and authentication
Security and authentication information is often sent based on the correct time and date. For example, if you have activated the two-step authentication method, the date and time are used to determine the correctness of the verification codes, and their incorrect setting can cause malfunctions and compromise system security.
3. Digital signatures and certificates
Many security processes, such as digital signatures and SSL/TLS certificate validation, rely on the date and time of the transaction, and incorrect time and date can lead to significant problems in this field.
4. Monitoring and analysis
Usually, Mikrotik routers and other devices in the network collect information about the performance and status of the network, which is used by the network management to monitor and analyze errors and fix them. The incorrect timing of these reports can make diagnosing and troubleshooting the device challenging.
5. Avoiding asynchrony problems
If the various devices in the network are set asynchronously, there will be big problems with traffic and communication. Selecting the correct clock using protocols such as NTP can help synchronize the devices.
6. Scheduling and planning for tasks
In networks, some studies are performed based on a specific schedule, which increases the accuracy of executing these tasks.
So, just as setting the time and date is essential in Linux and any other system and server, you must go through this process for Mikrotik to avoid its adverse effects:
Method 1. Setting the time and date in Mikrotik with Clock
Set your time and date with the Clock function. You have two ways, both of which are done manually:
1. Get help from the Winbox System section.
Winbox is an excellent tool for managing the Mikrotik router. To set the Mikrotik time and date, you can perform the following steps:
- Open WinBox and click on System.
- Select the Clock option to open Mikrotik’s time and date setting window.
- Enter the time in the time field and the date in the Date field.
- Tick the time zone autodetect option to automatically set the time zone based on the device’s IP address.
- If you want to specify the time zone yourself, enter the desired standard time zone name in the Time zone name field.
- Click on Apply to apply these changes.

The second tab of this window is for the manual of the time zone. So if you manually set your time zone location based on DS T, you can use this. Use the Clock command.
For this, click on New Terminal.
And set and run the following command with your descannotate:
/system clock set time=12:34:56 date=2023-08-16
But since Mikrotiks cannot save the System’s date and time, when you manually set the time and date in Mikrotik, the time and date will return to their original status after the System is turned off and restarted. Of course, you can solve this problem by creating a script to set the time and date and schedule it to run periodically, but the best thing is to use NTP servers to update them; in the following method, we have reviewed how to use them.
Method 2. Use an NTP client.
NTP stands for Network Time Protocol and is used to set and update the time and date of computer systems connected to the network. This protocol can also set the time of your Mikrotik router by clicking on the UTC world clock. The NTP protocol uses NTP servers to synchronize the time of systems, which are very reliable in accuracy and efficiency.
The process of updating the time and date in Mikrotik when using NTP is that the device connects to NTP servers, receives time information, and adjusts its clock based on this information.
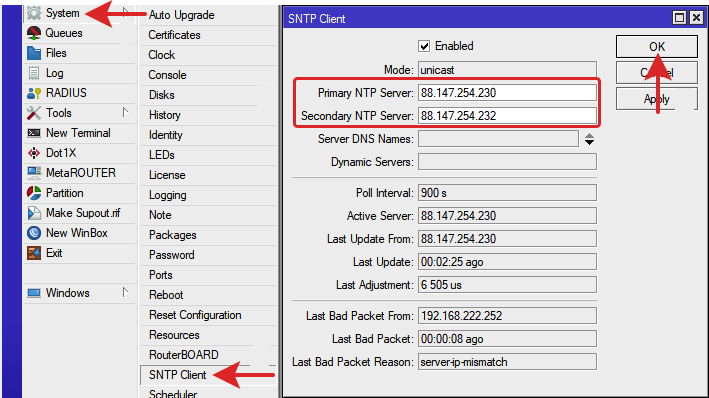
There is even a feature called NTP Client built into Winbox, which you can easily use to set the time and date in Mikrotik. Let’s get to know the steps of working with an NTP client in Winbox:
Open your Winbox and click on System from the side menu.
Select the NTP Client or SNTP Client option to open the NTP-related window.
Check Enabled.
In the Mode menu, you have the following options to choose from: Unicast.
Unicast: If you want the NTP Client to update and synchronize the time and date, select this option only from the servers in the Primary NTP Server and Secondary NTP Server fields.
Broadcast: This mode is not suitable for setting the time and date of Mikrotik itself because it is used to send Mikrotik time information to all devices in the network, and it is useful when you want to synchronize the time and date of all devices with the Mikrotik router.
Multicast: This option also sends time information to other devices in the network. This mode is suitable for multimedia networks such as video conference networks.
Manycast: This mode is a combination of unicast and multicast modes. Mikrotik uses several NTP servers as time sources. One of the servers is the central server and is synchronized with other servers as secondary servers.
Manycast Client: Mikrotik synchronizes with NTP servers in the network, which is helpful for large and complex networks.
But among these options, Unicast is a more suitable option, and it is better to choose it.
Enter the IP address or domain name of the NTP server
0.pool.ntp.org
Enter the IP address of the second NTP server so that if the first server is not responding, the second server will be activated.
1.pool.ntp.org
If you wish, set the poll interval to specify the time interval between each process of receiving time information from the server and synchronizing with it. (e.g., the 30s)
Then click Apply, and then Ok to save these changes.
If you want to do the exact synchronization using commands, open a terminal:
/system ntp client set primary-ntp=0.pool.ntp.org secondary-ntp=1.pool.ntp.org enabled=yes
Record changes for time and date sync every time the Mikrotik is turned off and on
You must click on the Clock option from the System menu.
Click on Time Zone Name, and as a user, select the option for the area where you live.
You can view the Mikrotik time and date using the clock print command. So open the terminal and run the following command:
/system clock print
By following the steps above, you have finally set the time and date in Mikrotik. If you want this time and date synchronization to be applied every time the Mikrotik router is turned off and on, be sure to implement the NPT method and use public and reliable NPT servers in this method to make this synchronization more accurate and correct. Be done. Of course, SNTP is also a simpler version of NTP that you can use if your device is limited in resources, and its steps are almost identical to NTP. However, the difference is that you have to select Client SNTP from the System section and set the values similarly to NPT.
Conclusion
The correct time and date are essential in the network world and affect network security and performance. In this article, we have introduced two effective methods to set the time and date on MikroTik, so you can be sure the time on your MikroTik router is correct and synchronized. Of course, if you want more accuracy and convenience, we recommend using the NTP method and setting valid NTP servers as time sources.
FAQ
Why is setting correct time on a MikroTik important?
Accurate time ensures proper logging, scheduling, security certificates, and synchronization with network services.
What does NTP do for a MikroTik router?
NTP (Network Time Protocol) automatically synchronizes the router’s clock with trusted internet time servers.
How do I configure NTP on MikroTik?
You add reliable NTP servers in the router settings and enable NTP client mode so the device regularly updates its time.