Fix 100% Disk Usage in Windows 11: 16 Proven Solutions
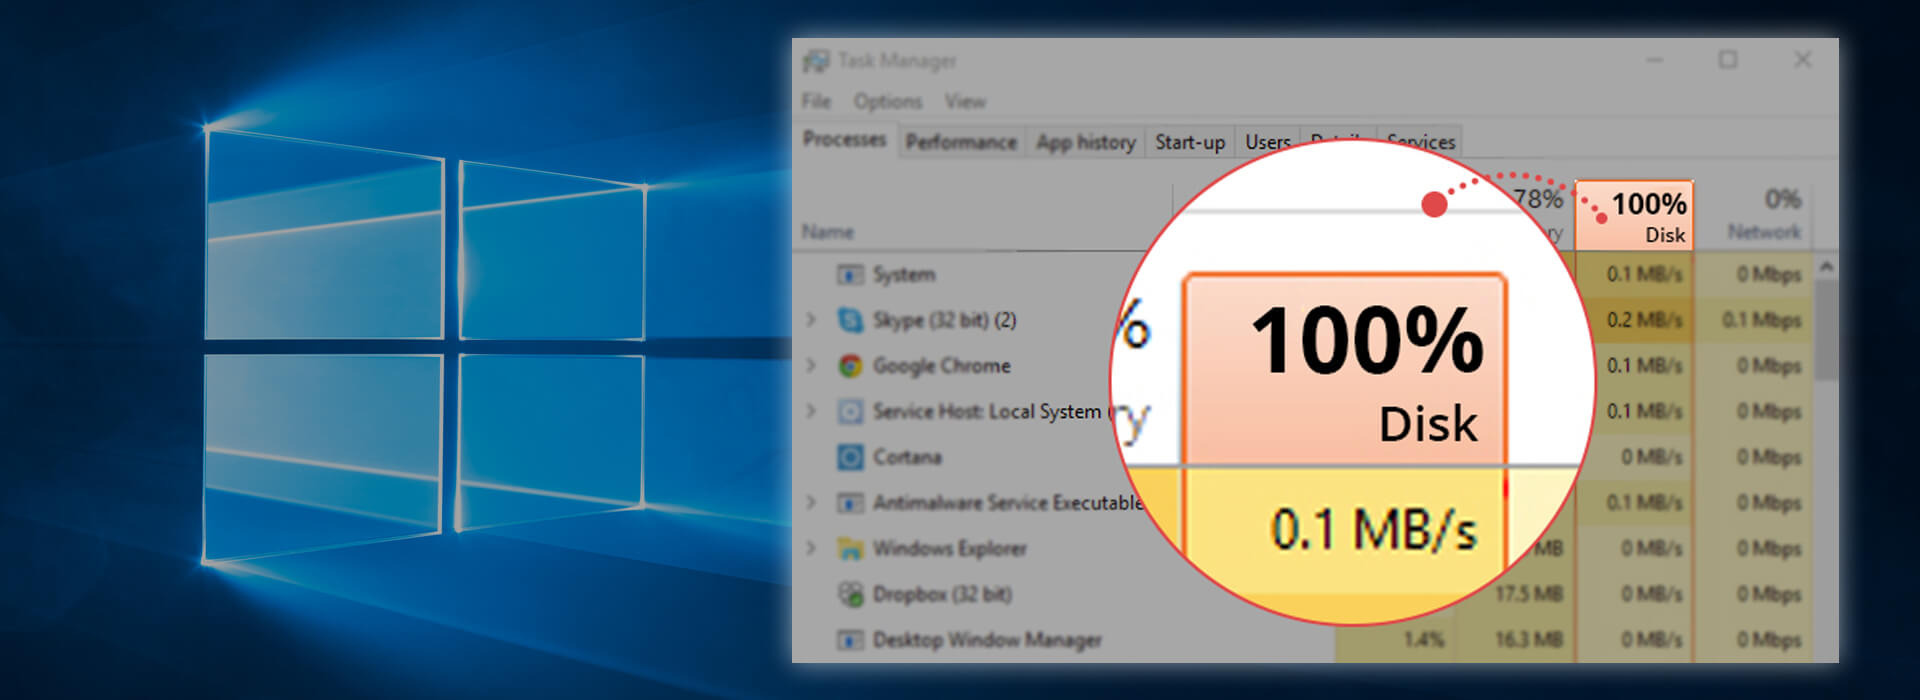
System slowness and delay in responding to inputs are the first signs of a 100% hard disk problem in Windows. If you are also facing this problem, it is better to know that 100% hard drive usage has specific reasons, and you should not immediately worry about your system’s hard drive failure when you see 100% hard drive usage in the task manager.
Some of the most important reasons for using 100% of the hard drive are using old or defective drivers, running unnecessary background programs and services, antivirus software, malware threats, and bad habits when using the system. By implementing the solutions presented in this article, you can completely solve the problem of the hard disk becoming 100% in Windows 10 and 11.
This problem can have many reasons, each of which has its own solutions, and in this article, we will try to provide you with all the answers to solve the 100% Disk Usage problem so that this process can be translated as quickly as possible. Leave the doer behind.
It is better to point out that the percentage of parameters, such as hard disk and RAM, available in the task manager changes periodically and goes up and down, but if you notice that the usage of the system’s hard disk is 100 percent. In the same state, all that’s left is time to get down to business to find out why the disk is filling up in Task Manager and optimize your system’s health.
It’s time to check the reasons and solutions for the complex problem becoming 100% in Windows 10 and 11. So, let’s get started:
Reasons for the problem of hard disk becoming 100% in Windows
The problem of 100% Disk Usage in Windows means that the hard drive of your laptop or computer is entirely in use and is not able to execute commands or process other data. This causes the system to slow down and not respond to inputs such as the mouse and keyboard. This is where the performance of your Windows system gets disrupted and can even stop working altogether.
So, until now, we have realized that the hard drive hurts the performance of your Windows system.
But what reasons can cause the problem of 100% memory usage?
- Unnecessary and incorrect system processes
- Old and defective drivers
- Corrupt filethe system
- Malware
- Continuous disk usage
- System services and applications
- Antivirus software
- The system is constantly in hibernation mode
- …
But these problems that cause 100% hard drive in Windows, what effect do they have on system performance?
- Decreased speed and system performance
- Hard disk failure due to excessive use
- Loss of files and sensitive information
- System failure
1. Restart your system
System power off/on is a miracle solution for most Windows system problems, and it can also work to solve the problem of the hard disk becoming 100% in Windows 10 and 11. Although restarting the system will not help you find the root cause of the 100% disk usage problem in Windows, if you are in a hurry and looking for a simple and short way to solve this problem, you should try this method. Especially if the reason for the hard drive filling up is being in hibernation mode, you can solve the problem by restarting the system.
By restarting the system, you make a new start for your Windows 10 and 11. This fresh Start will empty the system RAM and stop all short-term tasks and processes. In this way, your busy system becomes quiet and can continue operating with better performance and speed.
To restart your Windows system, open the start menu and select the Restart option after clicking Power.
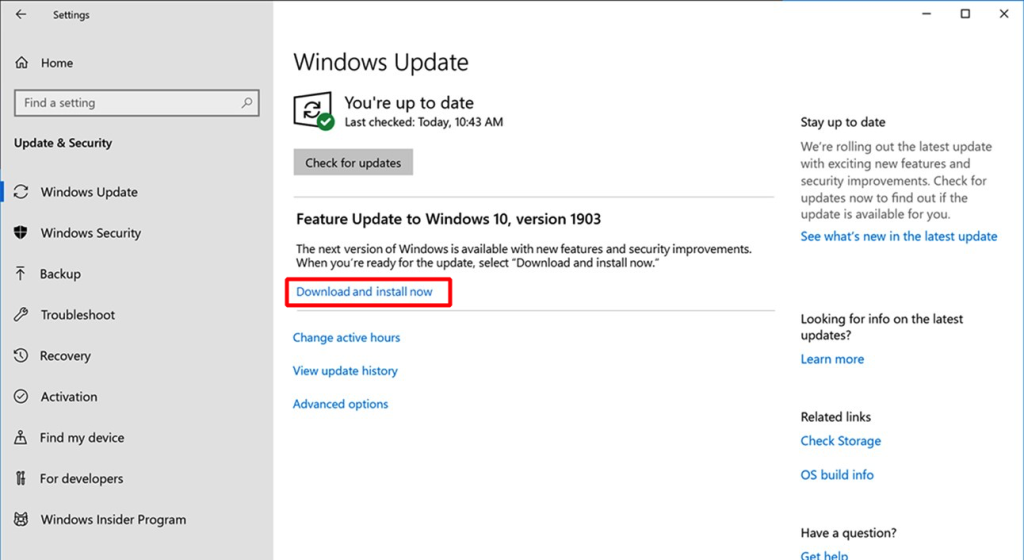
2. Update your Windows.
If you are using the old versions of Windows 10 and 11, installing the latest updates provided by Microsoft can save your complex system.
Follow the steps below to update your Windows:
Open Settings and click on Windows Update from the Update & Security menu.
If there is a new update, click on install now and wait until the download and installation of the recent updates are finished. Windows update to solve the problem of hard drive becoming 100%.
Even if the problem of the hard disk becoming 100% in Windows 10 and 11 is not solved after this method, you still have not lost anything because a Windows update is one of the best ways to increase the security and performance of the system. These updates are developed to fix the holes and defects of the previous versions, and by installing them, you help upgrade your system.
Suppose you notice a decrease in your system speed after updating your Windows. In that case, there is no need to worry because the solution for solving the problem of slowing down Windows after the update can solve this problem in three whistles.
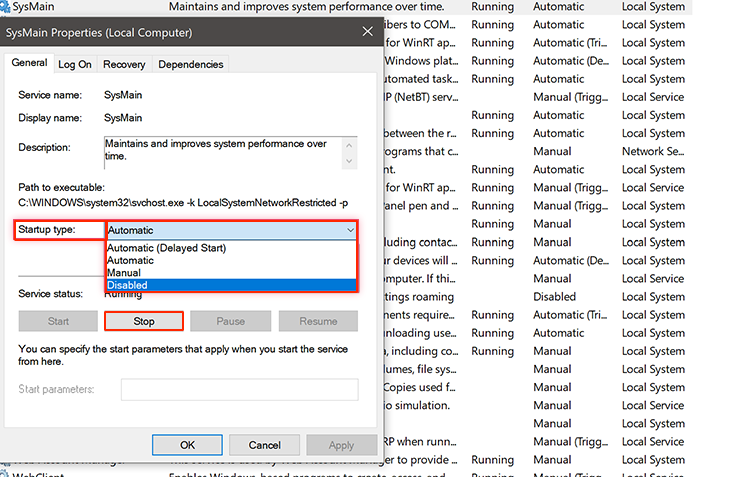
3. Stop the Superfetch service
Windows Superfetch is one of the Windows services that can cause the problem of using 100% of the hard drive. Although this service helps reduce boot time and load programs more efficiently, continuous use of this feature can lead to 100% disk usage and slow system performance.
You can use two methods to stop or turn off this service:
Using RUN
Right-click the Start button and type services. msc, and click OK.
From Services, fisMain and double-click it.
Select Disabled from the Startup type menu, click Stop, and finally, click OK.
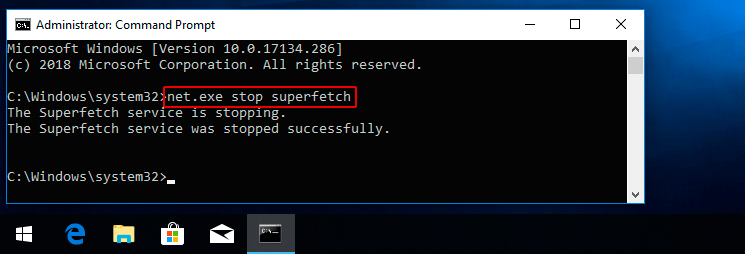
Using CMD
Click on Start and run CMD as Run as administrator.
Run the following command.
net.exe stop superfetch
After you have successfully stopped this service, open the task manager and check the hard drive’s status. If the hard drive is still at 100%, don’t give up and try the following methods.
4. Check for malware
Some hackers create and launch various types of malware to involve essential resources such as hard drives. Fortunately, the Windows operating system has an internal antivirus called Windows Defender, which works well against malware but may not perform as expected against phishing attacks.
For this reason, it is better to use another antivirus software to scan your hard disk entirely and identify and remove malware and viruses that have caused the use of the entire hard disk.
Avast, AVG Internet Security, Bitdefender, and AVIRA are among the best antiviruses you can safely trust.
5. Repair the StorAHCI.sys driver
The cause of the disk becoming 100% in Windows can be caused by the AHCI PCIe models that run with the StorAHCI.sys driver. A bug in the firmware causes the SSD not to complete I/O correctly when MSI mode is enabled, and as a result, the Windows storage stack freezes the system by waiting for read and write commands to execute without responding. resets
This is where you can solve problems such as 100% Windows hard drive usage by turning off MSI mode:
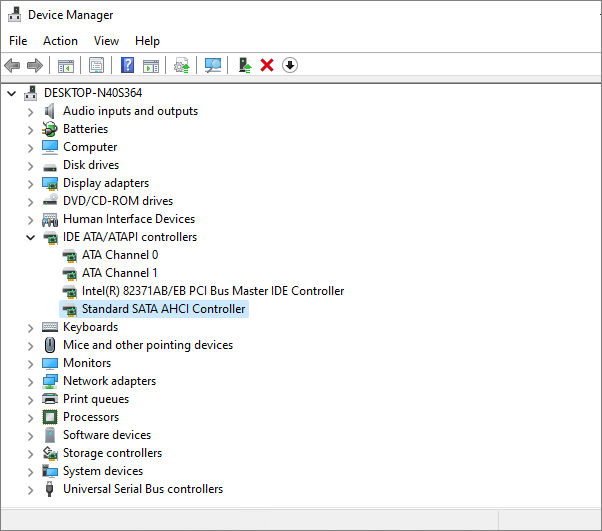
Right-click on Start and select Device Manager.
Open the IDE ATA/ATAPI Controllers category and double-click the AHCI controller option.
Go to the Driver tab and click on Driver Details.
If you see the storage sys option in the driver files section, you are running the AHCI driver.
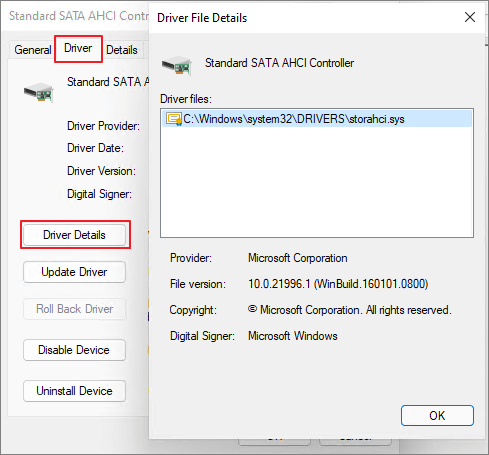
Click OK to close the Driver Details window.
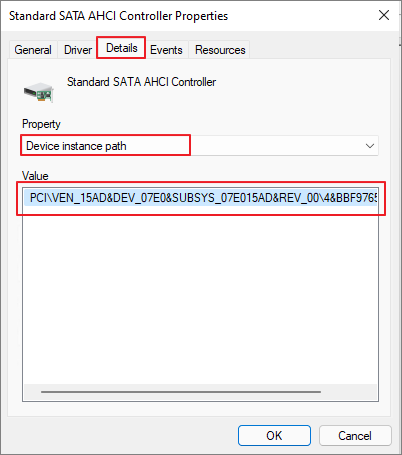
Click on the Details tab, sell, etc. Device Instance Path from the property menu, and write down the path starting with VEN.
Enter the following address in the top bar and hit enter to go directly to MessageSignaledInterruptProperties.
HKEY_LOCAL_MACHINE\System\CurrentControlSet\Enum\PCI\ <AHCI Controller>\<Random Number>\Device Parameters\Interrupt Management\MessageSignaledInterruptProperties
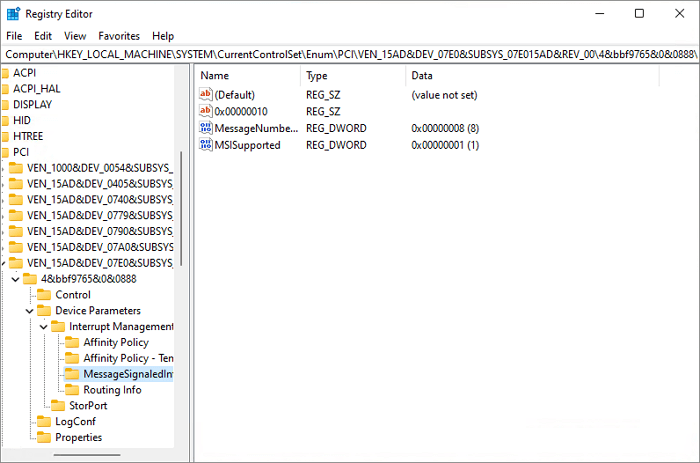
If you cannot follow this path using the ribbon, open the folders according to the above passage.
Double-click the supported key and change its value to 0.

Restart your system and then check whether the problem of the hard disk becoming 100% in Windows is solved.
6. Change the power consumption type to High Performance.
Changing the power consumption settings can also solve the problem of using the hard drive completely. By default, Windows 10 and 11 power settings are in Balanced mode, which is sufficient for most users. But if you are facing the problem of Windows’ hard disk becoming 100%, changing the energy mode to High Performance can indirectly help improve the complex system condition.
Click for an easy and quick tutorial on installing Windows XP in less than a few minutes!
To change the mode from Balanced to High Performance, follow the steps below:
- From the Start menu, open Control Panel and click on Power Options.
- Click on Additional power settings.
- Click on the Change plan settings option.
- Click on Change Advanced Power Settings and select High Performance from the drop-down menu.
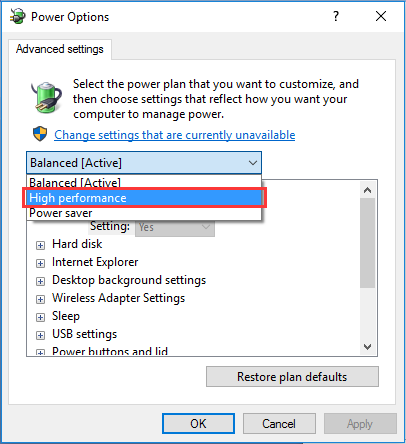
Click OK to apply this plan change.
Restart your system and check whether the problem of hard disk usage is solved.
7. Temporarily turn off your antivirus
Sometimes, heavy antivirus activity in the background can be the reason for the 100% Disk Usage problem. To be sure of this, the best thing to do is to turn off your antivirus temporarily and then check whether this improves the hard drive’s performance.
If you find that the problem of using 100% of the hard drive is related to the antivirus, you can use another lightweight antivirus, such as Kaspersky.
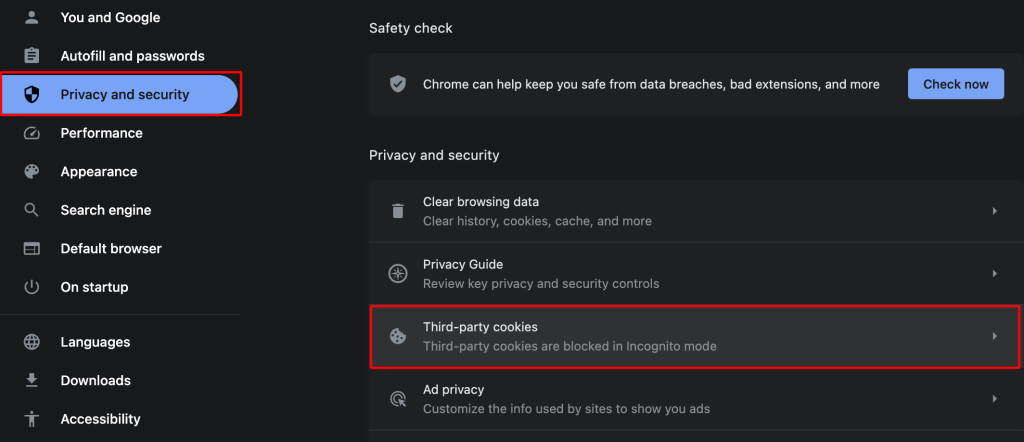
8. Change Google Chrome settings
According to the reports of some Windows users, some Google Chrome settings can cause additional load on the system driver. So, if you also use the Google Chrome browser and want to remove this extra load caused by Google Chrome from your hard drive, perform the following steps:
Open Google Chrome, click the three dots in the right corner, and select Settings.
From the left menu, click on Privacy and Security.
Click on Third-party cookies.
Scroll down and click on the Preload pages.
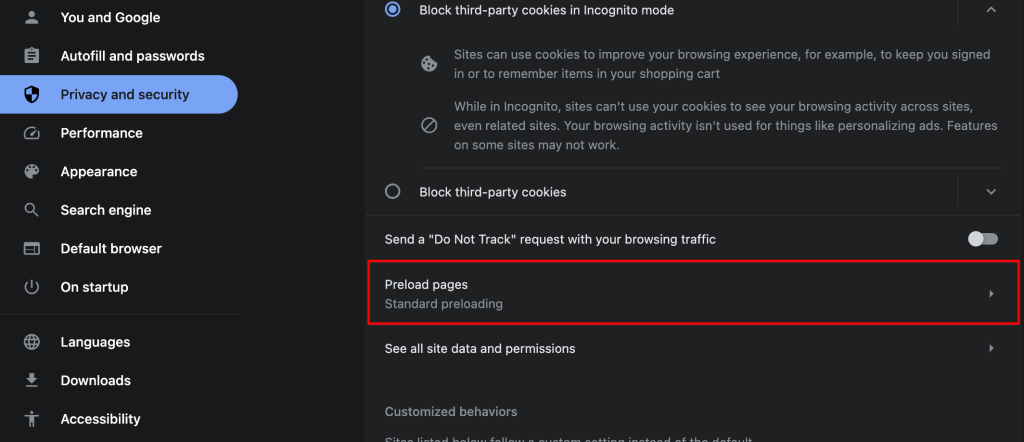
Check the No Preloading option and close the settings.
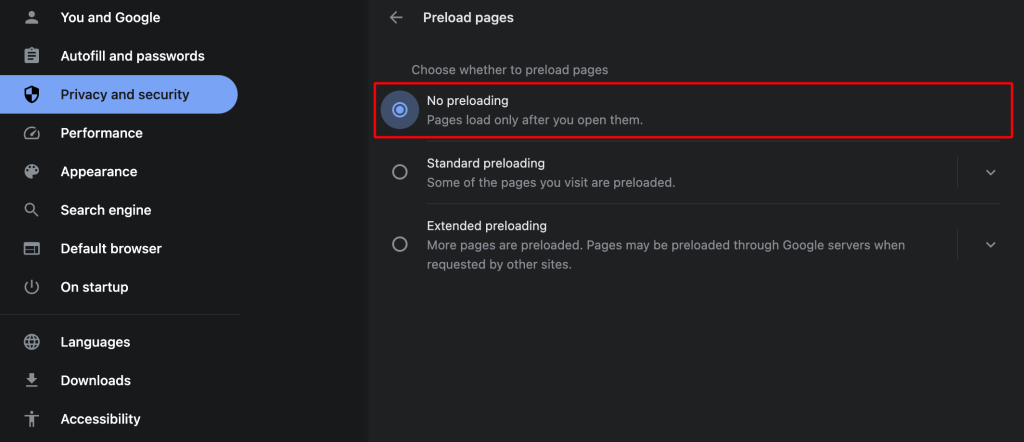
Check whether the problem with the hard drive is 100% solved.
9. Change Skype settings.
Sometimes, the Skype program can cause overtime on the Windows system hard drive, so if you go through the following steps and change the permission of its packages to write, you will not lose:
Open the task manager program, select etc., and click End Task to close it completely.
Open Explorer and the Program Files (x86) folder from the C drive.
Find the Skype folder, and after opening it, look for Phone and open it.
Right-click on Skype.exe and select Properties.
From the Security tab, click the Edit button.

Select the ALL APPLICATION PACKAGES option and check the Write option.
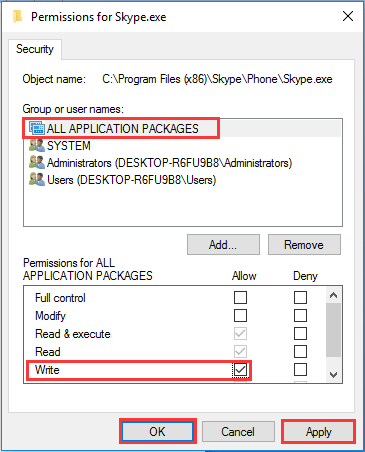
Click Apply and OK, respectively, to save this change.
Open the task manager and check whether the problem of the hard drive being 100% in Windows is solved.
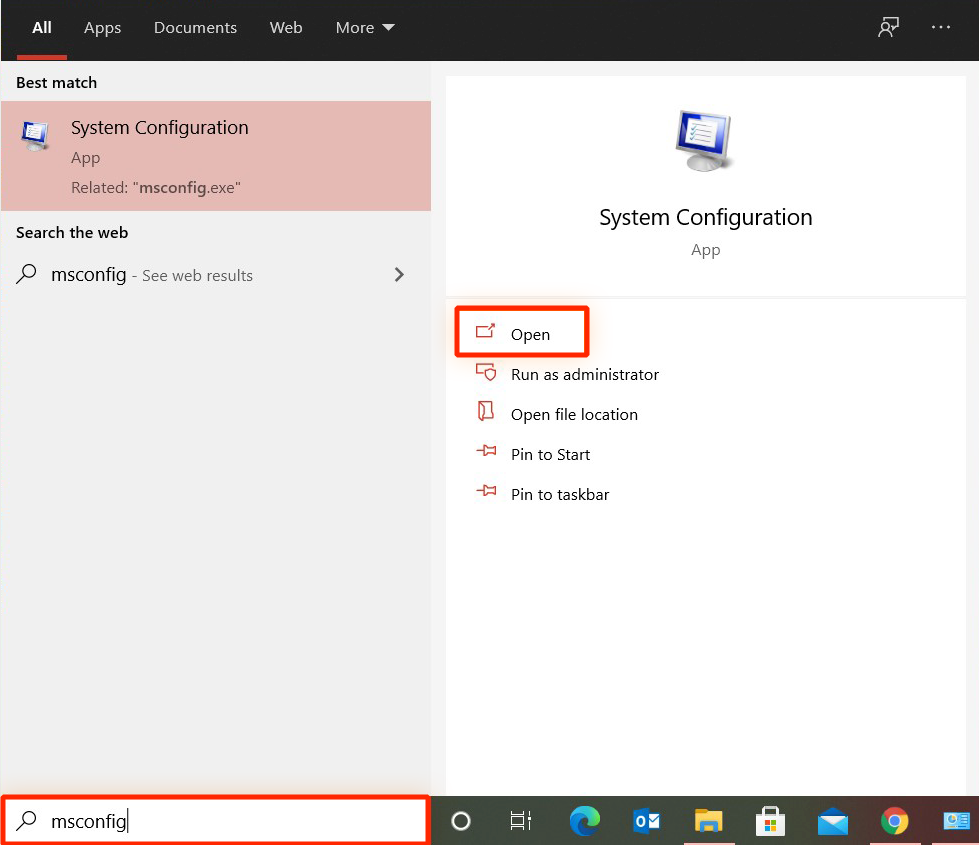
10. Do a clean boot.
By performing a clean boot, you want to restart the system with minimal drivers and programs. By doing this, you can find out which third-party programs are putting more load on the hard drive and causing the hard drive to reach 100% problem.
To do a clean boot, just follow the steps below:
Click on Start, and after typing msconfig, open the System Configuration program.
From the General tab, check the Selective startup option. 2 Check the option Load system services and Use original boot configuration, but remove the tick corresponding to the option Load startup items.
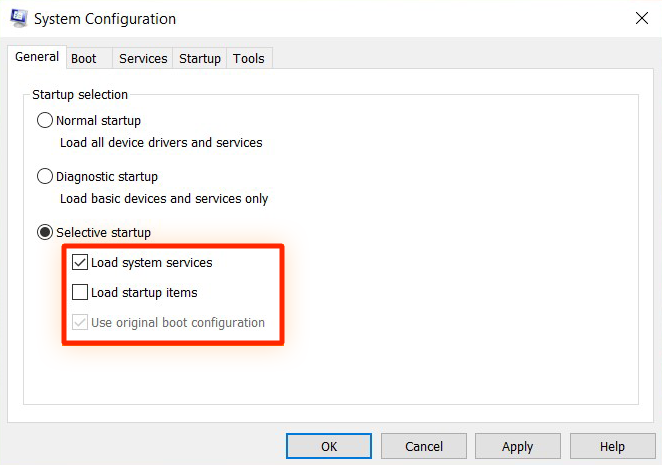
Finally, click Apply and OK, respectively, and restart your system.
11. Set the virtual memory size.
Virtual memory is a part of the hard disk that is used as an extension to the system RAM and is a combination of the hard disk and RAM. In this way, when the system RAM does not have the necessary conditions or capacity to do a task, Windows automatically temporarily stores files in this virtual memory to return them to RAM later if needed.
However, if the amount of space allocated to the virtual memory is unreasonable, a 100% disk usage error in Windows is possible.
If you think that this case has used all the hard disk space, you can reset the virtual memory by following the steps below:
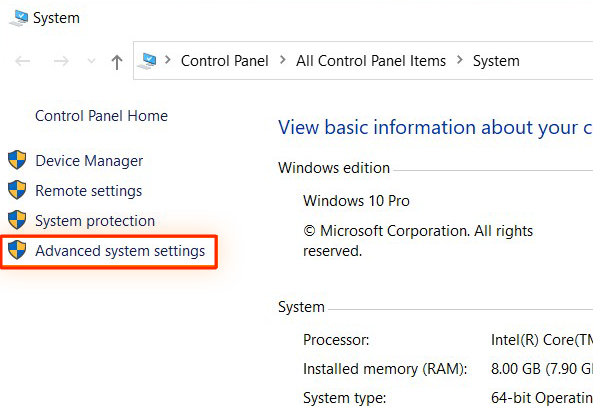
Click on Start and open the system information window by typing system info.
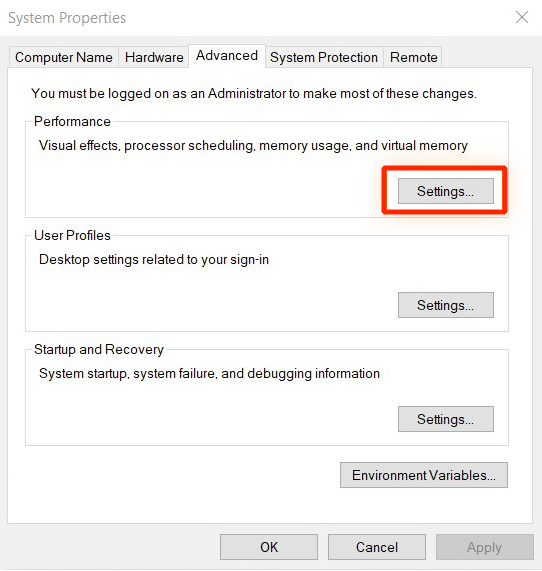
From the left panel, click Advanced System Settings.
From the Advanced tab, click the Settings button.
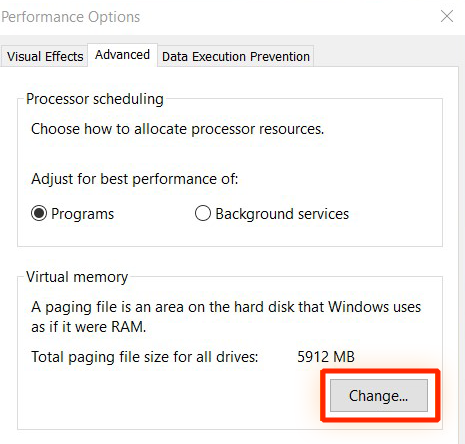
Go to the Advanced tab and click the Change button.
Uncheck the Automatically manage paging file size for all drives option.
Then click on the system driver (C) and enter the Initial size (in MB) and Maximum size (in MB) of the virtual memory from the bottom menu.
Initial size – This initial size depends on your system. If you are not sure about this, just enter the number that is in the suggestions.
Maximum size – Consider a fair value for this field. 1.5 times your physical RAM space is the ideal number for this field. For example, if your system’s RAM memory is 4 GB (4096 MB), the virtual memory should not be more than 6144 MB.
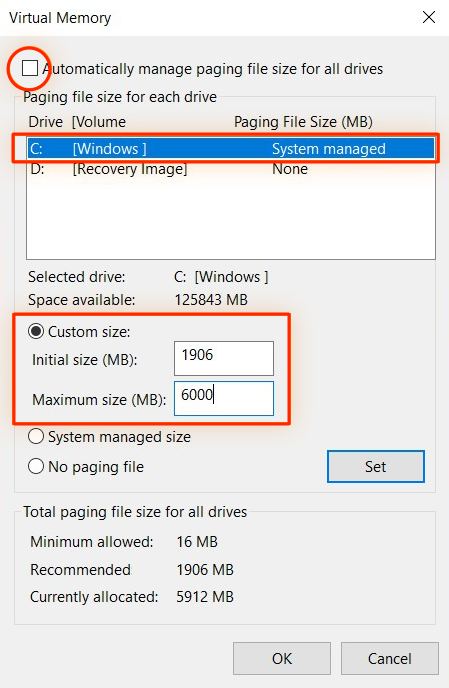
After entering your desired values, click Set and OK, respectively.
After the above steps, it is time to delete temporary files. For this, just follow the steps below:
Press the Win + R combination button. Then, in the RUN field, enter temp and press Enter.
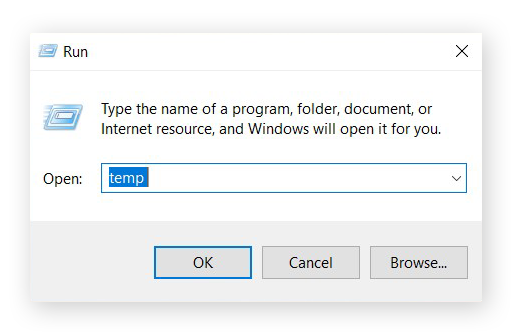
Select all the files in the temp folder and then delete them.
Restart your system and then check if the problem of the hard drive being 100% in Windows is solved or not.
Of course, if your system’s RAM is also having problems and you feel that this problem is causing more virtual memory usage, you can run the solutions to solve the problem of not fully using the RAM memory, a nd check the result.
12. Update system drivers.
Drivers are responsible for controlling the hardware of the computer system, of which the hard disk is an important part Old or defective drivers, such as SATA, can cause the problem of a 100% hard drive.
To check the drivers, just open the Device Manager and see the drivers you need to update in the left panel.
You have 2 ways to update your desired drivers:
1. Right-click on the desired driver and select the update option to allow the latest version to be downloaded and installed directly from Microsoft.
2. Go to your system manufacturer’s website and check the list of the latest versions of the desired driver, and download and install the new drivers.
13. Disable the Connected User Experiences and Telemetry service.
This service is responsible for collecting data related to the activity of system users, which can sometimes cause high hard drive consumption. If the above methods do not solve the problem of the hard drive becoming 100% in Windows, disabling the User Experience and Telemetry service is also a good idea to solve this problem.
So follow the steps below:
Press Win + R and type services.msc and click OK.
Find the Connected User Experiences and Telemetry option and, after right-clicking on it, select Properties.
From the General tab, set Startup type to Disabled.
From the Service status section, click on the Stop button.
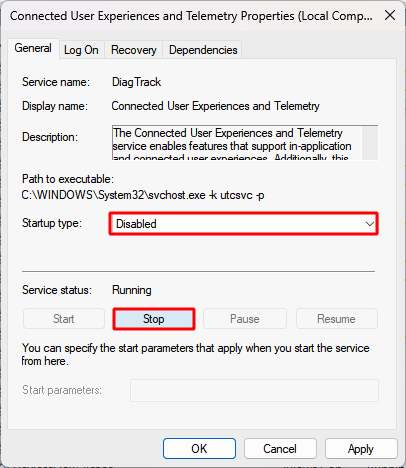
Click Apply and OK, respectively.
Check if the 100% memory usage issue is resolved.
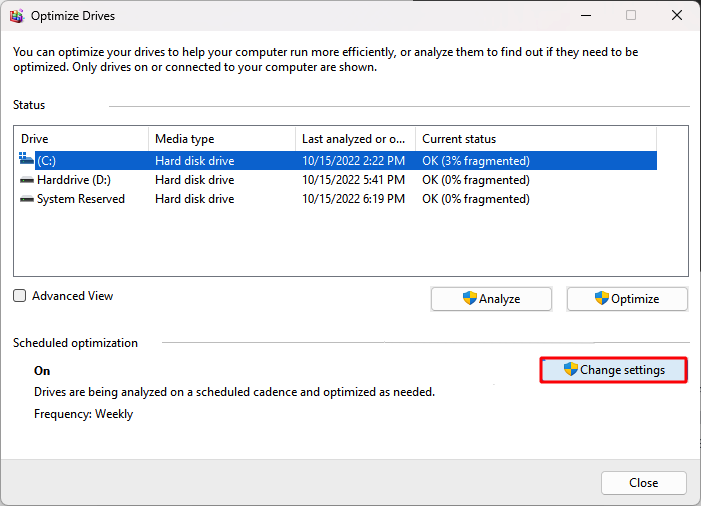
14. Disable the Scheduled defragmentation feature
Scheduled defragmentation is a disk optimization feature in Windows, with the help of which the hard disk can reach its best performance. But sometimes, this utility also places an additional burden on the hard disk and may be associated with the error of the hard disk becoming 100%.
By following the steps below, you can disable this feature and save important resources, such as your hard drive:
Click on Start and type defragment to open the Defragment and Optimize Drives option.

Select the system drive (C) and check whether the scheduled optimization is ON or not.
If it is ON, you need to deactivate it.
So click on the Change Settings button.
Uncheck the Run on a schedule (recommended) option.
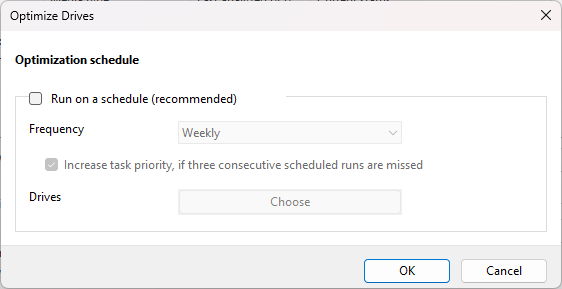
Click OK to save this change.
After applying these changes, check whether the problem of using the entire hard drive is solved.
15. Run the Check Disk command.
The violation or failure of the hard drive itself can cause 100% of the hard drive. To be sure of this, it is better to run the Check Disk command. This command scans the status of the hard drive and shows you the output. You can find out about the problems and malfunctions of your hard drive system.
For this, just follow the steps below:
Click on Start and run CMD as Run as Administrator.
Type the following command and press Enter to run it.
chkdsk.exe /f /r
Completing the execution process requires your confirmation, so enter Y and wait for it to show you the output.
16. Upgrade or replace your hard drive
If you tried the above methods and did not get the desired result, maybe the problem is with your hard drive. The first thing you need to do is to update your hard drive firmware. Installing recent firmware versions can help fix performance or read/write operation issues.
So first open the Device Manager and look at the name of the system drivers from the Disk Drives section.
After you find the exact name of your disk driver, go to the manufacturer’s page and download and install this firmware.
Then restart the system and check the status of your hard drive.
If you still can’t solve the problem, maybe it’s time to install an SSD drive to improve the speed and performance of your system. SSD drivers are very fast and reliable, greatly reducing boot times and computations.
conclusion
The problem of the hard drive becoming 100% in Windows depends on several reasons, the most important of which are old drivers, running unnecessary and heavy programs, and malware activity. In this article, we have provided you with all the solutions to this problem so that you can reach your desired result as quickly as possible. Also, if you know of another method that works to solve this problem, we will be happy if you share it with us in the comments section so that we can provide a more comprehensive training to those who are interested.
Thank you for staying with us until the end of the article. We hope that reading this article was useful for you. If you have any questions, requests, or need guidance, you can contact us by registering your opinion so that we can answer you as soon as possible.
FAQ
What causes 100% disk usage in Windows 11?
Common causes include background processes like SysMain (Superfetch), Windows Search indexing, malware infections, outdated drivers, and insufficient virtual memory.
How can I disable SysMain to reduce disk usage?
Press Win + R, type services.msc, locate "SysMain", right-click, select "Properties", set "Startup type" to "Disabled", and click "Stop" to halt the service.
Should I upgrade to an SSD to fix high disk usage?
Yes, upgrading from an HDD to an SSD can significantly improve system performance and reduce disk usage, especially on older systems.