


How to Enable or Disable Mouse Keys Keyboard in Windows?
You can use the numeric keypad to control the mouse in Windows 10 or Windows 11, and in this guide, you will learn how to use this feature.
You would want to use the keyboard to control the mouse pointer in Windows 10 and 11 for many reasons. For example, if the mouse on your desktop stops working, the touch screen on your laptop suddenly crashes, or you can’t use the mouse, then using the keyboard keys is the best alternative.
Whatever the reason, Windows 10 and 11 ships with the Mouse Keys feature, which allows you to use the numeric keypad to move the mouse as well as perform actions such as clicking, double-clicking, opening context menus, selecting, and more. Use it again.
In this Windows 10 and 11 guide, we will accompany you in different steps to enable the Mouse Keys feature to control the mouse with the numeric keypad.
- How to enable the Mouse Keys feature using Settings
- How to activate the Mouse Keys feature using the Control Panel
- How to move the pointer using the keyboard in Windows 10
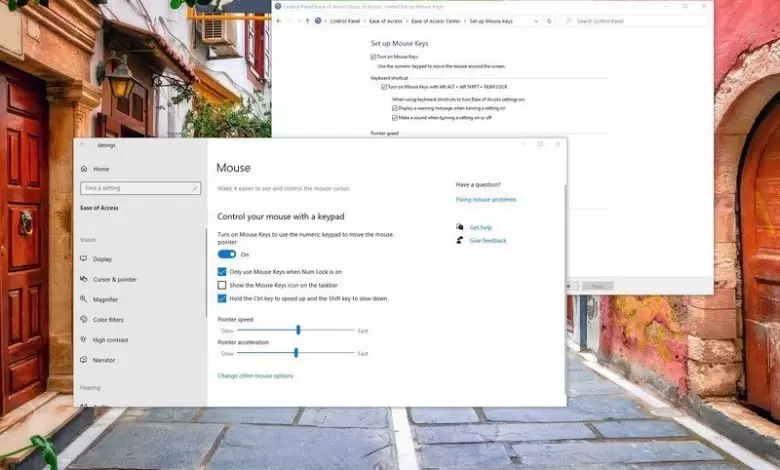
How to start the Mouse Keys feature using Settings
To control the mouse pointer using the keyboard in Windows 10 and 11, use these steps:
1. Open Settings.
2. Click on Ease of Access.
3. Click on Mouse.
4. Turn on Control your mouse with a keypad with the toggle switch.
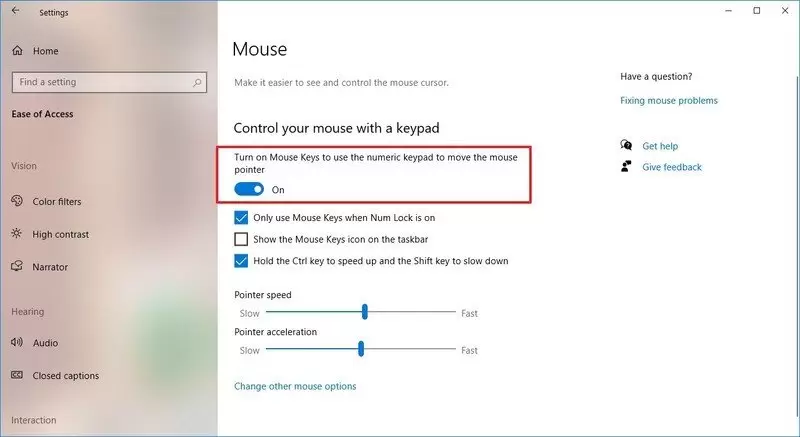
5. (Optional) Check the Hold Ctrl key to speed up and the Shift key to slow down option.
6. Use the sliders to adjust the pointer speed and pointer acceleration.
After completing the steps, you can use the keyboard’s numeric keypad to move the mouse around the screen. Usually, keys 4 and 6 are used to move left and right, and keys 2 and 8 are used to move up and down.
If you enable this option, you can press the Ctrl key while moving the mouse to speed up the pointer or the Shift key to slow the information down.
How to enable Mouse Keys feature using Control Panel.
To control the mouse using the numeric keypad, use these steps:
1. Open Control Panel.
2. Click on Ease of Access.
3. Click on Ease of Access Center.
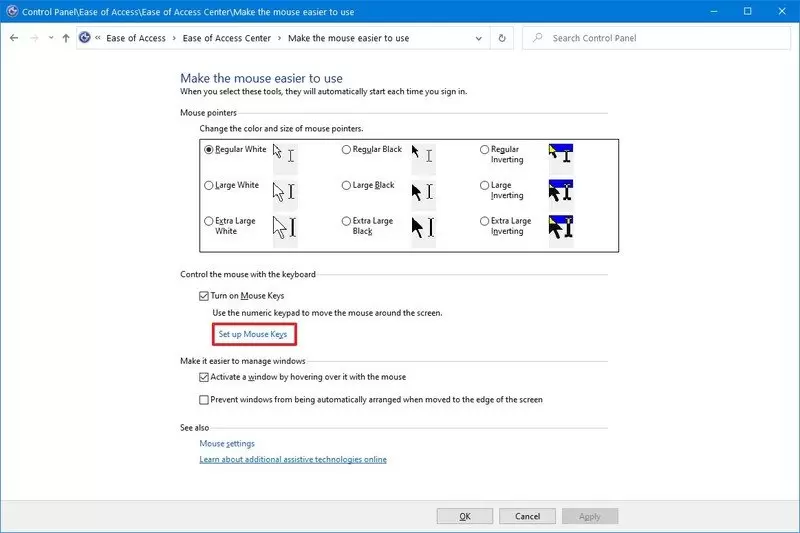
4. Check the Make the Mouse Easier to Use option.

5. In the “Control the mouse with the keyboard” section, click the Set up Mouse Keys option.
6. Check the Turn on Mouse Keys option.
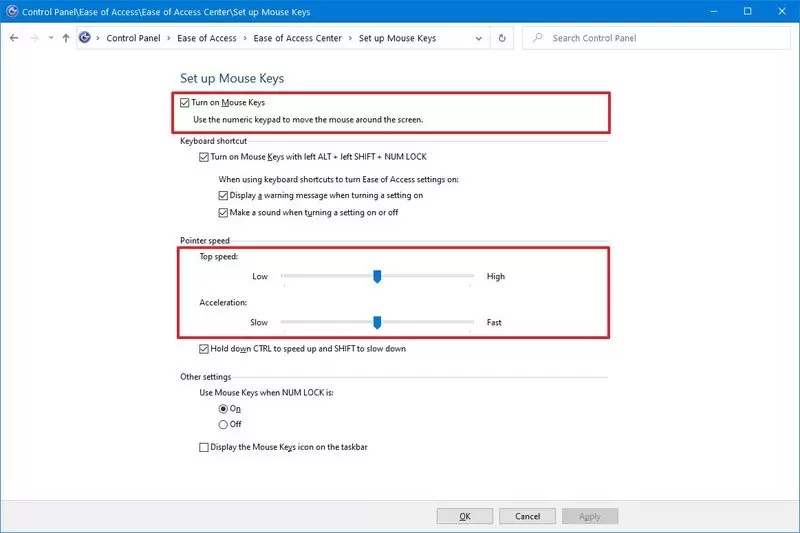
A quick tip: You can use the “Keyboard shortcut” settings to enable or disable the keyboard shortcut feature using Alt + left Shift + Num Lock.
7. In the “Pointer speed” section, use the Top speed and Acceleration sliders to set the mouse speed.
8. (Optional) Check to Hold down CTRL to speed up and SHIFT to slow down option.
9. Click on the Apply button.
10. Click on the OK button.
After completing the steps, you can use the numeric keypad to move the pointer on the screen without a mouse.
We’re focusing on Windows 10 in this guide, but you can use the Control Panel settings to control the mouse with the keyboard in older versions, including Windows 8.1 and Windows 7.
How to use the keyboard to move the mouse in Windows 10
When you enable the Control your mouse with a keypad option, you can not only use the numeric keypad to move the cursor but also select or click and drag items.
Move the cursor around.
Use these number keys to move the mouse pointer around the screen:
7 – Up and left.
8- Above.
9 – Up and right.
4- Left.
6 – Right.
1 – down and left.
2 – down
3 – down and right.
Clicking on items
Point to the item, press and hold “/” (select the left button), and then press “5” – click on the desired item.
Point to the item, press and hold “-” (selects the right button), and then press “5” – right-click the desired item.
Point to the item, press and hold “*” (selects both buttons), and then press “+” – double-click the desired item.
Drag and drop
To drag and drop items, you must first select the context menu, remove and select the move option:
Point to the article and press “0” – Drag the desired item.
Attribute to its location, and press” to move the object. (decimal number), and select the option Move here – Drop the desired item.