


Teaching how to work with Jetbackup in cPanel
Backing up a website’s information is one of the main things website owners should pay attention to. Normally, people should make a backup of their website information on a regular basis. In this regard, in the previous tutorials, we taught how to prepare a full backup from the cPanel host and how to backup from the direct admin host. But besides that, you can also use the backups that the hosting company automatically prepares. These backups are usually prepared automatically in certain time intervals and stored in a section called Jetbackup. As a result, you can easily refer to this section and restore your desired backup or save it on your system using the Jetbackup download feature. In this regard, we decided to Fa Host’s knowledge base on how to backup in cPanel with Jetbackup, how to restore cPanel backup with JetBackup, and also the ability to download backup with jetbackup in CPanel. So stay with us until the end of this article.
The topics covered in this article are as follows:
 Learning how to work with the Jetbackup CPanel plugin
 - How to restore CPanel backup with JetBackup
- How to download backup with jetbackup in cPanel
- Manage JetBackup backups
Learning how to work with the Jetbackup CPanel plugin
Due to the fact that today businesses have taken an online form, protecting their information is very important. Because the loss of information on a website may lead to the complete destruction of that business. In this regard, internet business owners are always advised to make a complete backup copy of their website information and keep it in a safe place. Currently, it is possible to prepare a full backup through Jetbackup for websites that use the CPanel management panel.
By using this capability, people can access the backups that their hosting company automatically prepares on a daily, weekly or monthly basis, and restore or download it if they wish and save it on their system. save In the following; we will teach you to step by step how to restore CPanel backup with JetBackup and also download backup with JetBackup in CPanel. 🙂
How to restore cPanel backup with jetbackup
If you intend to restore one of the automatically prepared backups using Jetbachup, you must follow specific steps that we will teach you step by step below.
Very important point: be careful before any kind of action, first, create a backup file of your database with the help of how to output the database information in the cPanel host so that you do not lose your information in case of a problem. In the next step, in order to make it easier to work with JetBackup, it is better to reset your host with the help of smart features. Be careful, by resetting the host, all information will be deleted and the host will be like the first day. In this way, you can read reset tutorial.
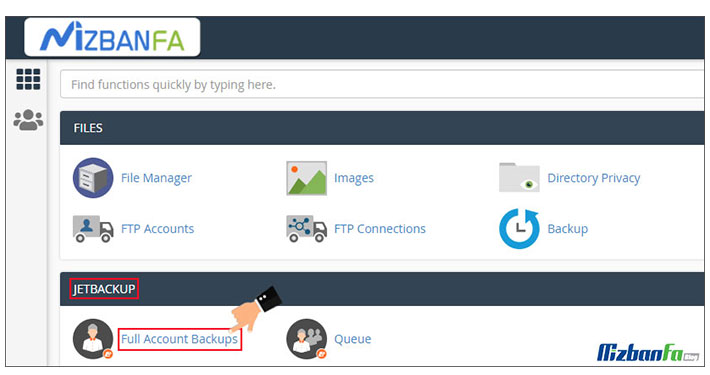
- In the first step of the cPanel backup restore process with jetbackup, you must log in to your host’s admin panel according to the cPanel login tutorial .
- Then, through the JetbacKup, the sub-menu can be seen under the title of Full Account Backup.
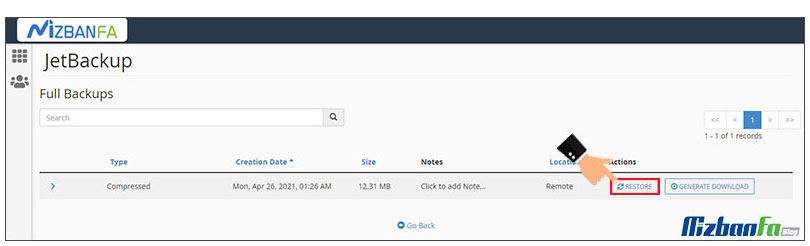
- In the new page that opens, you will see a list of backed up files. In this list, you can see the information about each of the available backups separately. The information that can be seen for each backup is:
- Type : In this section, you can see the type of backup taken.
- Creation Date : This section is related to displaying the time when the automatic backup took place. Backup time intervals are different in different hosting companies.
In Fa Host for shared hosting services in Iran , backup is done in two layers weekly and monthly , and in the services related to hosting for WordPress sites and hosting for online stores , backup is done in three layers daily , weekly and monthly .
- Size : In this section, you can see the backup size in MB . In this way, you can easily find out how much the backups have taken up on your hosting.
- Note : If you want to put a note on your desired backup or mark it, you can proceed through this section and click on the Click to add Note located in front of your desired backup.
- Location : Using this section, you can find out where the backup is stored on the host. This option is very useful.
- Actions : This part is actually the same part that you will deal with in order to restore the backup with Jetbackup in cPanel or download the prepared backup.
- Now, in order to restore CPanel backup with jetbackup, at this stage, you must click on the Restore located under Actions .
- At this stage, a message will be displayed to you, during which you will be asked whether you want the selected backup to be placed in the restore queue or not, and in fact, it will ask you to confirm the restore. If you want to restore, you must select the Add to Restore Quene button and otherwise, click on the Cancel to stop the CPanel backup restore process with Jetbackup.
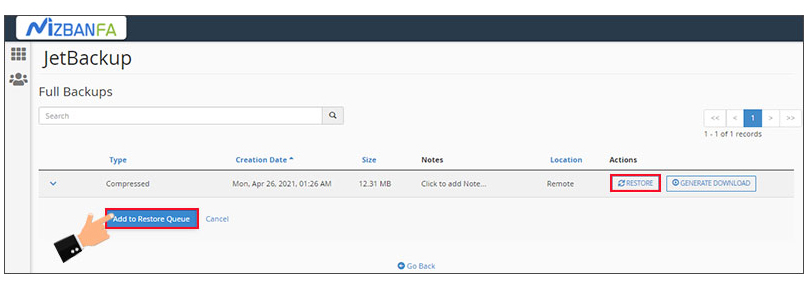
In this way, the restore backup process begins. It is necessary to keep in mind that the restore backup process may vary according to the backup volume. As a result, you have to wait for the restore process to be completed.
How to download backup with jetbackup in cPanel
If you plan to download one of the backups and keep it on your system forever, you need to learn how to download a backup with Jetbackup in cPanel.
Important: The issue that you need to keep in mind, the backups that are prepared automatically, are replaced with new backups in the same order and in the same daily, weekly and monthly intervals. This may be problematic for those who wish to restore a backup that is not listed. For this reason, it is suggested to this group of people to save their desired backups on the system so that even if it is replaced with a new backup that is taken, they have the corresponding backup.
In order to download backup with jetbackup in cPanel, you must follow the following steps in order:
- As before, enter your cPanel management panel by entering your username and password.
- Then click on the Full Account Backup menu located under the JetbacKup.
- through the Generate Download located in the Actions, download the backup with jetbackup in CPanel
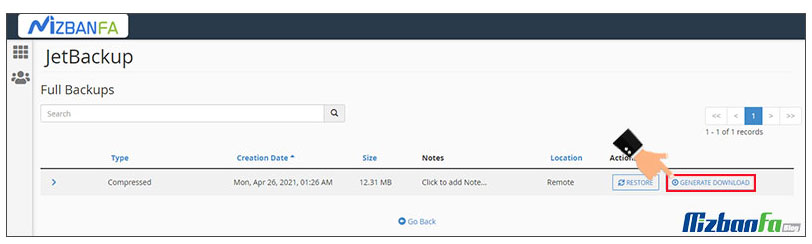
- After you select the mentioned button, you will be shown a message that in order to confirm that the desired backup is in the download queue and start the download process, you need to click on the Add to Download Queue button