


How to set up the WordPress template installation package in the cPanel host
After buying the hosting and domain, you need to install your desired cms like WordPress on your service. In this article, we will teach you how to set up the WordPress template installation package in the cPanel host, by using it you will be able to easily install the template designed as an easy package installation in WordPress, exactly like the demo on your site and from it. use. The steps to install the easy WordPress package on cpanel are very simple. At the end of this tutorial, you will be able to install your favorite templates on WordPress.
Before I proceed to the tutorial, I need to explain the installation package’s templates. After choosing the right template for your business and website, the most important part that will take a lot of time is that you come and spend a lot of time setting up the template and arranging its appearance. Of course, this is not the case with free and simple templates, but with commercial templates that are made using page builders, you have to spend days pulling out what you want from the template and ask exactly to make the purchased template similar to the demo and preview of the template. Design This is where a practical and popular tool was created, and by using it, it was possible for those who intend to sell templates to create a site preview after designing an installation package and with all the settings and plugins on that site after The fact that output was prepared from it, you can easily upload all the information on a new domain in the shortest possible time and within a few minutes, and it was nothing but the easy installation package of WordPress, which is no less a seller than that designed to sell templates. It is found that it has not been used.
In this educational article, we decide to discuss the following topics: ![]()
- What is a WordPress installation package?
- How to set up the WordPress template installation package in the cPanel host
- Creating a new database in the cPanel host
What is a WordPress installation package?
The meaning of the installation package is that you come and, in less than 5 minutes, the exact layout that was created and implemented for a template, along with all the plugins and other settings that are active on the desired site and on your domain and . host Bring it up and you don’t need to spend days to come for the main pages, content, archive, sheets, etc. and design and implement the layout you want one by one. Using WordPress, all the settings on the site, templates, and plugins, such as Persianizing and aligning the template, inserting tabs, etc., are in a package and in the form of a zip file. It is prepared that after that you can install this package and enter the database information of the site in that site and run it exactly like the demo and preview with all the settings. The function of this package is that you actually receive a copy of the template and its settings along with the WordPress script in raw mode, and then with a few steps, you can install it exactly the same as the demo site that is output from it in this package. Display it in your domain and host.
To create an easy installation package in WordPress, they use a plugin called duplicator, which after finalizing the design and layout of the template and site settings, it is enough to go through the steps of creating the WordPress installation package. At the end, two files will be prepared for download in the output, one These files include all the files related to the site, which include the plugins folder, WordPress files, uploaded files, etc., along with the WordPress database. The second file includes a file called installer.php, which is used to install and It is used to launch the WordPress installation package, and the settings and database are configured through this file, and at the end, you can delete this file from your host.
How to set up the WordPress template installation package in the cPanel host
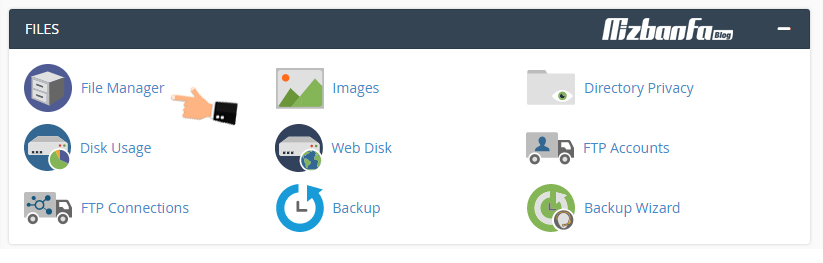
Before doing anything, you need to login to your host and upload the installation package file in your host’s file manager. So, go to the cPanel host login page and click on File Manager like the image below, and after entering the destination link, enter the public_html path. In the easy installation package files, if you already have your site and have started WordPress, you should know that by installing the easy package, all your data will be lost because WordPress will be installed separately. Therefore, delete any folder and file unrelated to the site from the public_html path.
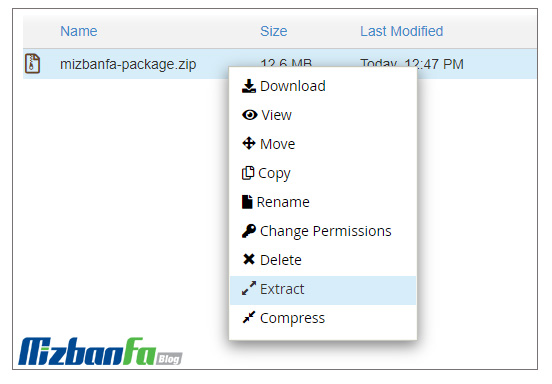
Now, after entering the CPanel host file manager, click on the Upload button and on the opened page you will find the WordPress installation package file in zip format. It is and you bought it from the website template stores, choose to upload it, depending on the size of the package, this may take some time, so wait until the end of the file upload, after your file is uploaded, it will be similar to the image below, the installation package file in the host will be added, now we need to unzip it. Therefore, right-click on the desired file and select the Extract button to extract the file from the compressed mode.
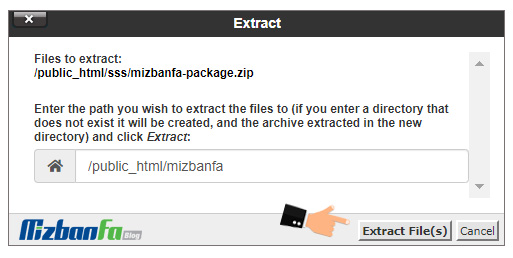
After clicking on the Extract option, the following window will be displayed to you, which asks you to choose the path where you intend to place the files after exiting the compressed mode, so from where we intend to Start the main domain of the WordPress installation package, leave public_html intact and click on the Extract Files button.
After clicking the button, wait for the operation to extract the compressed file from the zip mode. In the end, now that the files have been successfully extracted, you will see that there are two files, one of which is named installer.php and the other file can have a name of your choice, such as a template, which is in zip format. It is and it includes WordPress files, the main package is extracted from this file, now you can delete the first file that you unzipped or move it to another folder so that it does not cause you confusion when starting the installation package in the cPanel host. .
Now, in the next step, enter the address of your domain, and at the end of it, enter the installer.php address to enter the installation phase of the WordPress template installation package in the cPanel host. For example, your address should be mizbanfa.net / installer.php, now, as you can see in the image below, the information and requirements needed to install the easy WordPress package will be displayed on the desired page, if some of them If it is not active on your host, it will be displayed in red color, but if everything is correct and accurate, it will be visible in green color.
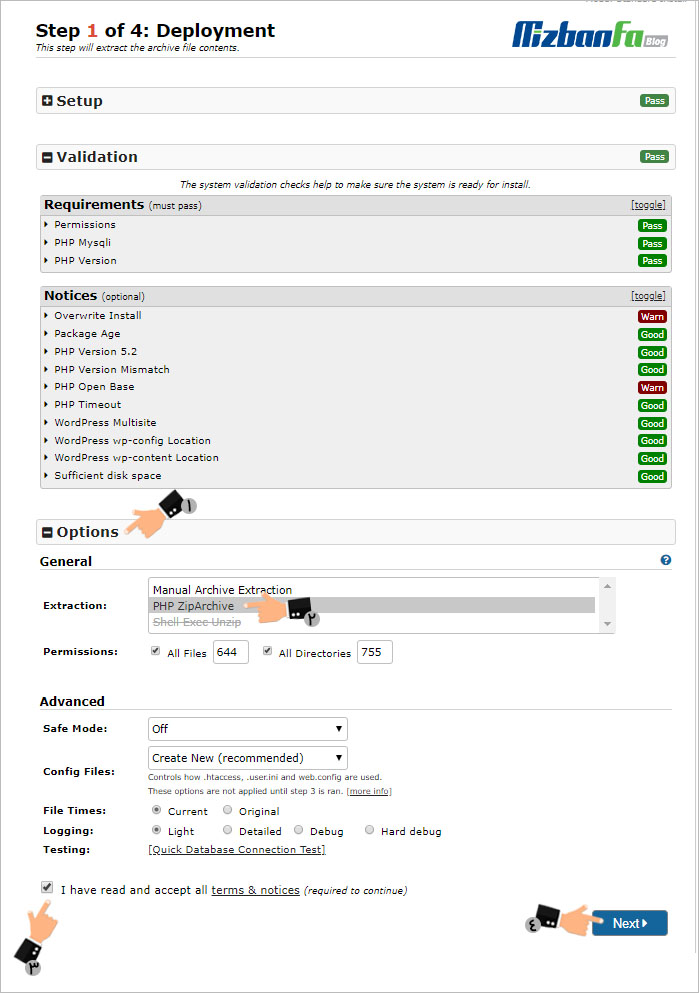
Click on the Options section to show you the options related to the settings and put it in Extraction mode as in PHP ZipArchive .
the mode in automatic mode zip. Select.
Extracting files from the compressed mode in CPanel, extracting files from the compressed mode in Direct Admin
🟢🔵 After extracting the installation package, WordPress files and SQL database site can be seen. At this stage, you can delete the zip file or move it to another folder so as not to cause confusion.
Now that the files are unzipped refer to the installer.php page again. Activate the I have read and accept all terms & notices (required to continue) option so that the Next button is activated and you have confirmed the rules related to the installation package of the WordPress theme in the cPanel host. Now click on the Next button to enter the next step. As you can see, at this stage, it asks you to enter information about the site’s database.
It is necessary to create a new database in the cPanel host and enter its information.
Creating a new database in the cPanel host
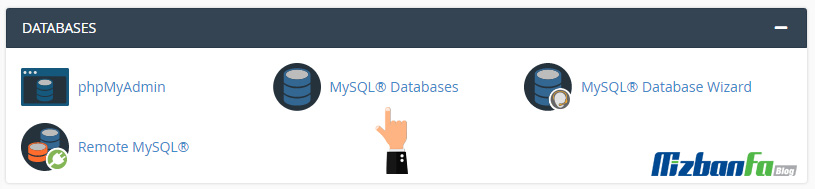
So, go to the main page of the CPanel control panel in the host and then click on the MySQL database wizard button as shown in the image below to enter the stage of creating a database in the CPanel host.
In this section, enter the step of determining the WordPress database username and WordPress database password and finally create your own database. In this regard, a step-by-step guide for creating a database in cPanel has been prepared for you, according to which you can create a database to connect to WordPress.
How to create a database in cPanel
Now that your database has been created, go to the installer.php page in the site domain and enter the database information to proceed with the installation process of the WordPress theme.
Continue the steps of setting up the WordPress theme installation package
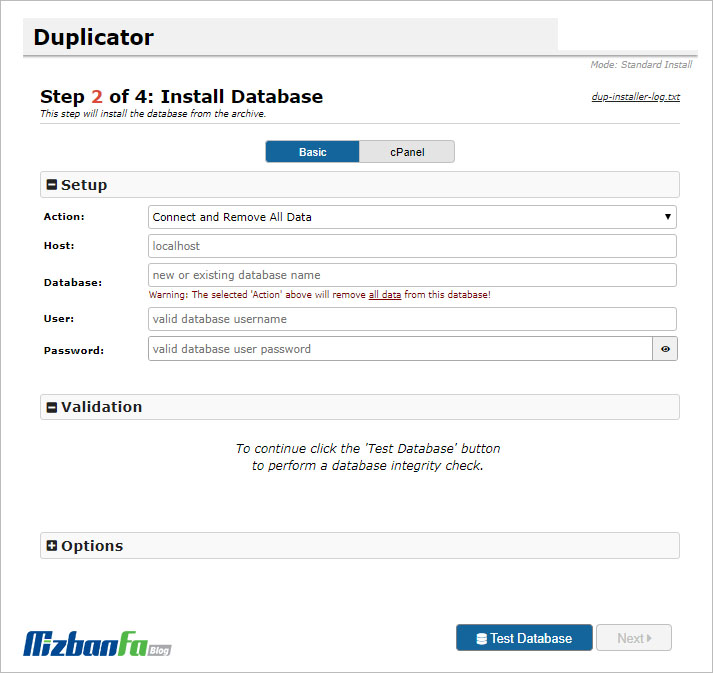
Now that you have entered the desired page, as you are in the Basic tab, first Action option connect and remove all data , and then enter the database information similar to the image and explanations provided below.
- Host: In this field, the localhost option is by default and you do not need to make any changes to it, as you can see, there is another field named port in front of it, which will be automatically identified based on your server. done, so we have nothing to do with this option and we should not apply any changes to them.
- Database: In this section, you must enter the name of your database that you created in the cPanel host, here we chose the name of our database pnubahir_mizbanfa, you also enter any name you chose for your database and WordPress database in this field. .
- User: In this section, you must enter the username of your WordPress database. Here, I chose the name pnubahir_mizbanf, you can enter any name you choose for your WordPress database username in this field.
- Password: Enter the password you chose for your WordPress database in this field. For the password of the database, I repeat that you should try to use a very strong password that cannot be easily guessed