


How to Fix We couldn’t create a new partition error on Windows?
Microsoft Windows is very easy to set up, even if you are a novice user. However, it does not mean there will be no errors in the process.
In Windows 10, one of the most common errors during installation is the “We couldn’t create a new partition” error. There are many reasons for this error to appear. However, you can easily fix it using the following methods.
Disconnect all external and internal storage devices
One of the most common reasons for not creating a partition is interference from other connected peripherals. Therefore, the first step you should take when diagnosing the error is to remove all external and internal storage devices except the main hard disk drive (HDD) and USB that you use to install Windows.
So the devices that need to be disconnected are external hard drives, SSD, USB, and SD cards. To avoid confusion, remove external USB WiFi devices and Bluetooth adapters.
If removing internal hard drives is too complicated, you can disable them through BIOS. Although the steps will vary according to the manufacturer of each board, the general process should be similar to this:
Step 1: Press F2 or DEL as soon as you see the manufacturer’s logo when turning on the computer. Keys vary from manufacturer to manufacturer.
Step 2: Once you enter the BIOS, look for a menu that lists all the devices connected to the computer.
Step 3: Disable all storage devices except the one you are installing Windows on.
Step 4: Restart the computer again.
How to use third-party software to create a Windows bootable device
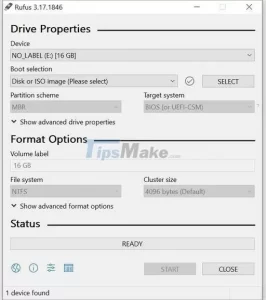
Sometimes the mentioned error can be caused by a Windows boot device that has not been created properly, and it is usually the fault of the Windows Media Creation tool. To eliminate this problem, create a bootable device with third-party software. There are many programs to create Windows bootable USB from ISO.
How to set the hard drive as the first bootable device
Usually, when installing Windows, the USB or CD is the first device that will boot. But there are also cases due to which Windows USB or CD are confused with the hard disk, resulting in the We Couldn’t Create a New Partition error.
Fortunately, this problem can be easily solved by choosing the hard drive as the first boot device:
Step 1: Remove the Windows USB or CD from the computer.
Step 2: Enter the motherboard BIOS.
Step 3: Now look for the boot menu in BIOS. You can refer to the motherboard manual for an easy search.
Step 4: In the menu that lists the boot devices, ensure that the hard disk is at the top; that is, the hard disk is the first device to boot.
Step 5: After doing this, connect the USB or Windows CD and restart the computer.
Step 6: As soon as the computer restarts, press F8, F10, F11, or F12 to enter the boot menu. Depending on the motherboard, the desired key can be different. Refer to the manual.
Step 7: Select USB or CD as the boot device from this menu.
Step 8: Install Windows.
Use Diskpart to create a new partition.
To create new partitions during Windows installation, you can use the Diskpart tool, which is run during Windows installation using Command Prompt.
Remember to back up your hard drive data before performing the following steps; Because they completely erase the hard disk.
Here’s how to use Diskpart to create a new partition:

Step 1: As soon as you get the We couldn’t create a new partition error, close the installation guide or wizard. Then click on the Repair option.
Step 2: Now go to Advanced Tools and click on Command Prompt.
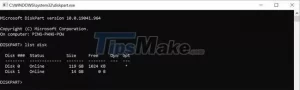
Step 3: In the Command Prompt console, type start diskpart and then press Enter.
Step 4: Then type list disk and press Enter. With this, a list of hard disks (HDD) connected to your computer will be displayed.
Step 5: Find the corresponding number next to the hard disk you want to partition. Type select disk x (here, replace x with your hard disk number.)
Step 6: Now you have to enter the sequence of commands listed below. It means first type clean and press enter. In the next step, type create partition primary, press enter and…:
clean
create partition primary
active
format fs=ntfs quick
assign
Step 7: After completing the process, close the Command Prompt. To do this, you can type exit in the console.
Step 8: Restart the Windows installation process.
How to convert Windows partition to GPT format
GPT partitions have fewer restrictions than the default MBR format. So it is worth converting the partition to GPT format and then reinstalling Windows. Here too, you should use the Diskpart tool. The only point is that by converting the partition format from MBR to GPT, all files will be deleted, so be sure to back up all important information before proceeding.
You can convert your Windows partition to GPT format as follows:
Step 1: Run steps 1 and 2 above from the previous section to open Command Prompt.
Step 2: Type start diskpart in the Command Prompt console and press Enter.
Step 3: Then type list disk and press Enter.
Step 4: Now enter select disk x in this section. x is the number next to the list of hard disks.
Step 5: Before proceeding, you must completely erase the hard disk. To do this, type clean and press Enter.
Step 6: Finally, type convert gpt and press Enter.
Step 7: Wait for the process to complete, then try to install Windows again.
By using the methods mentioned above, you can easily fix the “We Couldn’t Create a New Partition” error and install Windows without any problems. However, you may also encounter other common Windows installation errors. So it is better to be familiar with the necessary steps to prevent this error from appearing.