


How to Deal with the RAM Not Detected Error in Windows …
RAM is a critical component in determining the performance of a computer. The amount of RAM on your laptop determines its ability to process information, so the larger it is, the more computing capacity it will have. However, this Memory is only valuable when it can be used. A 32 GB memory module in the system allows only a part of it to be used.
If you feel your device is not working as it should, your system is probably not using its total RAM capacity even after adding a few gigabytes of RAM.

This article examines how to fix the problem of having less usable Memory than what is physically available.
Problem-solving based on personal experience
According to the author’s personal experience, the most common cause of this problem is the RAM not fitting correctly on the motherboard. First, you must turn off the system, remove all the RAM modules once, and reseat them firmly. There must be a clicking sound when you insert the RAM.
Then reset the system once and check to see if the problem is solved. If the problem is not solved, try the following solutions to solve the problem.
How to check the total installed RAM
First, it should be determined whether insufficient RAM is the reason for poor system performance. Therefore, you should compare the actual RAM installed and the usable Memory on the computer.
To check the actual capacity of RAM installed on your computer, run the following command in Command Prompt to get the exact amount:
Which memory chip gets capacity
This command returns the memory capacity. The numbers will be in bytes.

In the image above, those two rows show that there are 2 RAM modules, each with a capacity of 4 GB.
How to check available RAM
The fact is that not all installed Memory needs to be available for system use. For this reason, it is necessary to understand what capacity of the installed RAM can be used for the operating system.
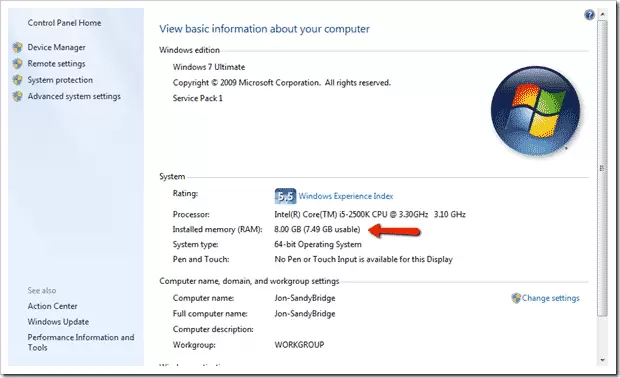
This information is displayed on the About page. Open the About page in Settings and look for the value inserted before the Installed RAM option. This is the amount of usable RAM in your operating system.

If you find a difference between the actual installed and usable Memory, there may be a problem with your system configuration that needs to be corrected. We will talk about this later in the post. Be sure to read this article and learn to read your system’s specifications once and for all.
Possible causes
As we said, there are several reasons why your system has less usable Memory than the actual amount:
- The installed operating system has a 32-bit architecture.
- Devices installed on your computer have dedicated Memory for specific functions.
- The motherboard cannot manage the amount of installed RAM.
- BIOS settings are configured to save Memory.
- BIOS is outdated.
- The version of Windows installed is not compatible.
A 32-bit operating system is not programmed to handle more than 4 GB of Memory, so the total usable Memory is no more than 3.2 GB. Here, the remaining 0.8 GB of Memory is used by other components such as BIOS, GPU, and other devices. Once memory segments are mapped, they are no longer available to the operating system.
This list does not end here. Many other factors can cause your computer to use less memory than it is. This topic is discussed below.
Problem-solving methods
You can do several things to allocate more usable RAM to your operating system. Here’s what you need to do:
1-Checking the amount of allocated memory using Resource Monitor
Resource Monitor is a built-in tool in Windows 10 that tells you what resources are being used by which hardware or service. It also explains how and how much device memory is divided for each function.
Open Resource Monitor by searching for it in the search box. Go to the Memory tab, and in the Physical Memory section, you should be able to see how the RAM is distributed. This feature lets you know how much RAM it uses and what ports another hardware reserves.
2- Switching from a 32-bit to a 64-bit operating system
As you can see from the table above, 64-bit operating systems support more Memory than 32-bit operating systems. Therefore, we suggest that if you use a 32-bit operating system, you change it to a 64-bit version. Unfortunately, this process requires reinstalling the operating system.
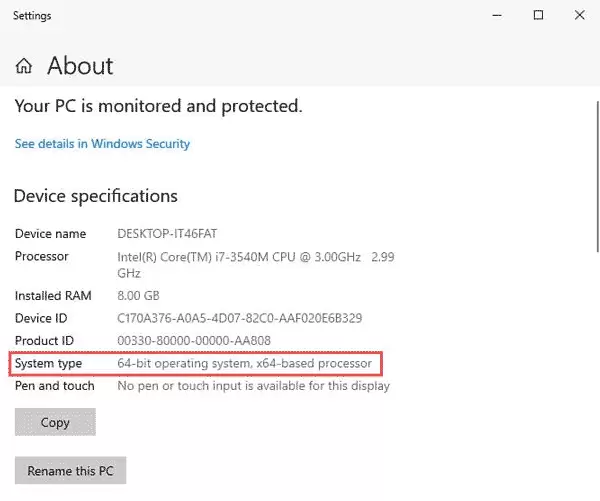
To check the current architecture of your operating system, open the About page in the Settings section and search for it in front of the term System Type.
3- Reset the RAM modules
Motherboards usually require RAM modules to be set according to the bay type. Each bay supports its clock speed, so it may not be able to utilize appropriately installed RAM modules fully. This method was mentioned at the beginning of the article (part of my personal experience).
We suggest you look at your motherboard manual and arrange your modules accordingly. In addition, if the connector is color-coded (black and white), match the colors to the modules.
4- Disabling the maximum Memory during boot
The maximum memory usage is usually determined when starting the computer. This allocation enables the computer to perform startup tasks faster and more efficiently. However, it also allocates a portion of RAM the operating system can no longer use.
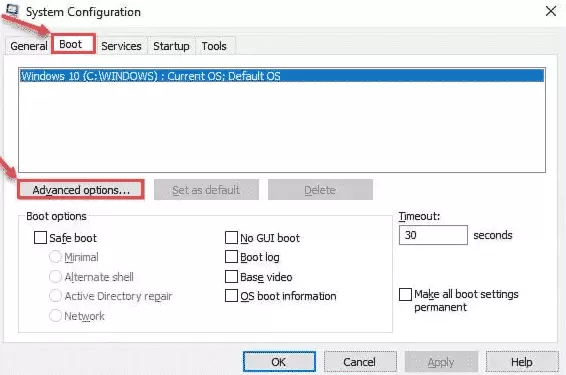
To disable this option, open the System Configuration window by typing msconfig in Run. Then go to the Boot tab and click on Advanced options.

In the Advanced window, remove the check box next to Maximum Memory and click Ok.
After finishing, restart the computer and check if the Installed RAM has increased from its previous value on the About page.
5- Reconfiguration of BIOS settings
An integrated graphics card may have reserved a portion of RAM for use as video RAM (VRAM). This one is more reconfigurable than the other settings through the BIOS.
After booting, access your computer’s BIOS and change the following settings:
- Virtualization – Enabled
- iGPU – Disabled
- Render Standby – Enabled
- iGPU Memory – Auto
- Multimonitor – Disabled
- Memory Remap – Enabled
You should also check the settings mentioned above in the BIOS and modify them as mentioned. Setting iGPU Memory to auto and iGPU to off has reportedly resolved many users’ issues.
6- Updating BIOS
An old BIOS version can cause your operating system to support only a part of the actual Memory in your device. Therefore, you must update it to the latest version.
Let’s also say that updating the BIOS can be complicated in some situations, so do this only if you fully understand the process. Any incorrect configuration can damage your BIOS and prevent you from working with your computer.
To update your system’s BIOS, refer to the motherboard user manual or the manufacturer’s website for the correct instructions or download them. This is very sensitive, and your system may suffer severe damage if not done correctly. In addition, each laptop and computer has its way of updating the BIOS. So, it is better to search on Google, for example, “updating the BIOS of Lenovo Ideapad 5 laptop”.
7- Set the Pagefile so that it is deleted after the system is turned off
Pagefile is a subvolume of RAM that temporarily stores data in this Memory. In some cases, Pagefile saves some space in the system memory to perform necessary tasks. You can configure the Pagefile to be deleted automatically when you turn off the computer.
Before proceeding, we suggest you create a system restore point, as this process will manipulate the system registries.
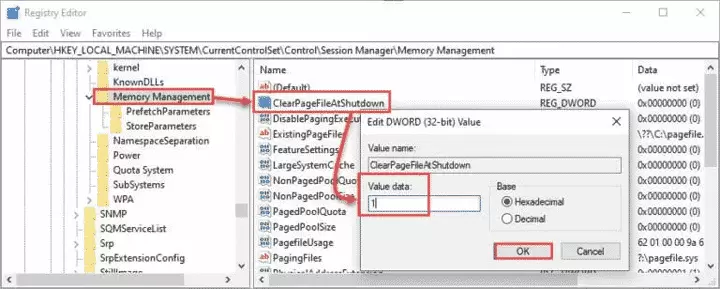
Run the Registry Editor by typing regedit in Run and then put the following path in the address bar for quick access:
Computer\HKEY_LOCAL_MACHINE\SYSTEM\CurrentControlSet\Control\Session Manager\Memory Management
Now, double-click on ClearPageFileAtShutdown in the right window and set its Value Data to 1. Then click OK. After finishing, restart your computer for your changes; to be applied.

After rebooting the computer, check if the Installed RAM on the About page is the same as the installed Memory.
8-Memory testing
You can also run a memory test to ensure no bad sectors. Windows 10 has a built-in tool for this. However, it comes with a system reboot.
To test the Memory, type mdsched.exe in Run and press Enter. In the pop-up window, click Restart Now and check for problems.
Your computer will now reboot and then automatically enter scanning mode. Your Memory will be scanned to find bad sectors. If a bad sector is found, we recommend that you replace your memory module(s) on a priority basis so that it can be used as much as possible. After restarting the computer, you can see the results in the System Tray.
Conclusion
We believe that every person should be able to get what he paid for, Use it, and enjoy it to the fullest. An extra bit of RAM can also bring you a smoother experience of working with the system by increasing the computer’s speed and ensuring that everything is done at the right time.
Therefore, check whether your device uses the desired RAM correctly or is being wasted.