


How to create an info email for the site in Host C Panel
After purchasing time to manage the control panel, one of the most important parts you need to configure is managing emails and creating an enterprise info email for your cartoon business. In this educational video from the knowledge base of the Fa host, we have decided on how to create an info email for the site in Host C Panel so that after that, you will be able to create dedicated email accounts with different extensions in your web host and from Use them to send and receive important and official emails.
In this educational article, we will address the following topics:
- Learn how to create an info email

- What is the use of creating a dedicated email address inside the host?
- Steps to create info email in Cpanel
- Learning to create corporate and official emails on hosts
Learn how to create an info email
Imagine that you are the manager of a large website, and your website is made up of different parts. For example, you sell your products in one part of the site, support your users in another part, and various training in one part. You provide your users. You may have hired special people to manage each part of your website. You want those people under your supervision to communicate with your website users and help advance your goals. Using email is one of the main. It is one of the most popular ways to communicate within e-commerce. You can create custom email addresses for each of your employees through the various features of the Host C Panel. The steps for info are the same as creating other emails on the host, except that our email address is predefined, and we have to enter the info in the name of the email address field. In the following, we will go through the steps of creating info emails, but before that, let me explain the use of dedicated emails with an example.
![]()
What is the use of creating a dedicated email address inside the host?
For example, for the sales section, email address sales@yoursite.ir support section support@yoursite.ir, training section learn@yoursite.ir, and for the management section, email address management@yoursite.ir with this feature to create a C panel to different parts of the company You will be able to exchange their messages with private and official email addresses that belong to the domain name of your website.
Steps to create info email in Cpanel
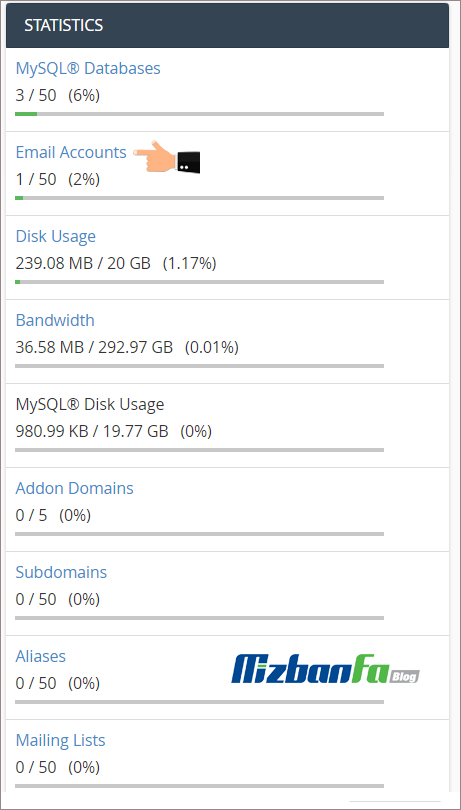
First, we enter the C-panel host of our website by learning how to enter C-Panel. Before starting the steps of creating an email, we must make sure that it is possible to create an email account from the hosting company or not. We will go down from the right-side panel, i.e., STATISTICS, to reach the Email Accounts section. As you can see, It is possible to create 50 email addresses, and so far, only one email account has been created.
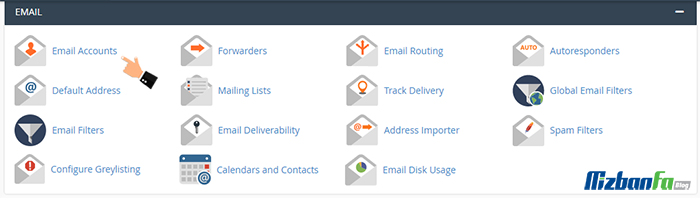
So now, we will continue the tutorial with more confidence than from the email section. Click on the email accounts icon from here to enter the page for creating and setting up an email account in the C panel.
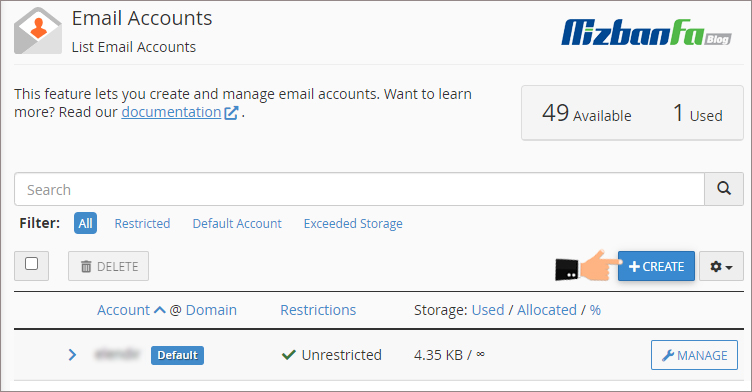
You will now be taken to a page similar to the one below. Click the create + button.
From the Add Email Account section, we can create a new email account for ourselves on this page. To do this, we must carefully complete the following fields:
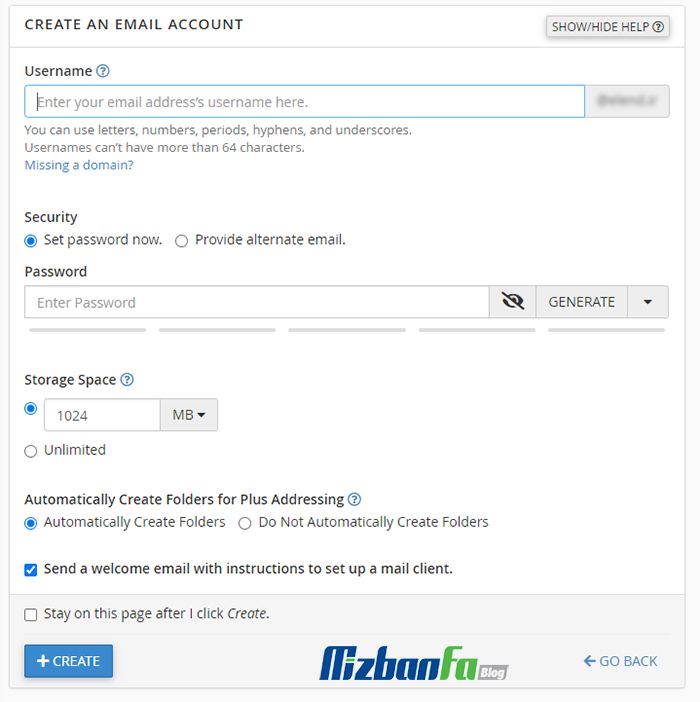
- Username: In this field, we have to enter the prefix of our request email. For example, we can write info or anything. Any prefix that we write here becomes our email address. In this example, our domain name is mizbanfa.net. If you enter the email prefix info, our email address is info@mizbanfa.net, so we write info here. If you want to create an info email, fill in this field with the phrase info.
- Domain: If you have parked or added another domain on these hosts other than your original domain, this field will be activated for you. With this feature, we can create a special email address with the extension of other domains of our website. The field remains in our original domain.
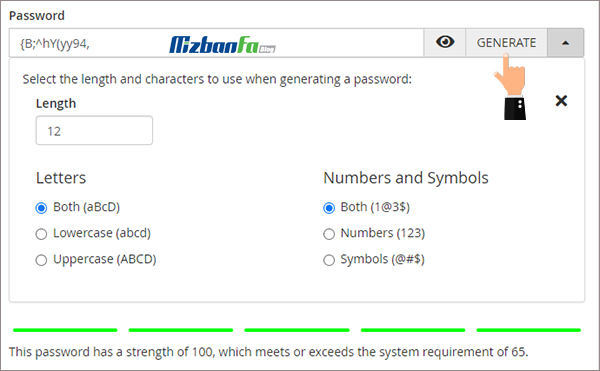
- Password: In this field, I have to consider a password for this email account so that in the future, we can access the emails inside this email, and it is very important to consider a strong password for this section because we are considering a specific password. We do not have to click on the password generator button from here to make C-Panel a secure password for us. We must save this password somewhere because it will hurt us in the future, so we copy and paste it into a Notepad file…
- : This field is related to the volume or amount of disk space on our website that we want to provide to this email account. It is better to consider a reasonable volume for each email account, our host has 1024 MB of space by default, and We limit it to one hundred megabytes so that this email account can not occupy a lot of space from our host over time. In this section, if we select unlimited, this email account will be able to use our host space indefinitely…
To finalize the creation of this email account, we click on the blue crate button from below to see the green message account created here, and just seeing this message means that our email account is well created.

Learning to create corporate and official emails on hosts
After creating the email, we will go down to get to the Accounts section. The email accounts created by us are in this section. The info email is the same email account you are creating now. In front of the account, we can retrieve the password to enter this email address by clicking on the manage button. If we forget it, on the same page in the , we will be able to edit the volume of this email account and increase or decrease it or delete an email account. We are also able to delete this email account forever.
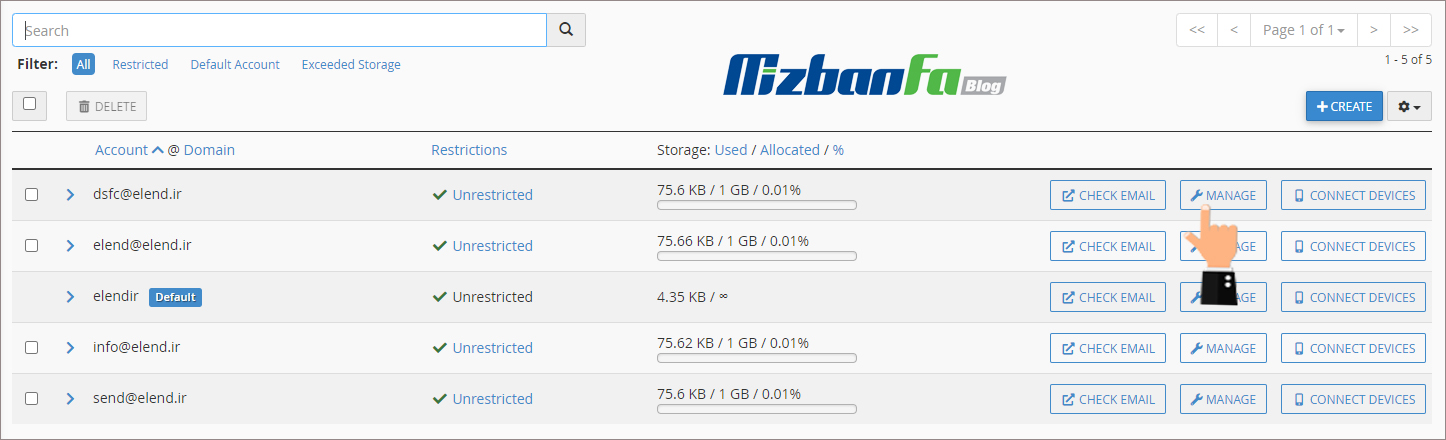
Now, if we click on the more button here, there is a series of items that we want to explain to you:
- Receiving incoming mail: With this option, we can make the owner of this email account can no longer receive emails, and if we activate it, no email will be received in the inbox of this account.
- Logging In: With this option, we can make the owner of this email account can not enter and use it, and of course, if we enable this option, it will not be possible to send email from this account anymore.
In the next tutorial video, how to log in to your email account via Webmail so that you can then enter the user interface to manage the created email accounts and manage the emails you send and received, so stay tuned To see more tutorials about C Panel, which is one of the most popular control panels for management.