


Flash Booting Tutorial For Quick And Easy Installation Of Windows
Bootable Flash Means The Possibility Of Running System Files And Executing Specific Instructions Directly From The Flash Memory.
Next, we will teach this process to install Windows quickly and easily.
Today, flash memory has become very popular and replaced other data storage methods such as CDs and disks. Many users use flash drives to store pictures, transfer files, play movies and music on different devices, and keep backup files. These applications have made buying high-quality flash drives necessary in today’s digital world.
However, flash memories have more uses, the most important of which is to boot and install the operating system through them. This article will examine the advantages and benefits of bootable flash memory along with the method.
What are the advantages of bootable flash?
Bootable flash means running system files and executing specific instructions directly from the flash memory, allowing you to run and implement the programs you want without the need for an external operating system. Next, we introduce the essential uses of bootable flash drives.
1. Operating system installation
One of the primary uses of bootable flash drives is to install operating systems such as Windows and Linux on a computer or laptop. This practice, done through CDs and DVDs in the not-so-distant years, has become very popular. If you have bought a new device or your current operating system is having problems, using a flash bootable to install the operating system is the best option.
Previously, we prepared a tutorial on downloading and installing Windows 11 and installing Windows 11 with flash, which you can use to install the latest Microsoft operating system.
2. Repair and troubleshoot and save device files
Suppose your computer or laptop has a problem. In that case, you can fix the problem using a flash bootable equipped with diagnostic and repair tools, or at least save the important files stored on the device and prevent them from permanently deleting. Many faulty devices can be repaired and troubleshot by creating a bootable flash and using tools like Hiren’s Boot CD or Ultimate Boot CD.
3. Testing the device or using someone else’s device
Suppose you intend to test a new computer or use someone else’s computer for an urgent task. In that case, you can use Flash Bootable and transfer the files you need without installing a new operating system or entering the privacy of others.
Flash booting steps
Creating bootable flash with Rufus software
One of the simple ways to make a flash drive bootable is to use the Rufus software, which makes the flash memory bootable with just a few clicks. To make a bootable flash with Rufus, follow the steps below:
- First, download and install the latest version of Rufus software.
- Download the desired file to make flash bootable. This file can include the installation file of Windows, Linux, repair and recovery tools, or other operating systems.
- If the file is in a compressed format like zip or rar, unzip it in a suitable place to get the iso file.
- Open the Rufus software.
- Connect the flash memory to the system.
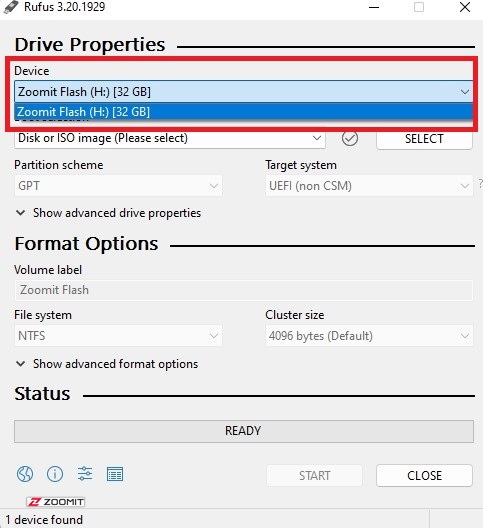
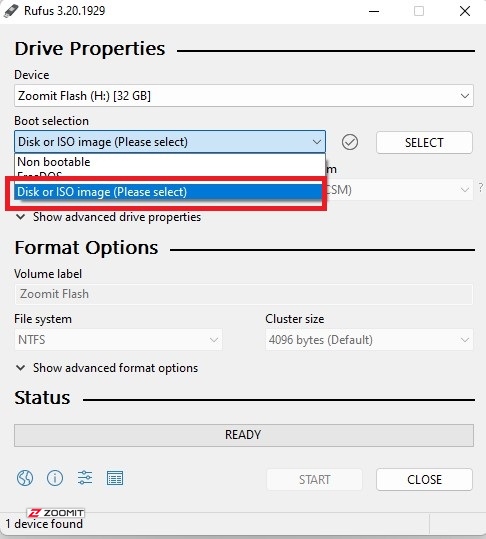
- In the Driver Properties box, do the following in order:
- Device: Select the flash memory.
- Boot Selection: Select Disk or ISO image option.
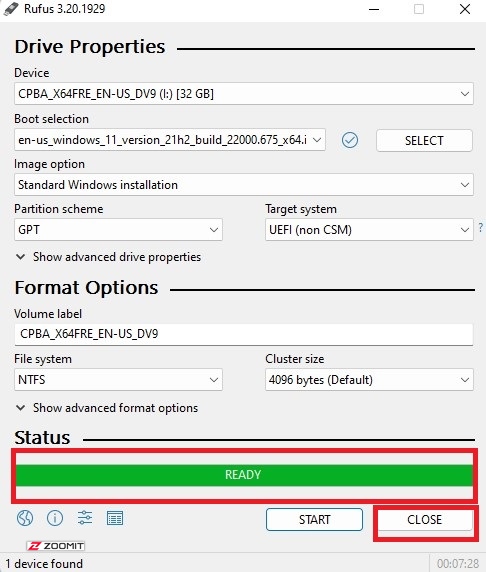
- Select: find the iso file and, select it, click on open.
- In the Format Options box, check the following settings:
- If the iso file size is more than 4 GB, change the File system option to NTFS.
- Finally, click START at the bottom of the window.

Other side settings may be displayed depending on the type of iso file. For example, when creating Windows 11 bootable flash, you will face options like the image below.
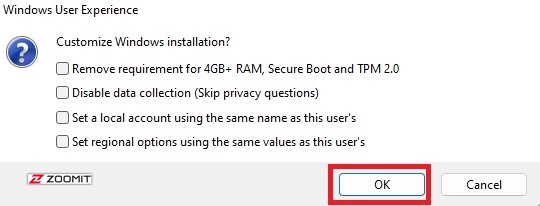
- If you don’t want to use them, uncheck them and click OK.
In the last step, the software warns to delete all the data on the flash memory.
- If you agree, click OK.
- After a few minutes, the bootable flash will be created. Close the software by clicking CLOSE.
Now your flash bootable is ready.
Creating a bootable flash with Windows without the need for software
If you want to make a Windows flash bootable without software directly, follow these steps:
- Connect the flash memory to the system.
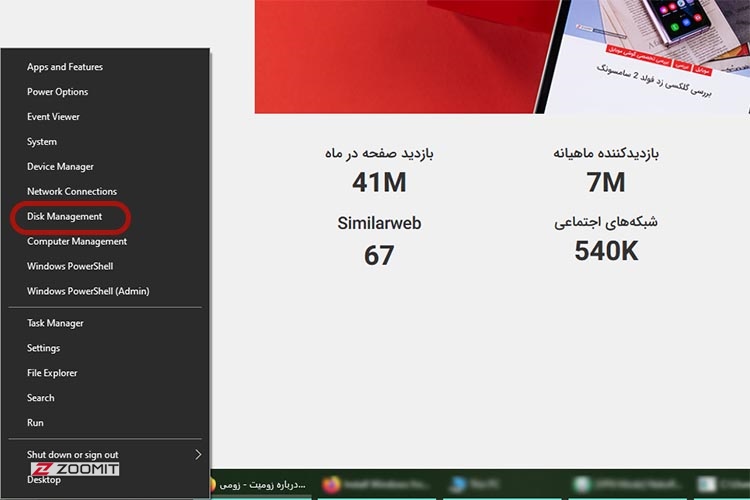
- Right-click on the start menu and select Disk Management from the opened menu.
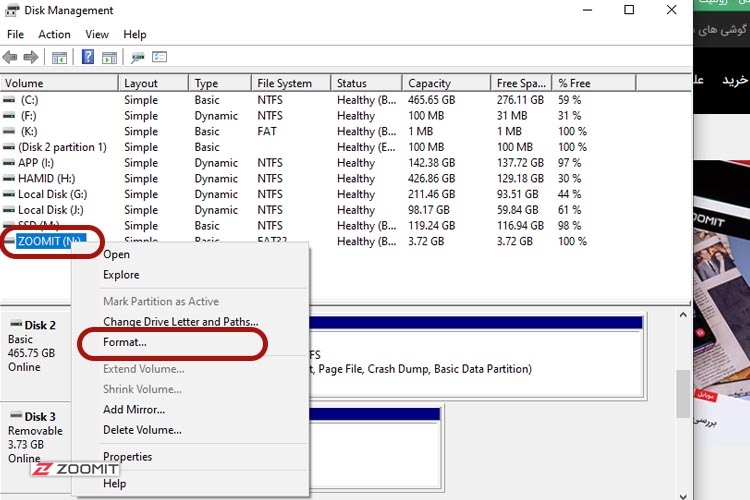
- Right-click on the flash drive in the Disk Management window and choose Format.
- If your computer uses the UEFI system, set the File system option to FAT32 and click OK.
If your computer is equipped with BIOS, you can use FAT32 or NTFS.
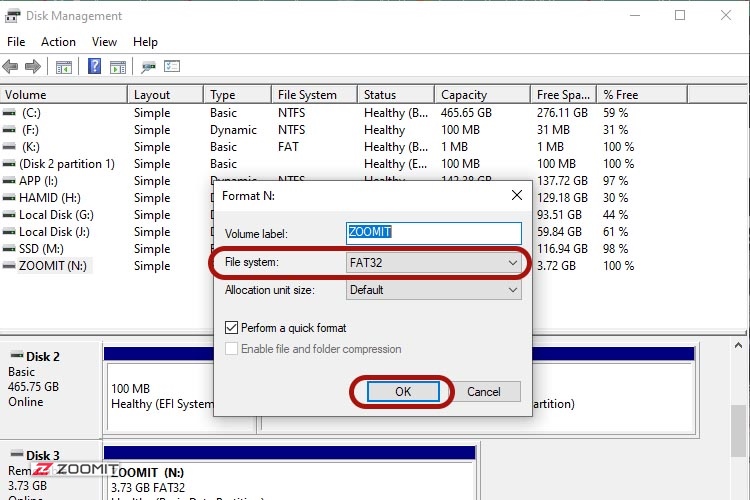
Suppose the volume of the Windows installation iso file exceeds 4 GB. In that case, you must either use the NTFS Format or, for computers equipped with UEFI, divide the file into several parts, which we will teach at the end of this method; Otherwise, skip this section.
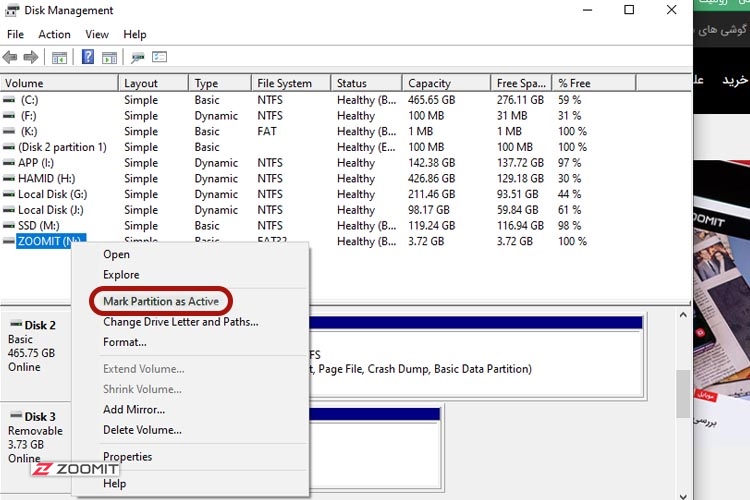
- Right-click on the arrow again and select Mark Partition as Active.
- Now transfer all windows installation files or iso files to flash.
Split files larger than 4GB
To split Windows installation files larger than 4GB, do the following:
- Move all Windows installation files except sources\install.wim to the flash drive.
- Right-click on the Start menu, select Windows Powershell (Admin) and confirm the message displayed by clicking Yes.
- Using the following command, convert the installation file into several smaller parts:
Dism /Split-Image /ImageFile: D:\sources\install.wim /SWMFile: E:\sources\install.swm /FileSize:3800
In the code above, instead of D: you should enter the location where the iso file is saved, and instead of E: write the flash letter connected to the system.
After these steps, your flash bootable is ready.
Can flash be bootable?
Converting flash memory to bootable eliminates the possibility of storing and transferring files through it, But fortunately, you can easily convert bootable flash to normal flash. If you have used flash memory to install Windows or other operating systems and want to use it again to store and transfer files at total capacity, you need to format it once. To do this, follow the steps below:
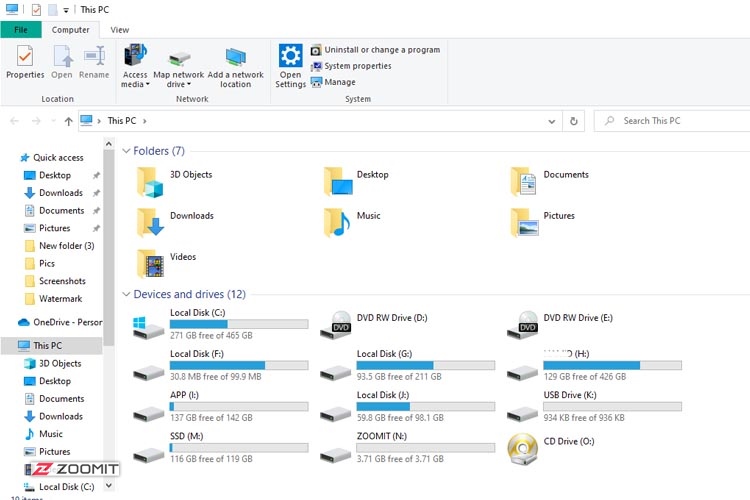
- Enter This PC on your computer.
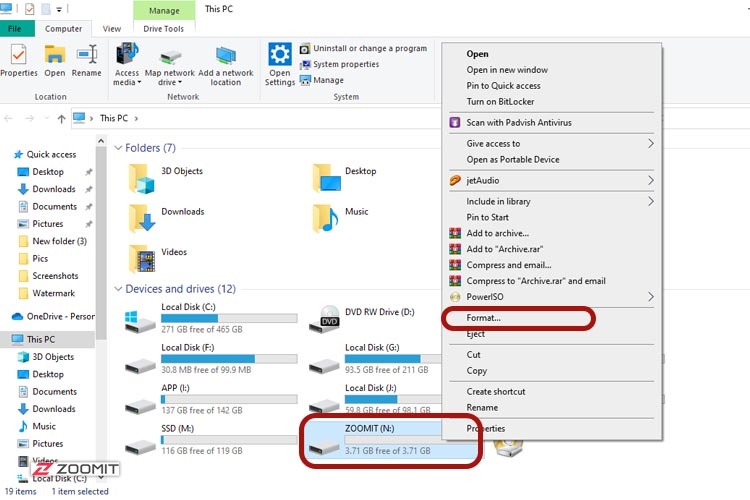
- Right-click on the flash drive.
- Select the Format option.
- Click the Start button.

After a few moments, the flash will be formatted and can be used again.
How do we know the flash is bootable?
To make sure that your flash is bootable, there are several methods, of which we mention two examples below:
1. Checking flash bootable through Disk Management
- Right-click on the start menu and select Disk Management.
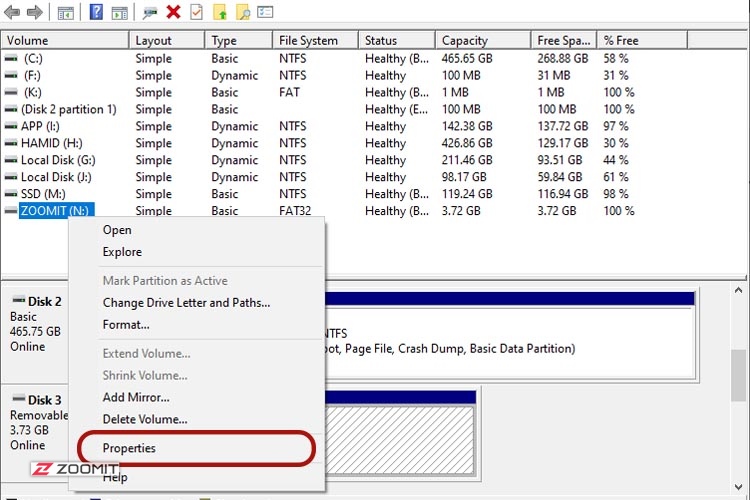
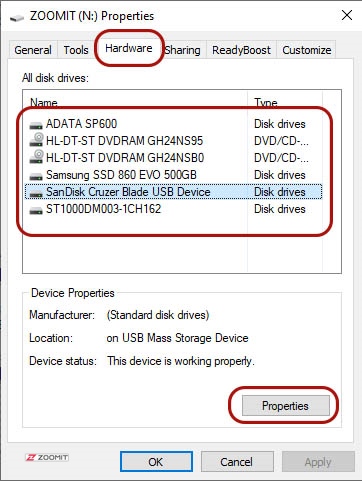
- Right-click on the flash drive from the list of dreams and select Properties.
- Go to the Hardware tab.
- Select the flash drive from the list and click Properties.
- In the opened window, enter the Volumes tab.
- If there is no information in the Disk Information box, click the Populate button.
- Check the Partition style front statement.
In this section, you should see terms like Master Boot Record ( MBR ) or GUID Partition Table.
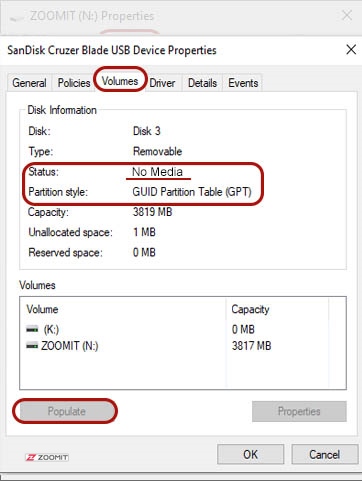
If your flash drive is bootable, phrases such as No Volume or No Media or minimal volume (just a few MB) should be displayed in front of Status; Otherwise, the flash is not bootable.
2. Checking flash bootable through the Windows command line
- Enter the Start menu and find the Windows Command Prompt program by typing CMD. Right-click on it and select Run as Administrator.
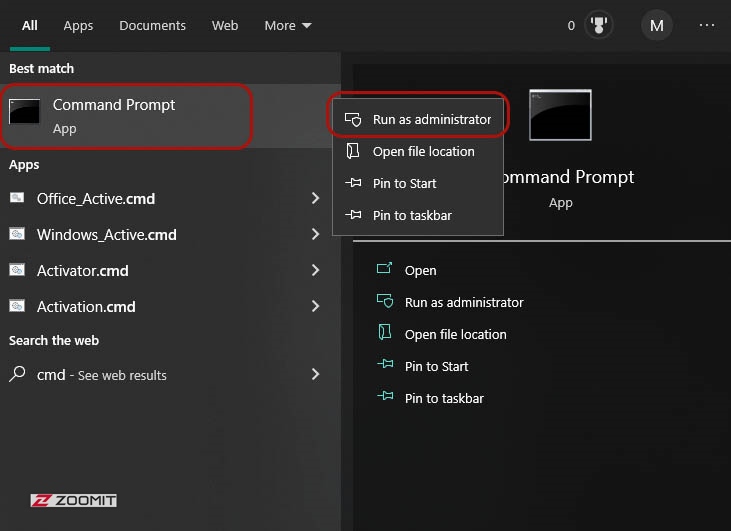
- Confirm the displayed message by clicking Yes.
- Type the word diskpart and press the Enter key on the keyboard.
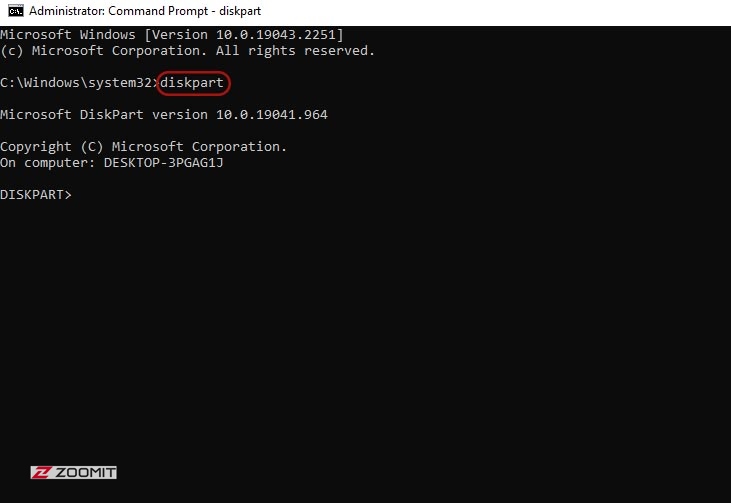
- Type list disk and press Enter.
The computer or laptop drives will now be displayed.
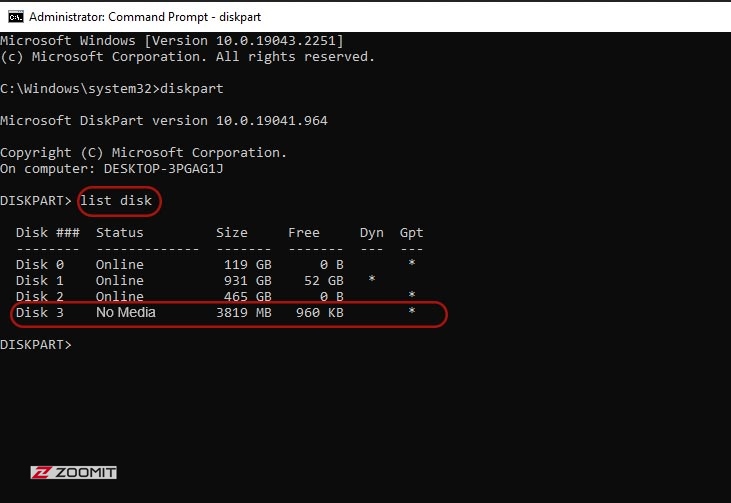
The drive is bootable if you see No Media in front of any of them in the Status column.
In this article, we have explored the benefits of bootable flash along with how to do it. Also, we got acquainted with the method of checking bootable flash and returning bootable flash to average beat with the ability to save and transfer files.
Now you can use your flash memory to install various operating systems, including Windows 11, and repair and troubleshoot a faulty computer or laptop.