


Important tips for editing (post-production) images taken in Photoshop and Lightroom
There are two types of workflows for the post-shooting process: one is to take high-speed but not-too-clean photos for photos that have a deadline, and the other is to get the best possible image when photo quality is important.
The tools and processes of these two tourists are more or less the same, but the decision-making method and the time you spend preparing them are in some cases fundamentally different.
In this tutorial you will learn the best possible approach to taking photos. Most photographers, however, need to know both workflows; But we advise everyone to start their work by learning the steps after photography in the best possible way.
Trying to get the best photos you can is the most worthy and valuable way to learn the post-photo processing process and apply it to a wide range of photography techniques.
The best possible method is the one we often use. This method is used by photography professors and now we will provide it to you.
Workflow steps
This type of workflow has 5 stages:
- File preparation
- Pre-visualization
- Construction
- Preprint
- Output
Important points before starting work
First of all, you need to put a notebook next to your hand to write the steps on it. In this way, the process of your work is completely under your control. We recommend that you use software such as Adobe Photoshop or Lightroom to edit and process your photos. We also use these two programs in this tutorial.
Important Note : If you are going to work on a collection of several photos, you must do all the steps at the same time; So before you start, move the photos to be processed and apply all the steps to all the images.
In addition, if you take high-volume photos or your photography style is fast, you should have enough information about how your images are processed. We suggest that you learn everything about working with Lightroom software and use it in the professional processing of your photos.
Raw file preparation
The key steps to prepare a file before editing include the following:
1. Default processing
Make settings that include everything from calibrating the camera and lens and adjusting the base color profile. For the profile of the camera, we recommend Faithful or Neutral mode, which can be used by default on the input photos to Lightroom software to give you the best starting point. You can also use manual camera settings and lens profiles.
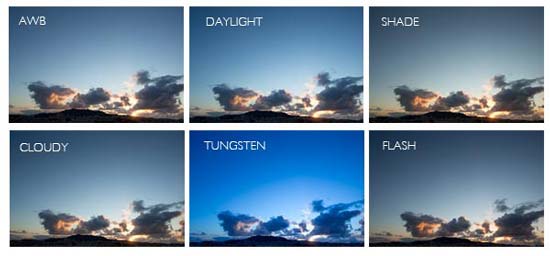
2- Adjusting white balance
The creation of white areas in the image is basically in line with our expectations of the scene. A good starting point for this is to use the White Balance Picker option to select the area that should be neutral. Be careful because the colors of memory are very strong: our perception of objects, such as light skin tones, is more in a way that tends not to be neutral. In fact, most photos that are not completely neutral in terms of white balance are preferred.
3- Adjust color balance
Medium color spectrums are much more important to us than white in the photo. Changing the balance of white light usually leads to a correction of the balance in the medium color spectrum. Except when the colors are severely out of bounds and inconsistent, Photoshop can usually best adjust the balance of the medium color spectrum.
4 – adjust light balance black
We create black areas that meet our expectations of the image. Here, too, the black light does not necessarily have to be neutral. Adding color to black light makes it look darker and creates an adjective or mood. Adjusting the color balance to create a sense of warmth and adjusting the black light balance to create a sense of coolness can take a subtle look at the color splitting process. Use the Split Toning settings (hereinafter) to adjust the black light balance.
5- Light correction
No image is fully illuminated. To reduce image fragmentation and preserve as much information as possible on it, you need to adjust the white dots and black dots. To adjust the white dots, hold down the Alt key and drag the Exposure tool over the image (the image will turn black) and release until the image starts to be created.
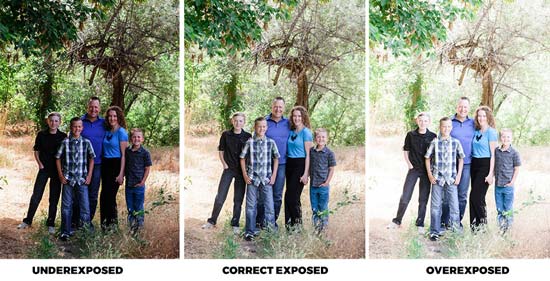
Then for adjusting the black dots, hold down the Alt key and drag the Blacks tool on the image (the image turns white) and release until the image starts to turn white. Recovery and Fill tools create more color spectrum, but also change the saturation mode, so I suggest leaving them as they are.
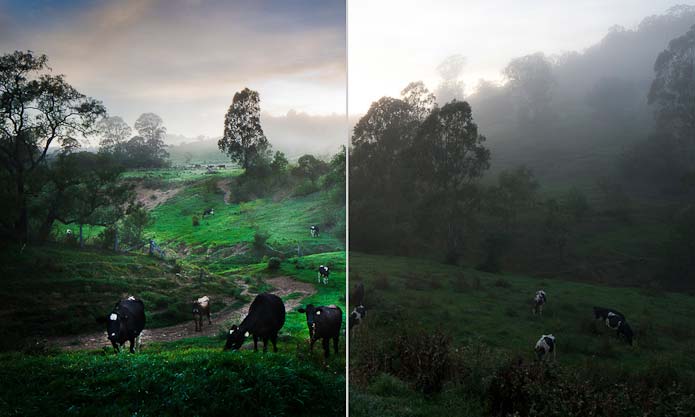
6- Adjust the brightness and contrast of the image
Create a balanced and slightly uniform image. Highlights usually require color spectrums, and shadows need to be separated. Do not rush to do the work and give the opportunity to get the job done. Be patient; This will take some time. Brightness and Contrast tools, in combination with Exposure and Blacks tools, are perfectly legal ways of doing things, but we think they are weaker than the spectrum curve (which holds the black and white dots). Tone Curve allows you to fine-tune the contrast of color spectra using points on a graph. In the preparation phase, it is best to use the global contrast settings. Do not enter local contrast settings right now.
7- Clarity
The sharpness tool applies a sharpening of colors over a wide radius. This will make bright spots appear brighter and dark spots appear darker. Be aware that using this tool may create a halo. In general, it is difficult to use this tool very accurately and properly.
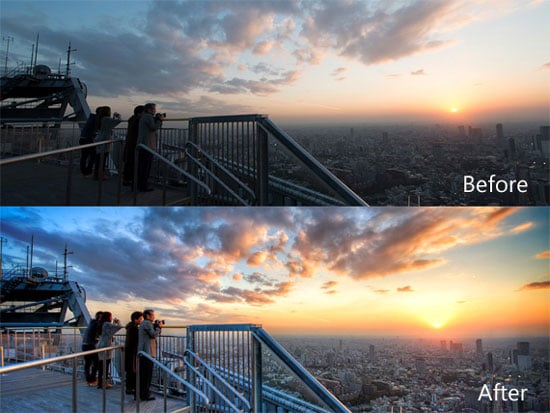
8- Vibrance and Saturation
The Saturation tool works on all colors, while the Vibrance tool works more on less saturated colors to so-called bring the image to life. These two tools can be used together to create a state of saturation. To create a smoother saturation, decrease the Vibrance and increase the Saturation. To make a difference in saturation, decrease the Vibrance and increase the Saturation.
9- Sharpening colors (Sharpening)
Proper sharpening of colors is the last step to increase the quality of work that is done locally and takes into account several factors in photo printing. What we have to say here is that the Sharpening tool is only used in Lightroom software for fast and not so clean workflow.
10 – Turn into a black and white photo
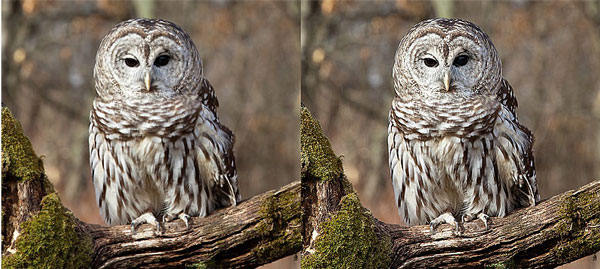
There are several ways to turn a color image into a monochrome image. Some people tend to use the black and white image conversion tool in the first step, but in our opinion, using this tool prevents you from understanding what can be done on the image and actually eliminates some technical flexibility. It is best to use the Before / After Split Screen tool by pressing the Shift and Y buttons at the same time to maintain a natural flow between colors when changing colors. Recovery and Fill tools work great on black and white images.
Pre-visualization
The object is the image evaluation stage to decide what to do with the image to make it look special and different. The ability to visualize the inherent potential of the image and to know what is good are the characteristics that distinguish a professional photographer. Being a professional photographer is a lifelong challenge and lifelong learning process.
If you practice, the pre-object stage only takes a few minutes for each image. If you skip the pre-visualization stage, you will be wasting a lot of time in the post-shooting stages in the wrong direction. The amount of time you have to spend in the pre-embodiment stage depends on your time to do the work and the importance of the image. In my opinion, every minute spent in the pre-visualization stage is worth it.
Define the image
Conceptual and verbal description of the image allows you to understand the ideas and feelings hidden in the image and convey it to others. It also allows you to control the image by destroying and rebuilding it.
Interpret the image in your mind and describe it to your audience. Describe the photo as if you were talking to a five-year-old, and begin by describing the main content and elements of the image. Then describe the abstract elements of the image: mood, emotion, emotional relationships of people and objects in the image.
End your conversation with something that makes the photo attractive. If you really want to be good enough at this, practice and describe your photos to someone who can’t see them.
Specify your purpose for taking the photo
Choose your contact based on the items and details in the photo; For example, ask yourself if this photo is going to be given to a specific person or given to a newspaper, magazine or a photo gallery? Think about the background of your image and see what is going to be showing in the background of this image.
Preprint
The pre-printing step is actually the step of preparing the file for output. At this point you can apply changes such as sharpening, adding grain and some other technical changes to your image and prepare it for printing.
Changes made at this stage usually include contrast and sharpening settings that adjust the image to the paper quality and printing technology you use. If the image is to be use on the website, the image will be compress or resize at this point.
Although the pre-printing step is usually done very quickly, but you have to be very careful so that nothing is missing and your final image is preparing in the best way because this part has a great impact on the quality of your output image.
Output
Image printing is the last step of your work. To save more, you can use it on the website instead of printing the image. Image printing is in many ways an independent process that has several stages:
- Choose your printing style: Is your image going to be display on giant billboards or in smaller sizes? Before printing and printing the image, you should think about the appropriate dimensions and style of the photo and decide.
- Print the image once experimentally: The computer screen cannot show the full and accurate quality of the final printed image; Therefore, it is better to print your photo once on a trial basis.
- Evaluate your test print: After you print the photo, thoroughly inspect it and see what corrections it needs.
- Print the image correctly again and again: After applying the corrections to your image, print it again and check the result.
- Make your final print: After applying all the corrections and settings related to the photo, print it for the last time.