


Complete Tutorial Of Metamask Wallet; Installation And Use Steps
Metamask Is One Of The Official And Reliable Wallets Of The Network Ethereum. You Can Use It As A Mobile Application And A Browser Extension.
This mighty wallet lets you quickly and fully secure Ether and standard-based tokens.ERC-20 save the
Without exaggeration, Metamask can be considered a complete wallet. In addition to storing assets, Metamsk has various capabilities, including swap tokens, bridge tokens from the Ethereum network to other blockchains, and interacting with decentralized applications(Dapps) pointed out. Stay with us in this article by teaching zero to one hundred Metamask wallets.
What is Metamask?
Metamask is a digital currency wallet specific to the Ethereum blockchain, which was initially released as a browser extension, but a software version was also produced later. This wallet can be used on popular browsers like Google Chrome, Firefox, and Brave.
Its software version is also available for Android and IOS operating systems. Metamask’s popularity is mainly because it is a wallet. Web 3 It is considered and allows interaction with the web world most simply.
Metamask was launched in 2016 by a technology company called ConsenSys. This wallet lets users store tokens quickly and securely based on the Ethereum network.
Metamask is one of the most popular non-custodial wallets, with over 30 million monthly active users. This wallet lets you access decentralized applications built on compatible Ethereum Virtual Machine (EVM) networks.
Metamask is more than just a crypto wallet. Metamask can be considered a translator, a tour guide, and a passport, all in one wallet.
To better understand the capabilities of Metamesh, imagine that you are in one country (like the Internet), and you plan to visit another country (like the Ethereum blockchain) that speaks an entirely different language and has different customs. It may be a bit difficult to communicate and navigate in that country.
Metamask is like a friendly translator and guides to help you interact in a new country. He understands the language and customs of both countries and helps them interact with each other.
When you install Metamask, the language of your web browser will be converted to Ethereum, and you can use it to perform activities such as interacting with decentralized applications, signing transactions, and creating and managing your Ethereum digital identity.
Also, let’s not forget that Metamsk is a cryptocurrency wallet that helps you securely store assets and manage transactions on the blockchain.
Advantages and disadvantages of Metamask wallet
The advantages of the Metamask wallet can be summarized as follows:
- Non-custodial: The private key of this wallet is owned by users, and Metamask has no control over their assets.
- User-friendliness: Metamask has a straightforward and user-friendly interface. This wallet is available to users both as a browser extension and as a mobile application, and it is straightforward to use.
- Support for ERC-20 tokens: Metamask supports various tokens based on the Ethereum network.
- Active community: This wallet has more than 30 million active users, and its community members are very active in Metamsk community.community.metamask.io) have.
- Access to decentralized applications: Metamask is more than a simple wallet. You can use it to access decentralized applications (dApps) built on Ethereum Virtual Machine (EVM) compatible networks.
- Support for NFTs: Metamask can store non-monogamous tokens (NFT) in its recent update. This wallet can store NFTs with ERC-721 and ERC-1155 standards.
Also, some of the disadvantages of the Metamsk wallet are as follows:
- Support for limited networks: Metamask supports a limited number of blockchain networks, and some digital currencies, such as bitcoins, cannot be stored in this wallet.
- Adding networks manually: Networks supported by this wallet must be entered manually.
How to install the Metamask browser extension
Metamask first started as a desktop browser extension for Chrome and Firefox browsers, and now this extension is installed on Brave, Edge, and Opera browsers.
A browser extension is a small software program that integrates with your web browser. The primary purpose of browser extensions is to add new functionality to your Browser or change existing features.
To learn how to install the Metamask browser extension, follow the steps below:
- Login to the Metamsk website
- Click on the Download option.
- Get the download link according to the Browser
- Click on Add to [Browser]
- Click on the Add extension option
1. First, through this link to the Metamask website.
2. Enter the Download section.
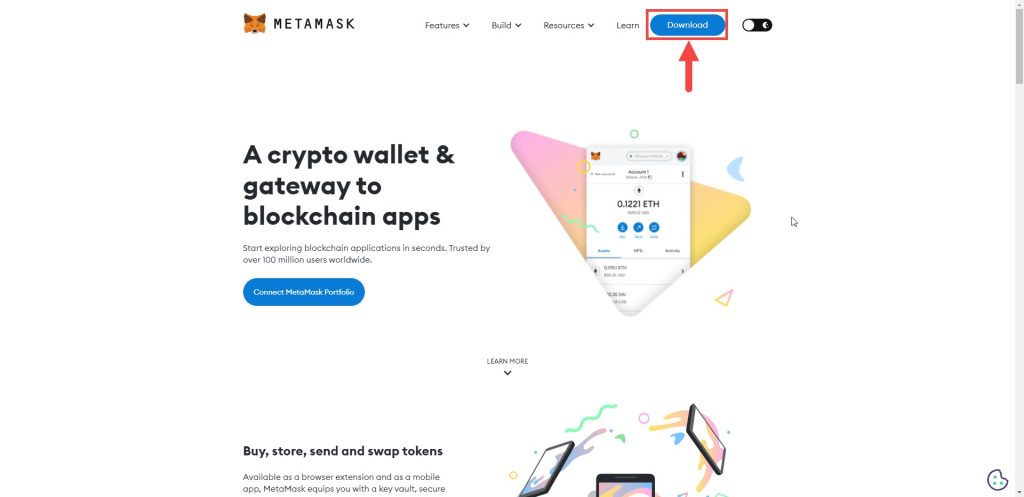
3. Depending on the Browser you are using, the link to download the plugin will be provided automatically.
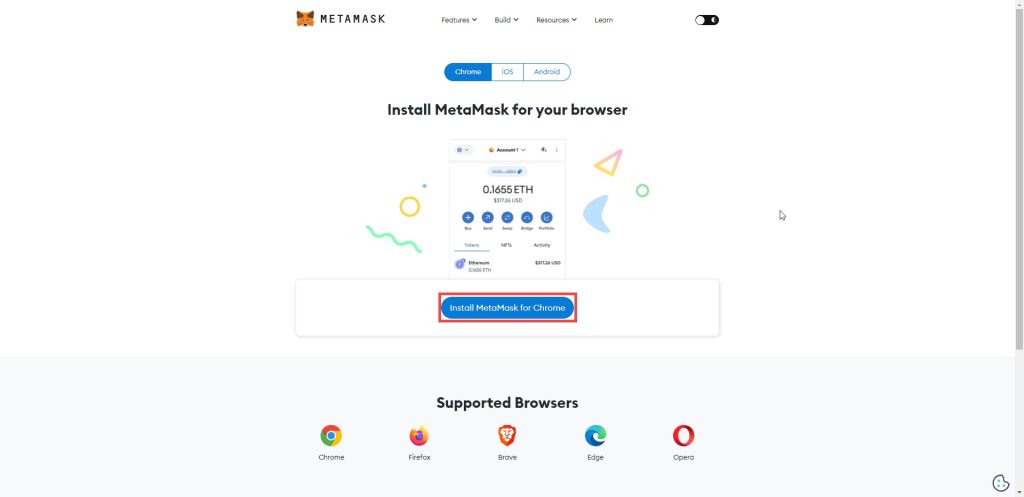
4. Click Add to [Browser] on the opened page.

5. Click the Add extension option to add this extension to your Browser.
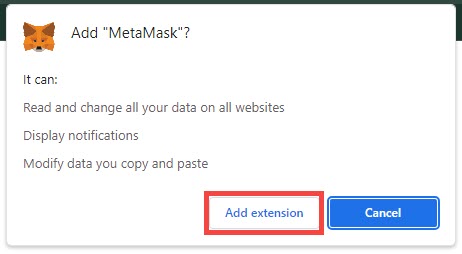
After completing all the above steps, the Metamask plugin will be successfully installed on your Browser.
Training on creating a user account in Metamask
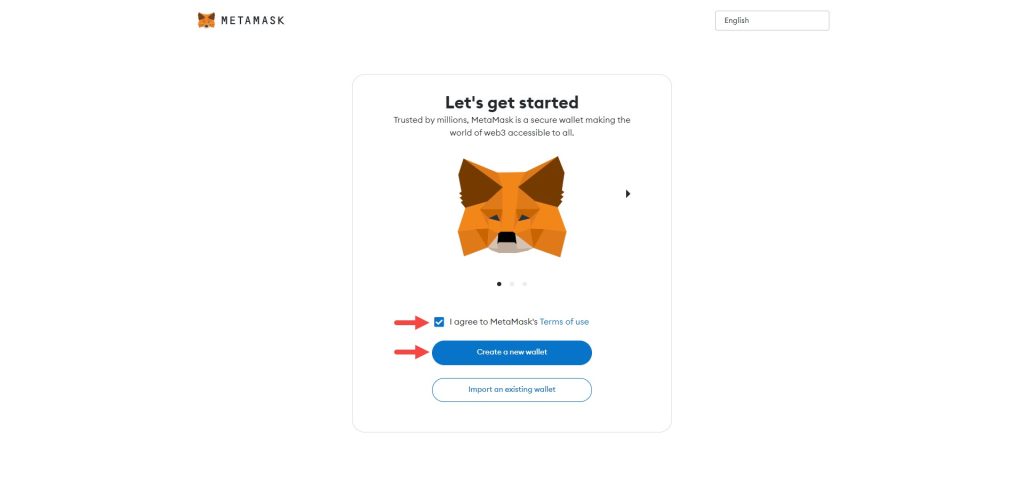
After you install the Metamask extension on your Browser, a new tab with the title Let’s get Started will open in your Browser. On this page, you create your own Metamask wallet account. To do this, follow the steps below:
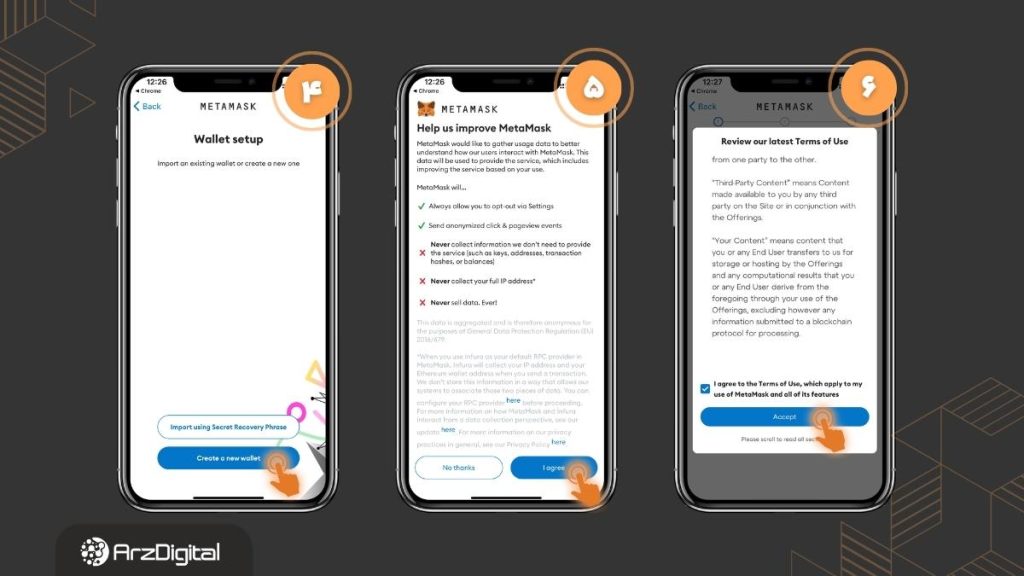
1. Check the Terms and Conditions of Use checkbox. If you already have a Metamask wallet, click on the Import an existing wallet option and load your wallet by entering recovery phrases. If you want to create a new wallet, click Create a new one.
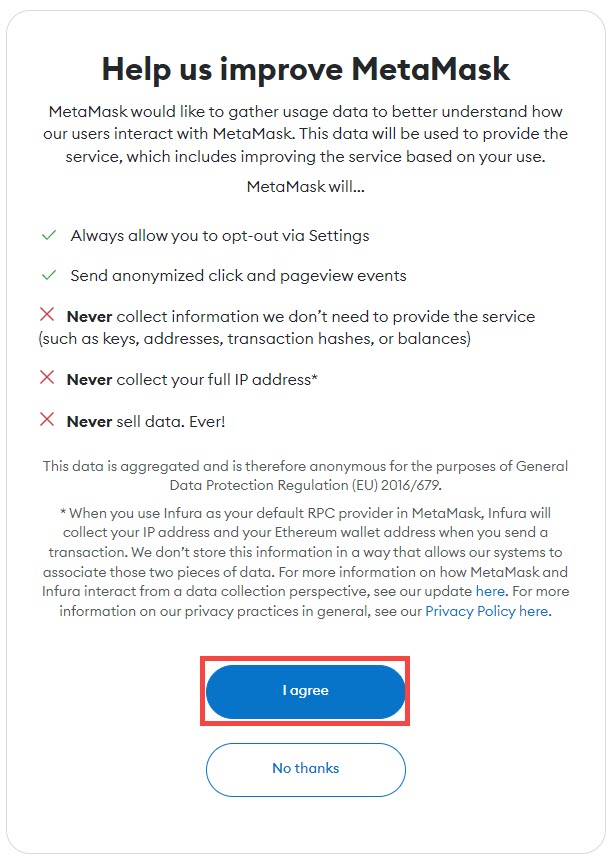
2. On the next page, you will be told that Metamask uses user information to improve user experience and increase efficiency. Still, it does not collect their private and personal information in any way. To confirm your agreement with Metamask privacy terms, click on I agree option.
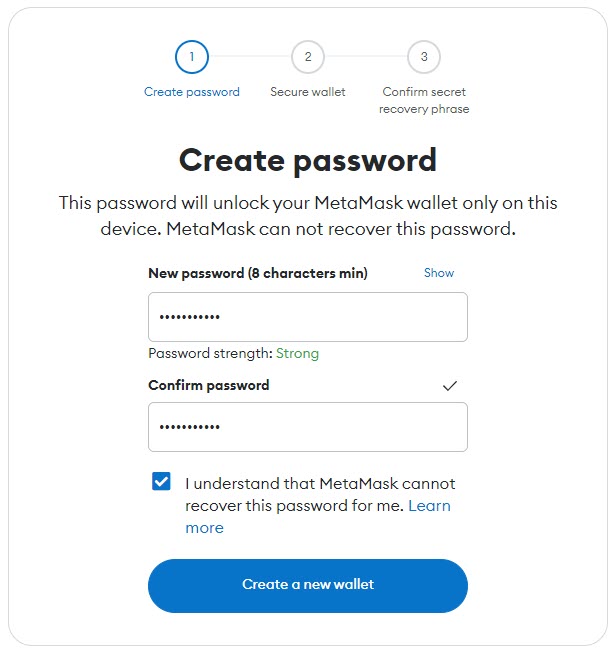
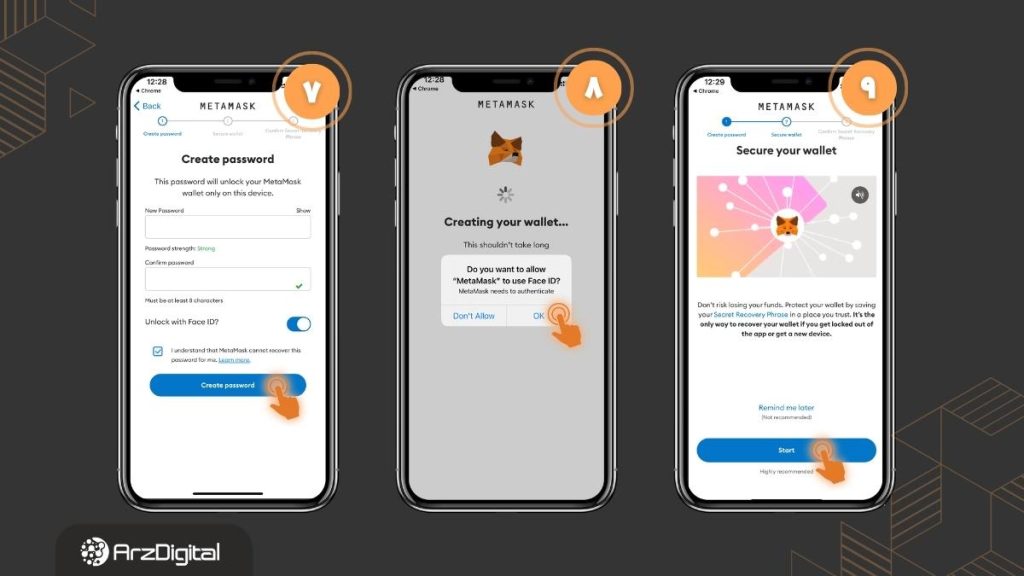
3. In the next step, you will be asked to create a password. Create a secure password with at least eight characters, including numbers, lowercase, and uppercase letters.
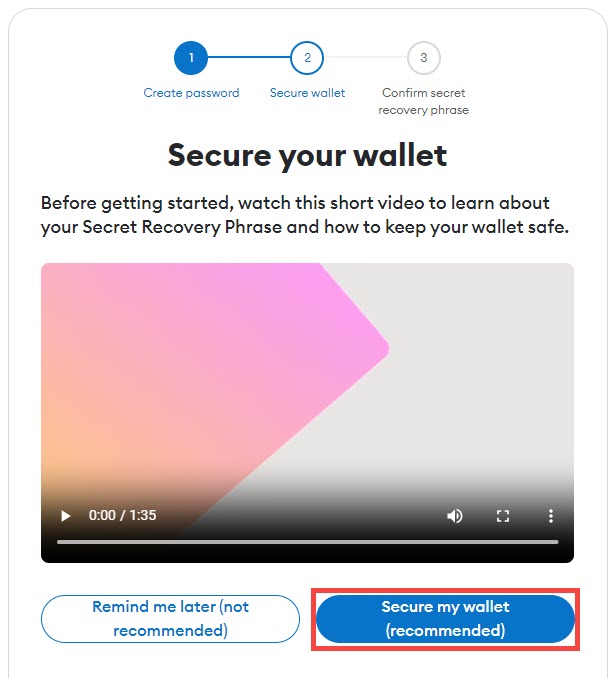
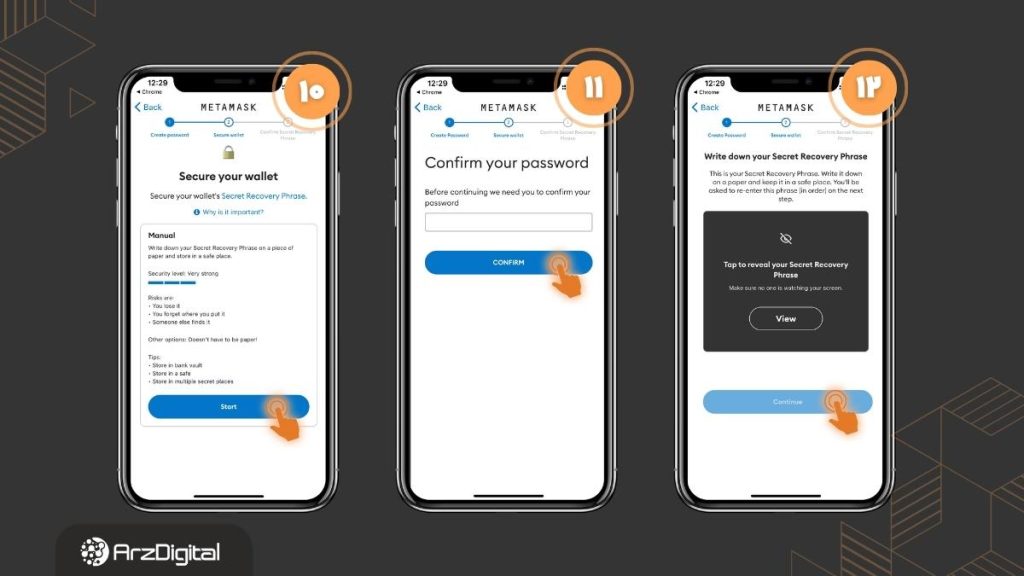
4. In the next step, you will be asked to secure your wallet by saving the recovery phrases (Secret Recovery Phrase). These recovery phrases will be needed later to recover your wallet. We suggest you do not delay this task and click the option Secure my purse.
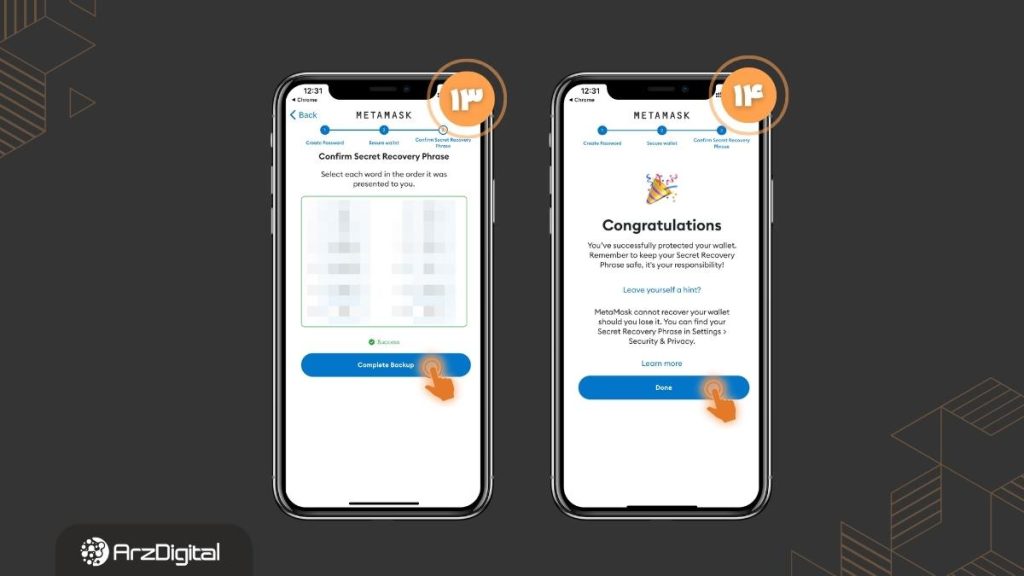
5. On the opened page, click on Reveal Secret Recovery Phrase to display the recovery phrases. Write these phrases down in a safe place, and make sure you never reveal them to anyone.
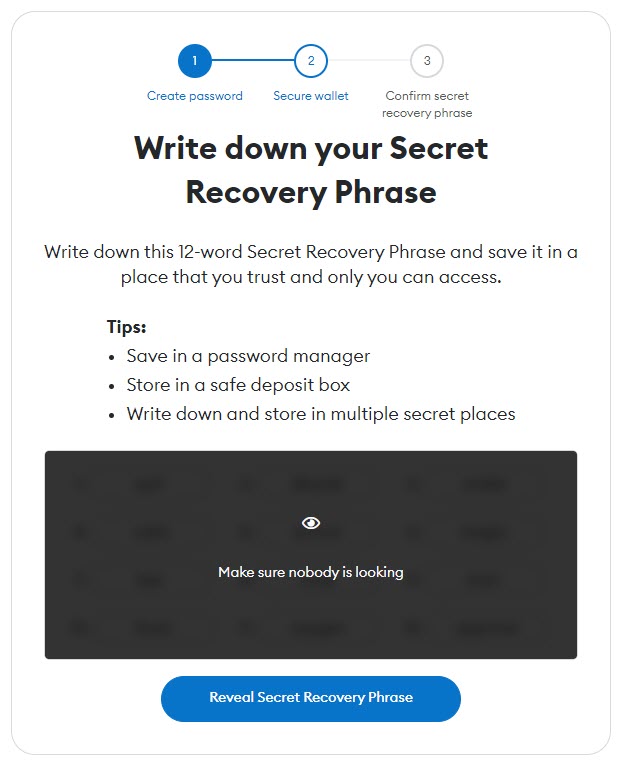
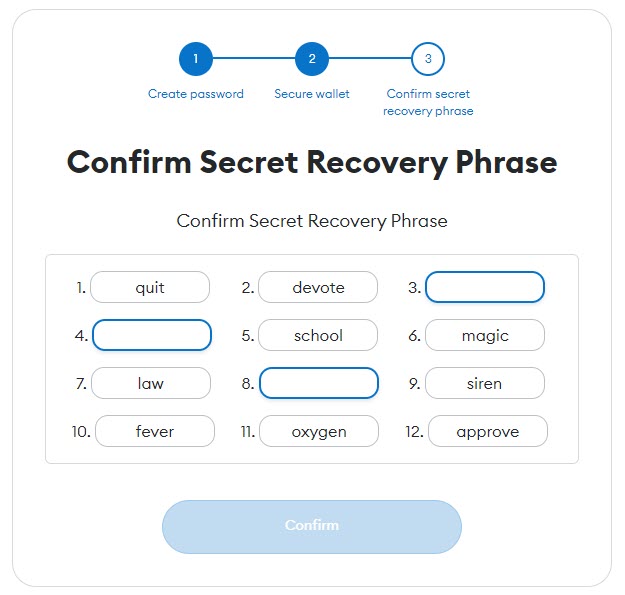
6. After writing down the security phrases, click Next. Next, enter your noted keywords for confirmation and click Confirm to create your wallet.
Here are a few tips for more security of your account
- Backup your recovery statements in multiple locations;
- Never tell anyone your recovery phrases;
- Watch out for fake sites and phishing. The main Metamask website will never ask you for recovery phrases for no reason;
- If you want to make another version of your recovery statements, go to the Settings section and then the Security section;
- If you have a question or problem for which you did not find a solution, address the department support.
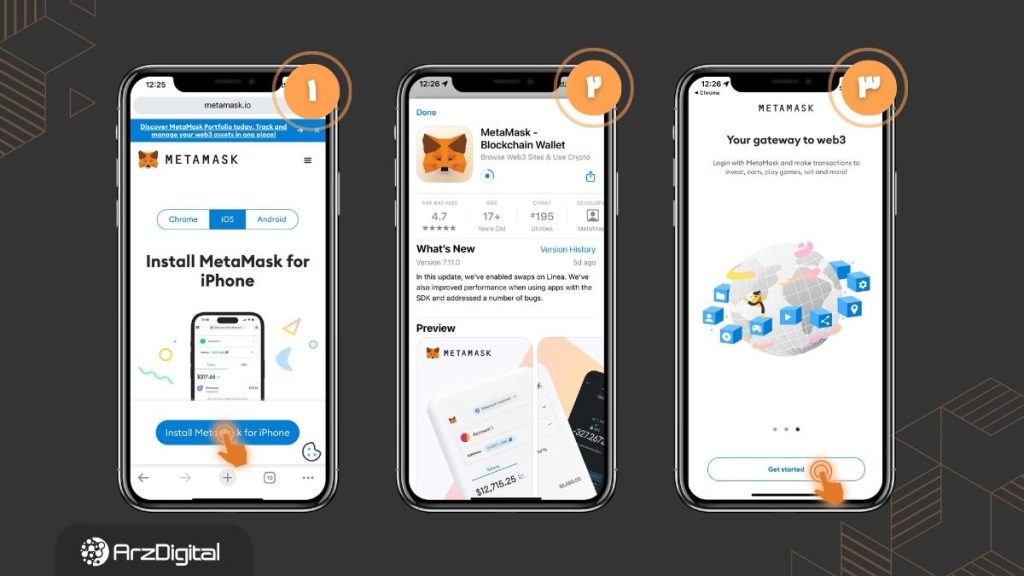
How to install the Metamask mobile application
After successfully launching the browser extension, Metamask expanded its reach to mobile operating systems. In 2019, Metamask launched the beta version of its mobile application. Then, Consensys announced in September 2020 that the official mobile version of Metamask for Android and IOS operating systems had been made available to the public.
Installing and creating a Metamask application user account is identical to its browser version. The step-by-step instructions for downloading the application version and creating a user account are in the images below.
How to add a network in Metamask
Metamask allows you to manage multiple cryptocurrency wallets simultaneously. On the other hand, you can use Metamask to interact with various dApps in the Ethereum ecosystem.
One of the powerful features of the Metamask wallet is its ability to support multiple blockchain networks. While Ethereum is the default Metamesh network, the wallet allows users to interact with several other networks. Follow the steps below to add other networks:
1. First, log into your Metamsk wallet.
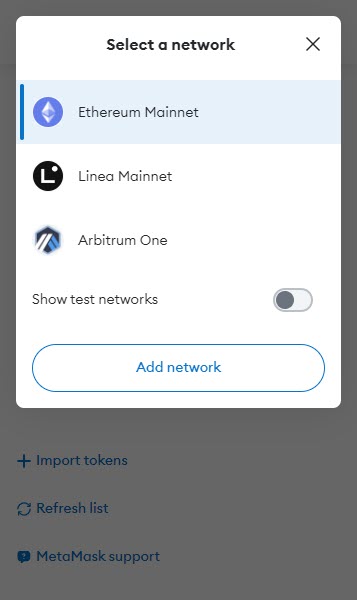
2. you can see your current network in the upper left part. Click the down arrow to change the grid.

3. To add other networks to the wallet, click the Add Network option.
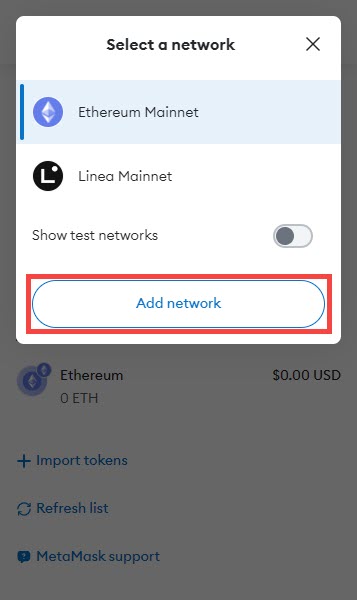
4. Next, a new tab will open, showing you the list of famous networks.
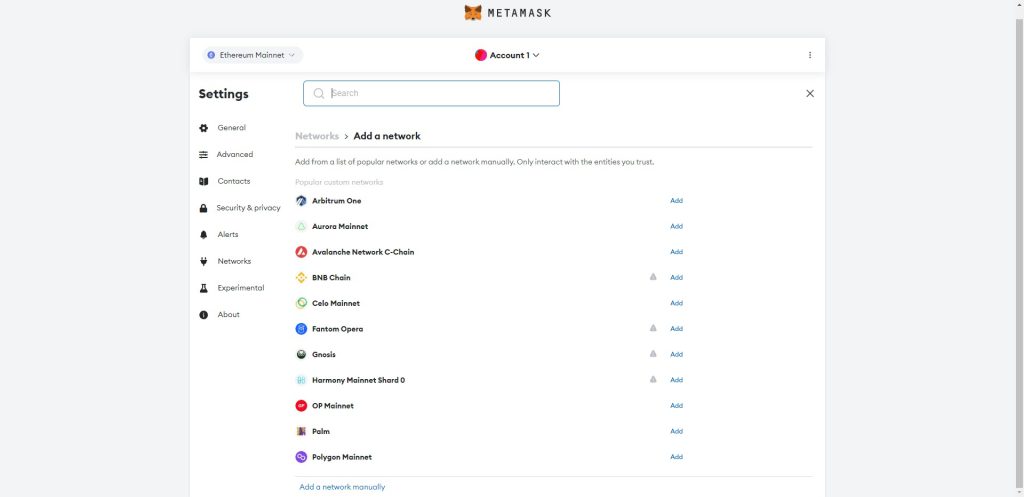
5. To add any of these networks, click the Add option and approve it.
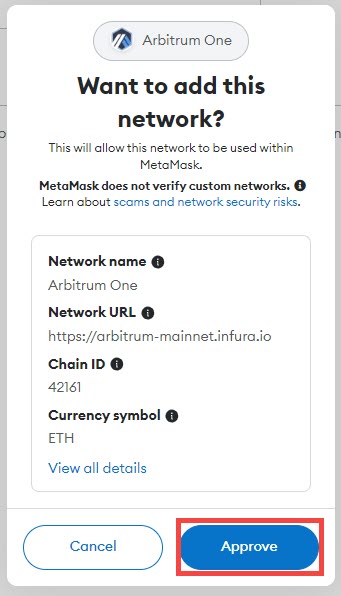
This way, the desired network will be added to the list of Metamask networks.
Some networks are not on this list; you must manually add them. To do this, click on the Add a Network manually option.
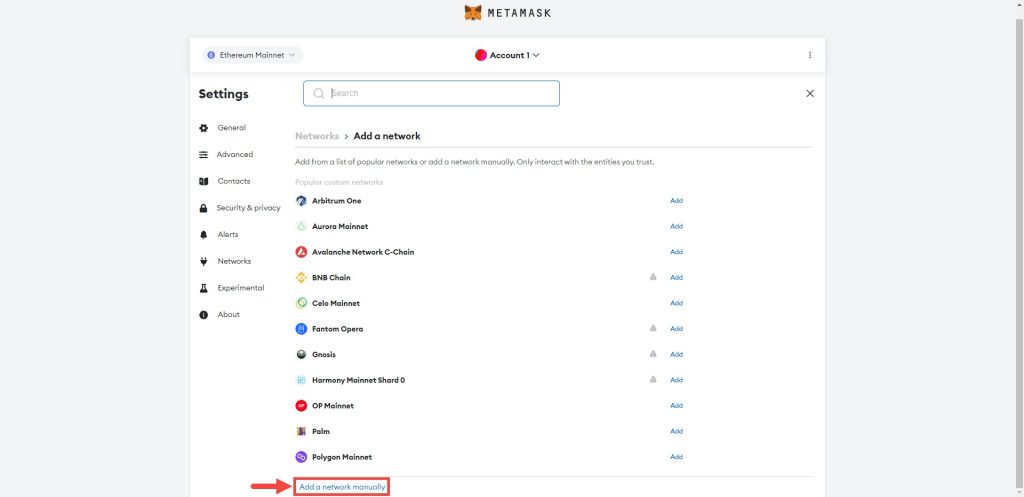
This section asks you for the network name, address, chain ID, currency symbol, and network explorer address.
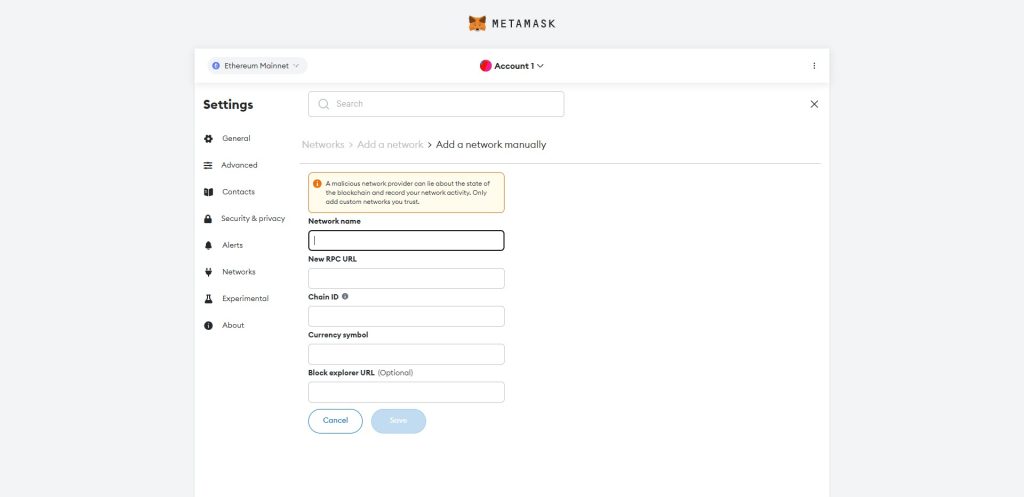
- Network name: Enter the name of your desired network in this section.
- New RPC Rule: Enter the desired network address.
- Chain ID: Enter the unique number of the chain you want to interact with.
- Currency Symbol: You enter the digital currency symbol of the desired network in this section.
- Block Explorer URL: If you want to see detailed information during the transaction, enter the address of the blockchain browser of your desired network in this section.
How to add tokens to Metamask wallet
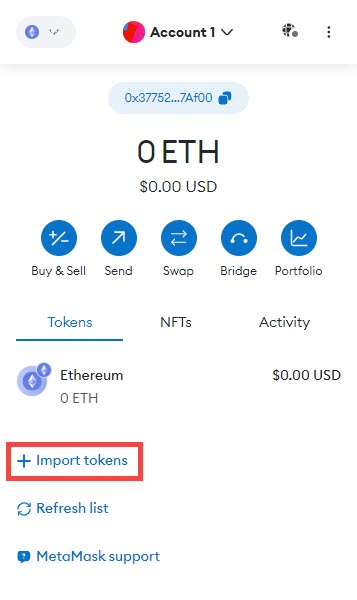
After successfully installing your Metamask wallet, you will have a list of assets on the home page. According to the blockchains you selected as the network in the Metamsk wallet, the native token of that network will be displayed to you by default. Follow the steps below to add new tokens to this list:
1. Click on the Import tokens option.
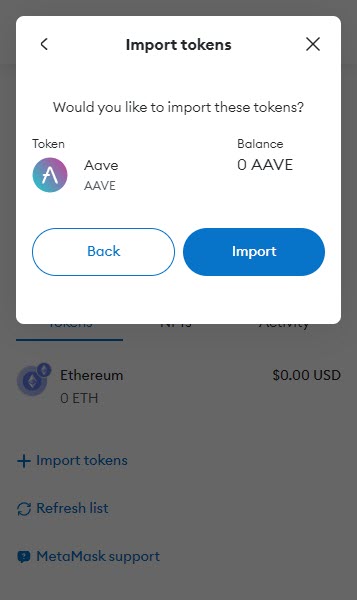
2. You can search for the desired token in the Search section and select it.
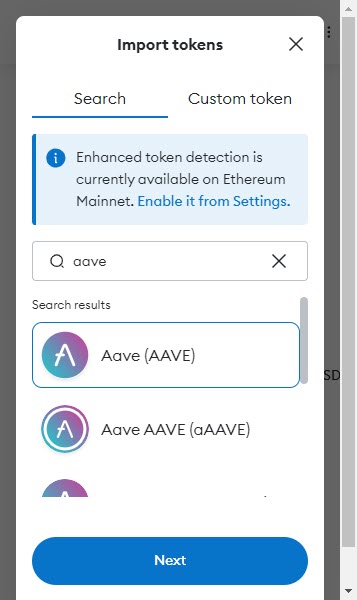
3. Click Next and Import to add the token to your asset list.
If the token you are looking for is not found in the list of digital currencies during the search, you can manually add that token to your asset list. To do this, go to the Custom Token section and enter the token’s contract address you want.
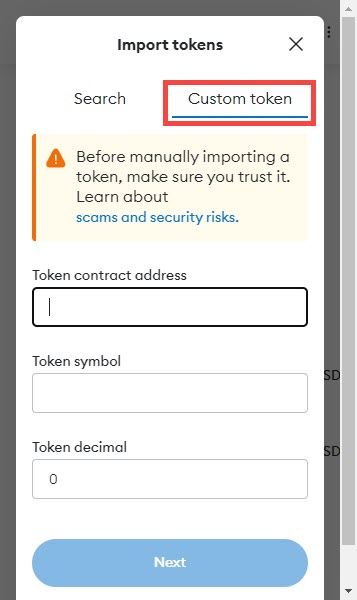
Note that you must get this token contract address from reliable sources. Anyone can mint a token with any name. This means that some profiteers may mint a token with the same name as a famous token!
Therefore, be sure to get the contract address of your desired token from the blockchain browser on which the token resides. For example, here is the address of the Aave token contract from Ethereum Explorer (etherscan) that we copied and entered in Metamask.

Training to send and receive digital currencies in Metamask
The way to send and receive digital currencies in the Metamask wallet is the same as in other blockchain wallets. These steps are entirely similar in the browser extension and the Metamask mobile version; the only difference is in the placement of some icons.
Send digital currency through Metamask.
To send digital currencies through Metamask wallet, follow the steps below:
1. Log in to Metamask wallet.
2. Click the Send option.
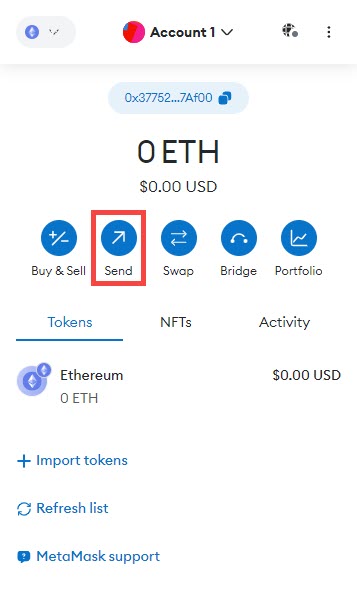
3. Enter the destination wallet address.
4. Select the desired token and enter its value.
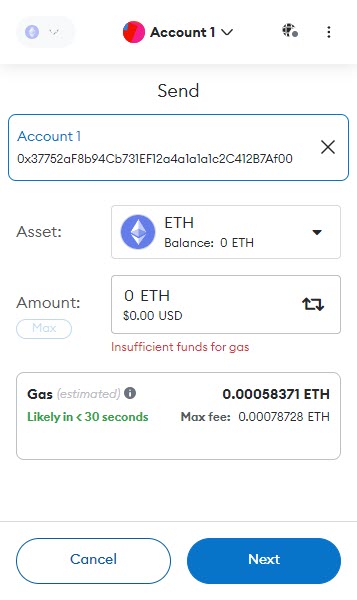
5. Click on Next to display the transaction details.
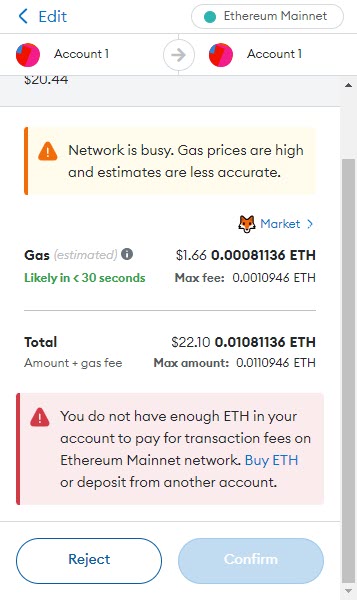
6. At the end, click on the Confirm option to send your transaction.
Receive digital currency in Metamsk wallet.
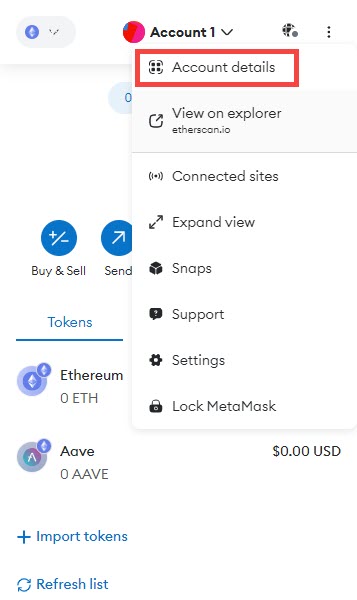
Getting digital currency in the Metamsk wallet is very easy. Just copy your wallet address displayed at the top of the screen and send it to the sender.
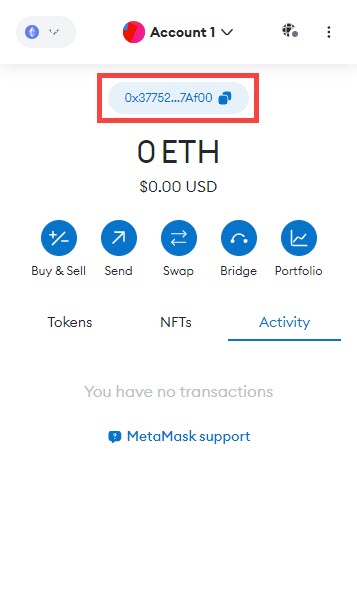
You can also click on the menu option (3 dots symbol) in the upper right and select the Account Details option to show the QR code of your wallet address.
Learning to exchange digital currencies in Metamsk
One of the valuable features of the Metamsk wallet is the ability to exchange or swap tokens. You can easily convert the tokens in your wallet to other cryptocurrencies supported by Metamask. To do this, follow the steps below:
1. Click on the Swap option.

2. In this section, you select the token you want to swap. In the upper box, you choose the token you want to convert (like ETH); in the lower box, you select the token you wish to receive (like USDC).
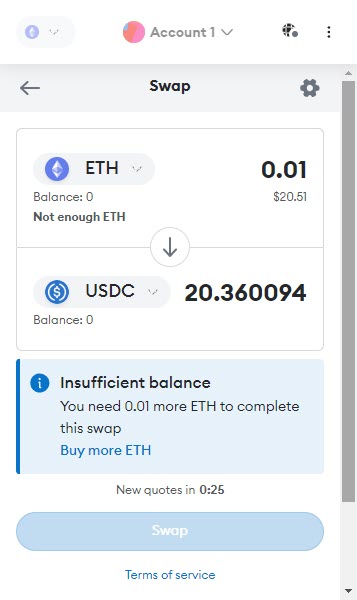
3. At the end, click on the Swap option to complete your exchange.
It should be noted that you can also perform swap operations from the Portfolio section of the Metamask wallet.
Metamsk portfolio training
Metamask Wallet has just unveiled its new feature called “Portfolio.” Metamsk’s portfolio section provides users with a professional dashboard to manage their asset portfolio easily. Metamsk Portfolio conveniently displays all your on-chain assets in one place. To enter the Metamask portfolio, click the Portfolio option.
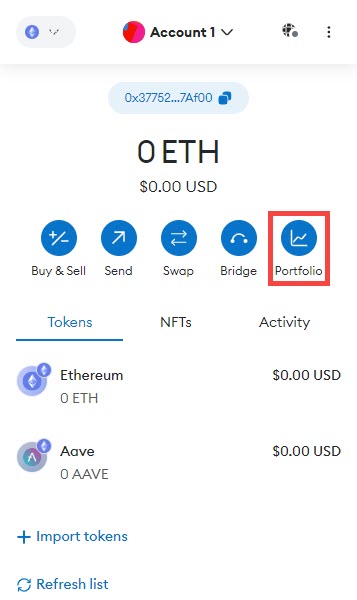
You can perform various activities such as buying, swapping, bridging, and investing using Metamask’s portfolio feature, which we will explain below.
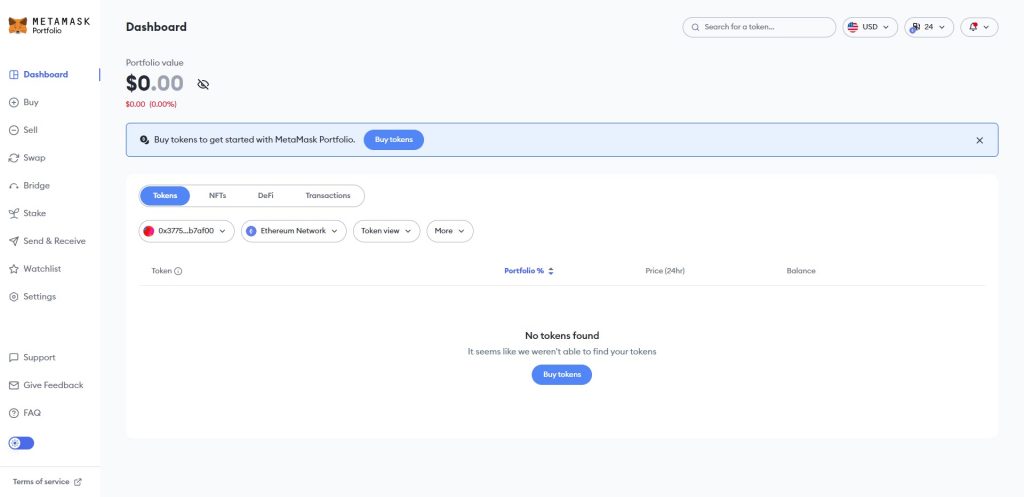
Dashboard: Metamask portfolio dashboard collects and shows you data related to all your assets in different accounts and networks. This feature helps you see them all in one place instead of checking multiple decentralized apps to calculate your inventory and track your on-chain activities.
Buy: This feature is for buying digital currencies using fiat currencies. This section asks you for your location and bank account, which, unfortunately, is not very useful due to the restrictions of Iranian users.
Swap: This feature allows you to convert your assets into other tokens. Metamask uses different decentralized exchanges to do this and automatically offers the best price for swap tokens. Earlier, we talked about swapping tokens through the Metamsk wallet.
Bridge: This feature allows you to move your assets between different networks.
Stake: The stake feature allows you to access our ethers and get effortlessly rewarded rewards. It should be noted that Metamsk cooperates with Lido and Rocket Pool to provide this feature.