


3 ways to Access and Control your PC remotely
If you do a lot of work remotely and need to access your PC, you should probably keep it on. But this work consumes a lot of electricity. So, instead of keeping your computer on all the time, you can turn it on remotely using Wake on LAN.
The Wake-on-LAN feature allows you to turn on your computer via LAN and the Internet. However, you may need to forward the WOL port to your Internet router. And after turning on your PC, you can easily access another PC remotely using TeamViewer or any other RDP tool.
This tutorial will show you how to turn on your PC remotely via Wake-on-LAN. To enable Wake on LAN, we need to make several changes in Windows and BIOS/UEFI settings. Let’s start with the BIOS setup first.
Step 1: Go to BIOS or UEFI settings.
First, you need to enter your computer’s BIOS or UEFI settings. In each model, the method of entering BIOS settings is different. The following table shows the methods of entering BIOS or UEFI settings for major brands.
Step 2: Enable Wake on LAN and Save Settings
Look for the Wake-on-LAN setting when you’re in BIOS/UEFI settings. In some brands, this option may be found in the Power or Network sub-menu.
If you press the right key while booting, you will see your PC’s BIOS/UEFI screen.
Step 2: Enable Wake on LAN and Save Settings
Look for the Wake-on-LAN setting when you’re in BIOS/UEFI settings. In some brands, this option may be found in the Power or Network sub-menu. We have used Lenovo ThinkPad as an example in this article. The Wake on LAN setting is under Network. So, go to the Config tab and select Network.
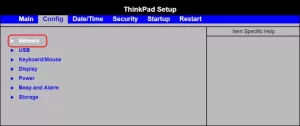
Here select Wake on LAN and press Enter. After that, select AC and Battery and press Enter again.

After that, save the settings and exit BIOS/UEFI setup. Now you are ready to turn on your PC remotely using Wake on LAN.

b) Change the properties of the network adapter to turn on your PC remotely
After setting up the BIOS, we must also make changes to the network adapter properties. To turn on your computer (Windows 11, 10, 8/8.1, or 7) using Wake-on-LAN, we need to enable Wake on the magic packet.
Step 1: Open Device Manager
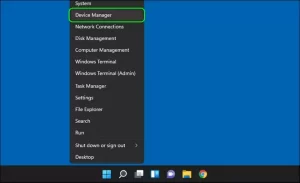
Open Device Manager on your PC. You can right-click on the This PC icon and select Manage to open Computer Management. From there, select Device Manager.
You can also right-click on the Start button and select Device Manager. We have used Windows 11 in this tutorial, but it also works on Windows 10 and earlier versions of Windows.
Step 2: Open Network Adapter Properties
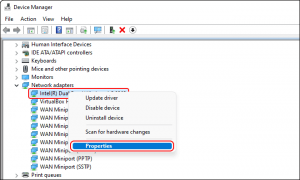
Now in the Device Manager window, scroll down until you reach Network adapters. Here, right-click on your network adapter and select Properties.
Step 3: Enable Wake on Magic Packet to turn on your computer remotely
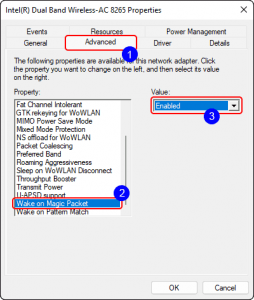
Go to the Advanced tab in the Network Adapter profile. Here, scroll down and select Wake on Magic Packet. After that, change the Value to Enabled.
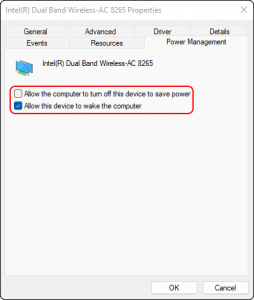
Afterward, go to the Power Management tab and check “Allow this device to wake up the computer.” Finally, click OK to save the settings.
c) Disable fast startup on your Windows 11 and Windows 10 computer
Windows 10 and 11 have a “Fast Startup” feature, enabled by default to increase boot speed. But this feature causes problems in Wake-on-LAN. So, first, we need to disable fast startup in Windows 10 and 11.
Step 1: Go to Power Options in the control panel.
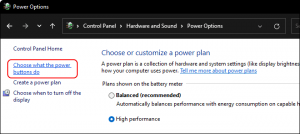
Open Control Panel in Windows 10 or 11 and go to Hardware and Sound > Power Options. Here, click on Choose what the power buttons do.
Step 2: Disable Fast Startup to allow Wake-on-LAN
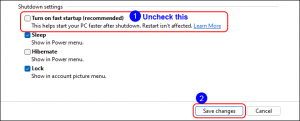
Here, you can change the capabilities of the power button, which are not editable by default. So, to enable these functions, click on Change settings that are currently unavailable.
Now uncheck the Turn on fast startup (recommended) option to disable fast startup on your Windows 10 or 11 PC and allow you to turn on the other system remotely via LAN or the Internet using Wake-on-LAN.
d) Turn on your computer remotely using the Wake-on-LAN Utility
Now, after you have successfully set up your PC for Wake-on-LAN, it’s time to test. We will use a small portable tool called WakeMeOnLan (download link) by NirSoft to turn on the PC using Magic Packet. But before that, we need to find the IP address and MAC address of the personal computer that we want to turn on remotely.
Step 1: Find the IP address and MAC address of the other computer
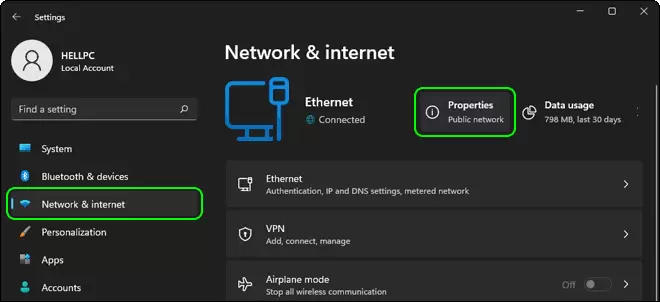
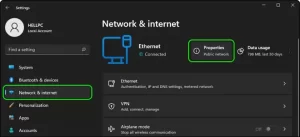
You can find the IP and MAC address or the computer’s physical address in the network connection specification. Just go to Settings > Network and Internet. Here, click on Properties below or next to your network connection.
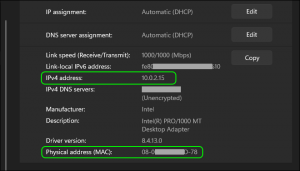
After that, go to the bottom section and write down your computer’s IP address and MAC address.
Step 2: Download and run the WakeMeOnLan tool
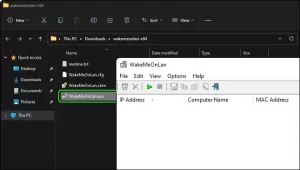
Now download and extract the WakeMeOnLan tool from the above link. Run WakeMeOnLan.exe from the extracted files to launch the WakeMeOnLan tool.
Step 3: Add your PC to WakeMeOnLan Utility
The WakeMeOnLan tool allows you to scan the local Network for connected computers. However, you can also manually add a computer using its IP and MAC addresses.
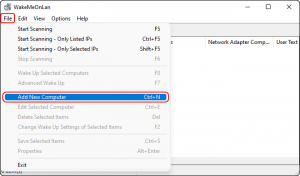
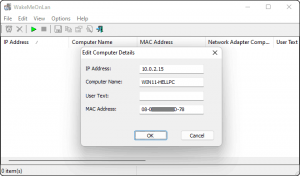
Now click on the File menu and select Add New Computer to add your computer details manually.
Here, enter the IP and MAC address of the computer you want to turn on remotely using Wake-on-LAN and click OK.
Step 4: Turn on your computer remotely using WakeMeOnLan
Now your computer will be displayed in the list. Right-click on it and select Wake Up Selected Computers.
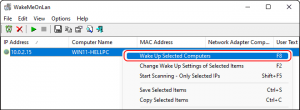
You will see a confirmation message. Click Yes to send a magic packet to turn on your PC using Wake-on-LAN remotely.
If you have configured everything correctly, your computer will turn on without problems.
E) Turn on your computer remotely using TeamViewer
In addition to the WakeMeOnLan tool, you can also use the TeamViewer remote support tool to turn on your PC remotely. First, you need to install TeamViewer on your PC. After that, you can enable Wake-on-LAN in TeamViewer.
Step 1: Enable Wake on LAN in TeamViewer
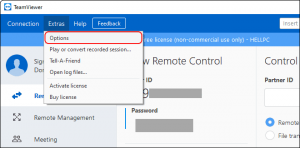
Start TeamViewer on your PC (the one you want to start remotely) (download here). After that, click on Extras and select Options.
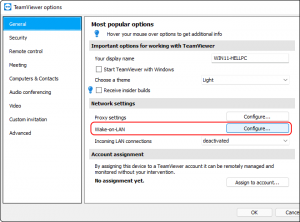
After that, click Configure next to Wake-on-LAN in General Settings.
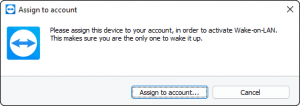
TeamViewer requires you to assign a TeamViewer account to your computer. If you don’t already have such an account, You can make one. And if you have, get into it very easily.
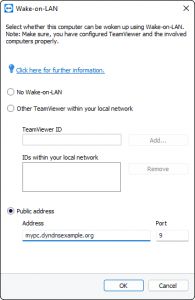
After that, you can enable Wake-on-LAN in TeamViewer to turn on your computer remotely. Select Public address, enter your computer’s public IP address or public DNS name, and click OK.
Step 2: Turn on your PC remotely using TeamViewer
Now, go to where you want to turn on your PC and select the computer. Remember that you need to install TeamViewer (download here) and log in to your TeamViewer account there.

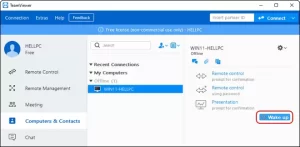
Next, go to Computers & Contacts and select the computer you want to turn on remotely. After that, click on the Wakeup button on the right side.
If everything is set correctly, your computer will turn on successfully.
Turn on your computer remotely using Wake-on-LAN.
Now you can turn on your computer through LAN or WAN and access your computer from anywhere. However, you need to forward a port to your router to turn on your PC over the Internet. The special port for Wake on Magic Packet is UDP port 9. After forwarding a port on your router, you need to use your public IP address in the WOL tool to turn on your computer remotely. You can check your router’s manual to check the necessary information about forwarding a port.