


What is arduino? And top 5 projects you can do With it!
If you are into coding and programming hardware, then you must be aware of the popular tool Arduino and hence, that brings you here to brush your skills further on this tool. We stated some of the best Arduino projects that you can begin to code to get the hardware’s flavor and add them to your profile.
To make this journey smooth, we begin by explaining what Arduino is and why it is useful. We shall also guide you through how to program Arduino so that beginning any project is hassle-free for you. Trying every project on the list is recommended as it would help you get hold of the concepts as every project would offer something different and new for you to learn.
So let us get started with learning cool, fun, and easy Arduino projects.
What is Arduino?
Arduino is an open-source electronics platform for microcontroller devices that makes embedded programming easier. Arduino was born at the Ivrea Interaction Design, and its hardware boards can read inputs, a finger on a button, turn it into an output, light a sensor, activate an LED, and much more.
The Arduino board is programmed by sending a set of instructions to the microcontroller on the board. The Arduino platform composes of the following:
Arduino Programming and Framework: Arduino uses C/C++ frameworks for ARM, AVR, etcetera.
Device Bootloader: This refers to the program, which is pre-programmed on the hardware microcontrollers. The program offers assistance with the loading of the code from memory on startup. The bootloader also provides the functionality of loading the code on the device using a USB cable.
Arduino IDE: The IDE is a glorified text editor desktop application to write, compile, and load Arduino code.
Next, let us see why you choose Arduino and what it offers.
Why is Arduino Useful?
Arduino has been the brain of thousands of projects over the years. It is used by a vast community comprising students, teachers, scientists, professionals, and programmers because it is open-source, cheap, and easy to use. Read on to find out why it is so much preferred and what features does it offer.
- Inexpensive: In contrast with other microcontroller platforms, Arduino boards cost much less, with the least expensive one costing less than $50. If you still want something cheaper, then go to the lowest Arduino version that can be assembled manually.
- Cross-Platform: The Arduino IDE is supported by most operating systems like Macintosh OSX, Linux, Windows, etc.
- Simple, Clear Programming Environment: Arduino software IDE is flexible for all types of users. It is easy to be used by beginners but also offers advanced functionalities for professionals.
- Open Source and Extensible Software: The software is open-source and can be expanded through C++ libraries.
- Open Source and Extensible Hardware: Circuit designers can modify the hardware to make their version of the module extend it or improve it further if required. Beginners can even play with the device and build different modules from it to understand its working.
Let us see the Arduino projects that you can try your hands on; if you wish to brush up on your Arduino skills, you can check out the best Arduino books for quick reference to the concepts while you attempt the projects.
Best Arduino Projects to Try
1. Heartbeat Sensor
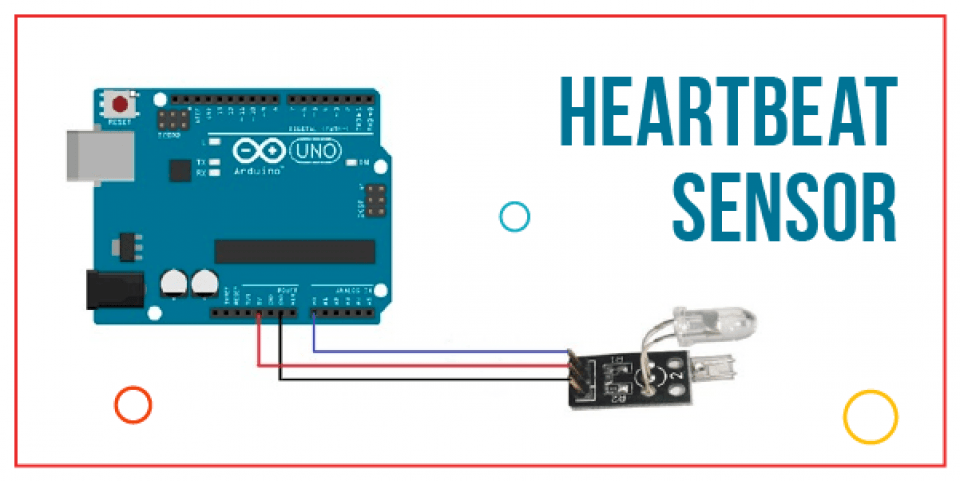
Electrocardiography is one of the precise and popular ways to measure heart rate in the medical field. Monitoring heart rate is essential for athletes and patients to determine their heart condition.
With advancements in technology, a heartbeat sensor is an easy and smart way to measure heart rate. You can install this sensors in wristwatches, smartphones, and chest strips to check on a person’s heart rate.
Principle of Heartbeat Sensor
Photoplethysmography is a principle that measures the changes in the volume of blood in an organ. It does this by measuring the changes in the intensity of the light passing through the organ. This principle works behind the working of the Heartbeat Sensor.
An IR LED is generally taken to be the light source in the heartbeat sensor, and photodetectors like Photo Diode, Photoresistor, or an LDR can be used.
It is possible to arrange the components, i.e., the light source and photodetector, in two ways:
- Transmissive Sensor: In this, the light source and detector face each other. The patient must place their finger between the transmitter and the receiver.
- Reflective Sensor: In this arrangement, the light source and the detector are adjacent to each other. The finger of the person is on the front of the sensor to read the heartbeat rate.
Circuit of Heartbeat Sensor
Components Required
- Arduino UNO x 1
- 16 x 2 LCD Display x 1
- 10KΩ Potentiometer
- 330Ω Resistor (Optional – for LCD backlight)
- Push Button
- Heartbeat Sensor Module with Probe (finger-based)
- Mini Breadboard
- Connecting Wires
Application(s)
This project is an inexpensive alternative to Smart Watches and other expensive Heart Rate, Monitors.
2. Wireless Doorbell
In earlier times, a knock on the door worked as a doorbell that asked for permission to let in. The concept further advanced by shifting to electronic doorbells that were wired devices fixed in one place. With the concept of WiFi being introduced, many devices have become wireless and portable. Therefore, the idea of wired doorbells is replaced by Wireless Doorbell Devices that don’t require the position of the bell or switch to be fixed.
Principle of Wireless Doorbell
The project uses simple hardware to build a wireless doorbell using the Arduino UNO board. The project demonstrates the RF module’s implementation for wireless communication and the UNO Arduino board to analyze the data.
Circuit Diagrams
Components Required
For Transmitter
- 434 MHz RF Transmitter Module
- HT – 12E Encoder IC
- 750 KΩ Resistor
- Push Button
- Power Supply
- Connecting Wires
- Prototyping Board (Breadboard)
For Receiver
- Arduino UNO
- 434 MHz RF Receiver Module
- HT – 12D Decoder IC
- 33 KΩ Resistor
- Small Buzzer
- Power Supply
- Connecting Wires
- Prototyping Board (Breadboard)
Applications
- The idea can be further extended to a real-time wireless doorbell system.
- Since the mode of communication is RF, its range is considerably large than other wireless technologies as the model uses RF.
- The project is suitable for homes, shops, garages, hospitals, offices, etc.
3. RGB LED Matrix
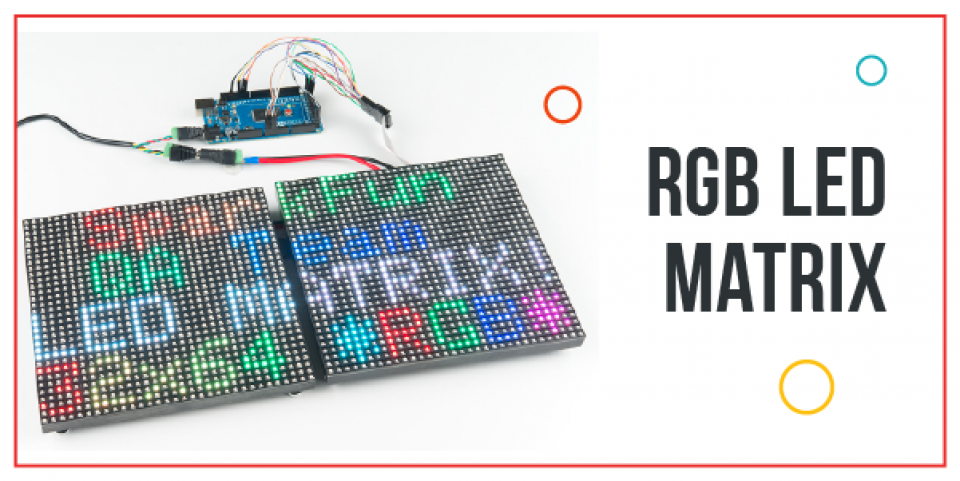
Building the RGB LED matrix is a popular project amongst students. An LED matrix has various usages as signboards with messages, displaying animations, synchronized music spectrum, and more. Building an RGB LED matrix involves designing a circuit, constructing a matrix, assembling components, and coding.
Principle of RGB LED Matrix
The project is to build an 8×6 RGB LED matrix using Arduino Nano, HC-06 Bluetooth Module, and an Android Phone with a custom app. So let us begin with this DIY project for Arduino.
Circuit Diagrams
The image below demonstrates the connections concerning the shift registers. The shift registers are connected to Arduino Nano, source transistors connect to the Columns, and sinking transistors connect to the Rows of R, G, and B LEDs (Cathodes).
The second image shows the layout of the RGB LEDs. They organizations are into 8 rows of Cathode terminals and 6 columns of anode terminals. Each row further consists of 3 cathode terminals for Red, Green, and Blue LEDs.
Components Required
- Arduino Nano
- Bluetooth Module HC-06
- 48 X Common Anode RGB LEDs
- 6 X BD136 power PNP Transistors
- 30 X BC337 NPN Transistors
- 4 X 74HC595N Shift Register IC
- 36 X 10KΩ Resistors (¼ W)
- LM35 Temperature Sensor
- Power supply
- A lot of wires and materials like plywood and polystyrene sheet
Application
Used as signboards with messages, displaying animations, synchronized music spectrum, and more
4. Arduino Calculator
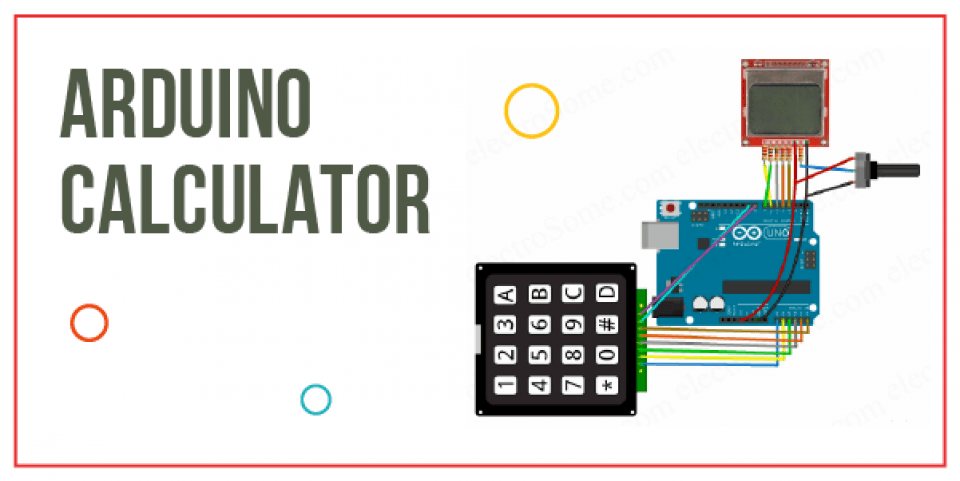
But a Calculator is a handy device that everyone is aware of to perform simple arithmetic operations to complex mathematical calculations. Also scientific calculators also have evolved to perform complex calculations. People rely so much on the device installed in watches, phones, and laptops as applications.
Principle of Calculator
The project purpose is using Arduino UNO, a 16×2 LCD, and a 4×4 Matrix Keypad.
Circuit Diagram
Components Required
- Arduino UNO
- 16 x 2 LCD Display
- 4 x 4 Matrix Keypad Module or 16 Pushbuttons
- 10 KΩ Potentiometer
- Breadboard ( Prototyping board )
- Connecting wires
Application
The project can extends to perform complex calculations. This may even result in an increased number of switches.
5. Digital Thermometer
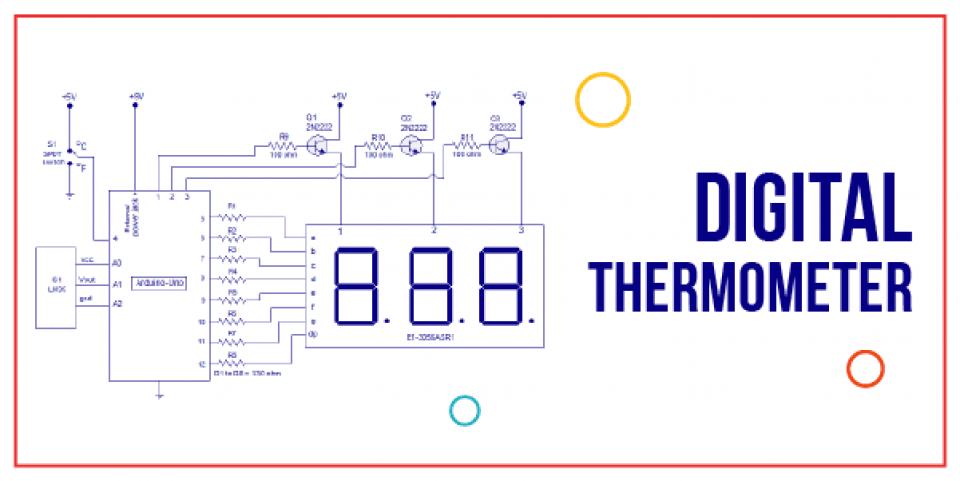
Also we are all aware that a thermometer is a temperature measuring instrument. Since we have been using this a lot lately during Covid times as every place checks a person’s body temperature as part of their check while letting inside their premises. Also measuring temperature or keeping a check on temperature is an important part of other fields besides medicine, such as incubators, storage rooms, laboratories, etc.
Principle of Digital Thermometer
Measuring temperature depends on various principles like the thermal expansion of solids or liquids, gas pressure, measurement of infrared energy, and more. But the construction and functioning of the thermometer depend on the principle.
Circuit Diagram
Components Required
- Arduino Uno
- LM35 Temperature Sensor
- 16X2 LCD Display
Applications
- Thermometers are useful in industries, weather studies, the medicinal field, and scientific research.
- Also the project can monitor a room’s temperature within a range of -550C to +1500C with very accurate readings.
- Also the temperature sensor used (LM35) is a precision centigrade temperature sensor. Use the Fahrenheit temperature sensor (LM34) for Fahrenheit temperature readings.
- Also the thermometer can get power by a 9V battery making it a portable device.
- You can use it in vehicles to determine the icing conditions of the road.
- Also You can control the air conditioning systems, heating, and cooling systems manually or automatically, based on the thermometer’s readings.