


Top 6 Ways to Fix Internet Keeps Disconnecting on Windows
The constant disconnection of the Internet is one of the most annoying things that occupy the mind. But don’t worry; usually, this problem is not very difficult to fix. . .
First, you need to see if other devices are using the same Internet and experiencing outages. If yes, your router is most likely to blame. You can restart your router or ask a technician for help.
If only one computer has this problem, read on and try the solutions below.
Fix persistent internet outages in Windows 10, 8.1 or 7
Before starting, please check other devices (such as tablets, mobile phones, or other personal computers) to see if the Internet is also interrupted on them.
If your other devices have the same problem of Internet interruption, as mentioned, the cause is your router or modem. You may have to do some troubleshooting or contact your Internet service provider for help.
If not, and other devices are connected to the Internet without issue, please try the following six solutions that have helped other users solve Internet disconnection.
Solution 1: Restart the WLAN AutoConfig service
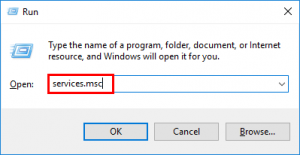
1) Press the Windows logo key and R simultaneously on your keyboard, then type services.MSc and press Enter
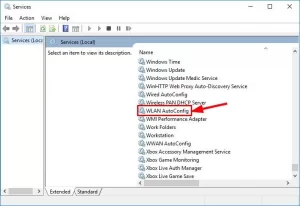
2- Scroll down and double-click on WLAN AutoConfig.
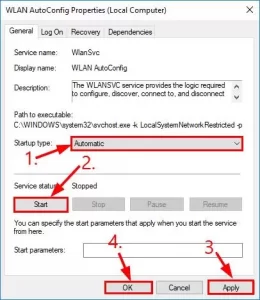
3- In the Startup type section, select Automatic and click Start. Then click Apply and then OK.
4- Check if your Internet outage problem has been solved or not. If yes, that’s great! But if the problem persists, please try the next solution.
Solution 2: Update your network or Wi-Fi driver
This problem may occur if you use a bad or outdated Wi-Fi network. So you need to update your network or Wi-Fi driver to see if your problem is solved. If you don’t have the time, patience, or skill to update your driver manually, you can do it automatically with Driver Easy.
Driver Easy automatically detects your system and finds the right drivers for it. In this case, you don’t need to know exactly what system your computer uses, you won’t get into trouble by downloading the wrong driver, and you don’t need to worry about possible mistakes during installation. Driver Easy controls all of these:
1- Download and install Driver Easy. (download link)
2- Run Driver Easy and click the Scan Now button. Then Driver Easy will scan your computer and identify problematic drivers.

3- Click Update All to automatically download and install the correct version of all missing or outdated drivers on your system (you need the Pro version for this. Clicking Update All will prompt you to upgrade it.)

4- Restart your computer for the changes to take effect.
5- Check if the Internet is still disconnected. If it works properly, that’s great! If it still hangs, go to the next step.
Solution 3: Change the speed and two-way mode of your network card
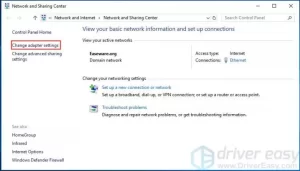
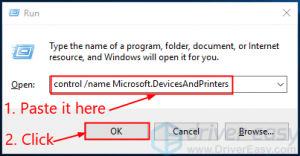
1- On the keyboard, press the Windows key and R simultaneously. Next, copy and paste Control /name Microsoft.NetworkAndSharingCenter into the box and click OK.

2- Click on the Change adapter settings option.
3- Right-click on the network adapter (for me, it is Ethernet) and click on Properties.
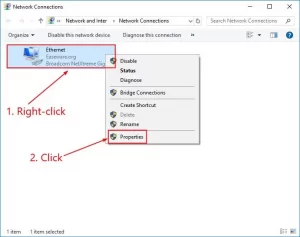
4- Click on Configure…
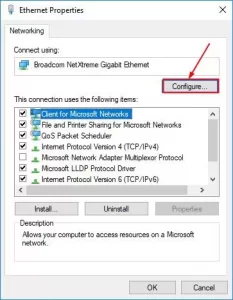
5- Click on the Advanced tab, scroll down the sidebar in Property, click on Speed & Duplex, select the Value of 10 Mbps Half Duplex, and click on OK.
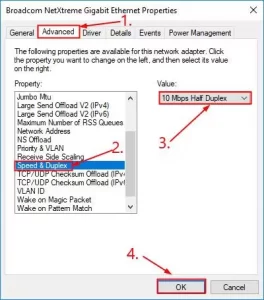
6- Check if the Internet is back to normal or not. If the Internet continues to drop, try step 4.
Solution 4: Clear the DNS cache
1- On the keyboard, press the Windows key and R simultaneously, then type cmd and press Enter.
2- Type the following commands and press Enter after each one:
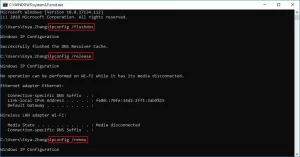
3- Close the window.
4- Finally, check whether the Internet is back to normal. If not, try another solution.
Solution 5: Change DNS settings
1- On the keyboard, press the Windows R key simultaneously. Then copy and paste control /name Microsoft.NetworkAndSharingCenter into the box and click OK.
2- Click on Change adapter settings.

3- Right-click on the network adapter (for me, it’s Ethernet) and then click on Properties.

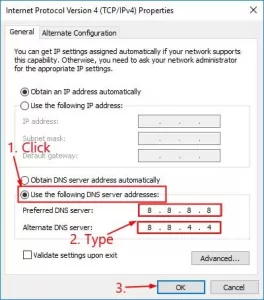
4- Click on Internet Protocol Version 4 (TCP/IPv4) and then on Properties.

5- Click on Use the following DNS server addresses option.
For the Preferred DNS server, enter the number 8.8.8.8.
For the Alternate DNS server, enter the number 8.8.4.4.
In the end, Click on the OK option.
6- Check your computer’s Internet to see whether the disconnection problem has been resolved. If not, go to the last solution.
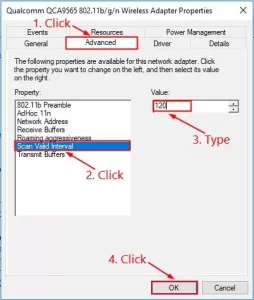
Solution 6: Change your valid scan interval
If you are using a Qualcomm or Realtek wireless network adapter, you can set the Scan valid interval to 120 to see if that helps reduce the internet dropout problem.
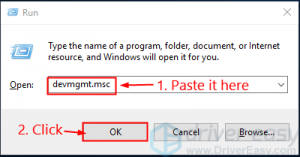
1- On the keyboard, press the Windows key and R simultaneously. Then copy and paste the devmgmt.MSC in the box and click OK.
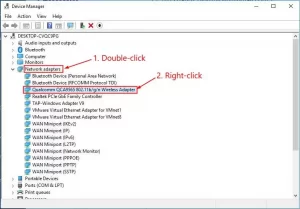
2- Find the Network adapter and double-click on it, then right-click on the desired wireless adapter and then; Click on Properties.
3- Click on the Advanced tab, then click on Scan Valid Interval, type 120 in Value, and then; Click OK.
4- Check if the internet disconnection problem still exists or has been solved.