


How to Repair Windows Using DISM and SFC Utility
How to Repair Windows Using DISM and SFC Utility
Naturally, the operating systems have problems; some files get damaged, and they cannot perform well. There are various built-in tools to scan and fix these problems in Windows. One tool that can help you is the SFC and DISM commands.
Usually, there are problems due to damaged or missing files in Windows, which can be solved with the help of DISM and SFC commands. These commands are used in Windows 10, 11 and 7, 8, and 8.1.
If you encounter problems with your Windows, we recommend you use these commands first instead of immediately uninstalling and reinstalling Windows.
If you are using Windows before version 10, the SFC command will be the answer for you, and if you are using Windows 10 or 11, you should use DSMI (Deployment Image Servicing and Management) commands. But how should these commands be used? In the rest of the article, we will teach you how to use these commands to solve problems that exist in Windows. Be with us.
Training DISM command for troubleshooting and repair in Windows 10 and 11
To be able to use this command, you must first open a PowerShell or CMD terminal through Administrator access.
To solve your Windows problem, troubleshooting must be done first. The command below will help you identify the problem that has occurred in Windows:
DISM /Online /Cleanup-Image /CheckHealth
With the help of this command, you can easily check all the errors that caused you problems in Windows. After you run this command, DISM will check the error logs and find the files that have been corrupted.
Of course, you can also use the Scan health parameter to check your Windows problems. To use this parameter, use the following code:
DISM /Online /Cleanup-Image /Scan Health
The Scanhealth parameter does not search only among log files but also checks all Windows files and finds any errors in Windows. For this order to be executed, you need to be patient; Since this command checks all files, it takes 10 to 15 minutes to complete.
You can easily diagnose your Windows. Be patient, and the story does not end here; Because we have to fix the problems that have been identified.
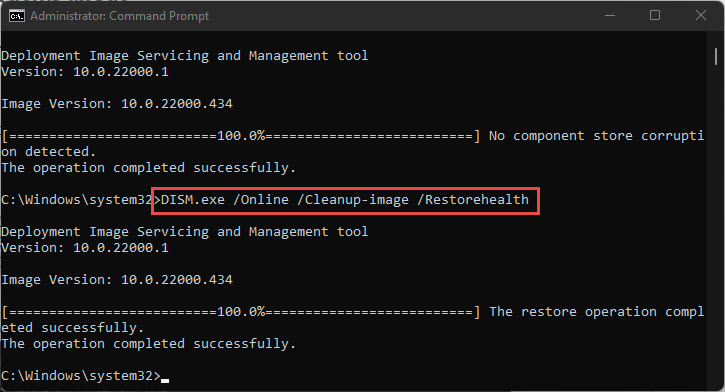
To fix problems with DISM, you need to use the Restorehealth parameter. To use this command, use the following code:
After you enter this command, if your Windows starts to recovdon’ton’t worry; it replaces damaged files with healthy files.
We recommend that you pay attention to the point that you must turn on your Windows Update service and that the Internet is available; If you do not follow these tips, your operation will fail.
Another thing we want to remind you that the duration of fixing Windows problems depends on the size and number of problematic files. If you see on the progress bar that it is stopped at a certain percentage, be patient until the process is completed; If your DISM encounters a problem for any reason, the System will notify you by presenting an error.
The following content will help you to obtain the resources needed for DISM from local sources if you do not have access to the Internet.
Change the source of the DISM command from the Internet to multimedia files.
Whatever we say about the advantages and capabilities of DISM, we have said little. For example, one of the functions that DISM has is that it can find files from various sources and repair Windows. Various file formats, such as DVD and ISO, can also be read by DISM.
You can use the Source parameter if you want DISM to use other sources instead of finding them from the Internet.
To enter DISM using RestoreHealth, you must use the following command:
DISM /Online /Cleanup-Image /Restorehealth /Source: G:\Sources\install.esd
You must enter the Install address to determine the source required for the DISM command. esd or Install. Win or Install.wsm file, which are the main Windows installation files, and be sure to note that in each media, usually one of There are three files.
In order to restore the lost files from the local source, the version of Windows you are using must be completely the same as the version of the media (multimedia file). Assuming your Windows Pro version is 1504, your multimedia file version should be the same.
Keep in mind that this command that we have brought you is only used to introduce specific sources, if DISM sees fit, it will go to other sources, and if you are not satisfied with this issue and do not want the DISM command to go to For other resources, you can use the limit access command at the end of the command; It means as follows:
DISM /Online /Cleanup-Image /Restorehealth /Source:G:\Sources\install.esd /Limitaccess
Up to this point in the article, nothing has been left unsaid about the DISM command. But as we said, this command is for Windows 10 and 11. If you are using versions prior to Windows 10, you need to use the SFC command.
Using the SFC command to troubleshoot and repair Windows 7, 8, and 8.1
SFC is short for System File Checker. The purpose of this command is to replace system files that are corrupted or missing with WRP system files.
To use this command, you need to run Command Prompt first. You can run both as Elevated and as Run As Administrator. After running the Command Prompt, you must enter the SFC command along with the Scannow parameter so that this command starts checking the system files. Of course, note that this process takes a lot of time.

Output messages from the sfc /scannow command. After the process that we said went correctly, Windows will inform you of the process result. Below is a list of messages that you may see.
Windows Resource Protection did not find any integrity violations.
This message means that SFC could not find any corrupt or missing system files, and everything is safe and sound, and you should look elsewhere for the problem.
Windows Resource Protection could not perform the requested operation
You will encounter this message when the SFC command cannot continue checking itself or when there is a problem checking. Of course, if you need to run offline, you will also encounter this message.
Windows Resource Protection found corrupt files and successfully repaired them. Details are included in the CBS.Log %WinDir%\Logs\CBS\CBS.log:
This message is what we expect. This message will be displayed when the SFC command finds the corrupted files and replaces them with WRP files.
Windows Resource Protection found corrupt files but could not fix some of them. Details are included in the CBS.Log %WinDir%\Logs\CBS\CBS.log:
You see this message when SFC finds problem files but fails to replace them with WRP system files.
Run the SFC command offline
As we said above, SFC does not always succeed in replacing corrupted files with system files. If the desired file is uploaded to the RAM, then it is necessary to enter the SFC command in Safe mode or Windows Repair mode.
Press the start, and i keys at the same time to adjust.
From the Update & Security section, select the Recovery option and select the Restart Now option located in the Advanced Startup section.
Click on the Troubleshoot option and enter the Advanced Options section and select the Command Prompt tool. Your Windows will restart and after that select your user account and enter your password.
If you want to run SFC outside of Windows, you must first run the wmic command and find the path of the Windows partition and the Reserved partition.
Wmic logicaldisk get deviceid, volumename, description
After the Windows and Reserved partitions are identified, you need to enter the SFC command with the paths found:
sfc /scannow /offbootdir=C:\ /offwindir=D:\Windows
Pay attention that before the parameter /offbootdir you must enter the address of the System Reserved partition and before the parameter /offwindir you must enter the address of the Windows partition.
Another thing you need to know is that when you run Windows from the command line, there is a possibility that the letter of the drives will chanThat’sat’s why we need the wmic command to verify the role of Windows drives. After checking the system files with SFC is finished, close the CMD window and select the Continue option.
Check the performance details of the SFC command
After you have checked the system files, SFC will provide an output of your operation, which you can find at:
%windir%\Logs\CBS\CBS.log
The content of the output placed in the CBS.log file is complex. To make this file more readable, you can use the findstr command to solve this problem and send the output to another text file.
findstr /c:”[SR]” %windir%\Logs\CBS\CBS.log >”%userprofile%\Desktop\Sfcdetails.txt”
The Sfcdetails.txt file contains complete details of each SFC command usage. In this file, you can get information about files that have not been repaired. In order to make sure which files were not repaired when you last ran the SFC command, you should check their history.
After you execute the above command, the sfcdetails.txt file will be saved on your desktop, and you can run this file with the help of Notepad to manually repair all the files that were not repaired by the SFC command.
For example, the content you see below is related to a file that was not fully repaired by SFC:
2007-01-12 12:10:42, Info CSI 00000008 [SR] Cannot repair member file [l:34{“7}]” Accessibility” dll” of Accessibility, Version = 6.0.6000.16386, pA = PROCESSOR_ARCHITECTURE_MSIL (8), Culture neutral, VersionScope neutral, PublicKeyToken = {l:8 b:b03f5f7f11d50a3a}, Type neutral, TypeName neutral, PublicKey neutral in the store, file is missing
Manually repair corrupted or missing system files
It is possible that you failed to repair the damaged files by running SFC command in Windows or running SFC offline, you can do it manually with the help of Command Prompt.
To repair system files manually, you need to know which files are damaged. You can achieve this with the help of CBS.log, which is provided through the SFC command. We recommend that you check the version that was rebuilt using the findstr command; This will increase the speed of your results.
How to replace corrupted or missing system files with the help of CMD?
In order to replace the damaged files, you must first run the Command Prompt as Administrator and claim ownership of the damaged file. To take ownership of the files, you need to use the takeown command with the /F parameter. We have given you this command below:
takeown /f C:\Windows\Microsoft.NET\Framework64\v4.0.30319\Accessibility.dll
What you need to do is replace C:\Windows\Microsoft.NET\Framework64\v4.0.30319\Accessibility.dll with the address and path of the corrupted file.
After you take ownership of the file, you need to edit the file permission. For this, you can use the Icacls command along with the /Grant parameter.
icacls C:\Windows\Microsoft.NET\Framework64\v4.0.30319\Accessibility.dll /Grant Administrators:F
Running this command gives you full access to edit or delete files completely. You can use the Copy or Xcopy command and replace the file system with the damaged file.
Xcopy H:\WRP\Accessibility.dll C:\Windows\Microsoft.NET\Framework64\v4.0.30319\ /Y
Note that like the previous command, you can replace the addresses with anything you want.
After you run the above command, you can use SFC and the /verifyfile parameter to verify the correctness of the file sysyou’veu’ve replaced:
sfc /verifyfile=C:\Windows\Microsoft.NET\Framework64\v4.0.30319\Accessibility.dll
Conclusion
Do you think there is a point left about troubleshooting and repairing Windows with the help of DISM and SFC commands? of course not! Everything related to Windows troubleshooting and repair has been explained in detail in this article so that don’ton’t need any other source. But if you have experience in this field or if you have a question, you can ask us in the comments section so that we can answer you as soon as possible.