


How to Remove Text in Photoshop?
You have the right article if you want to remove text from a photo in Photoshop. Photoshop sometimes confuses novice users because it has many tools, and often multiple devices can be used even for a simple edit. But the more you work with Photoshop, the easier editing is. On this page, we will teach you how to remove text from photos in Photoshop in several ways.
If you have never used Photoshop software or you want to learn this software professionally, we suggest you get the Photoshop tutorial series. This educational collection includes 30 academic titles in 96 hours of Photoshop training videos. You can prepare one or more training according to your needs and start learning. To get this valuable educational collection, you can refer to the following link:
Removing text from photos in Photoshop using Brush and Rectangular Marquee
If your writing is on a plain background, your job is pretty straightforward. Just replace the reader with a few pixels of the same color as the background.

Here we want to remove the year 2017 and replace it with the current year.
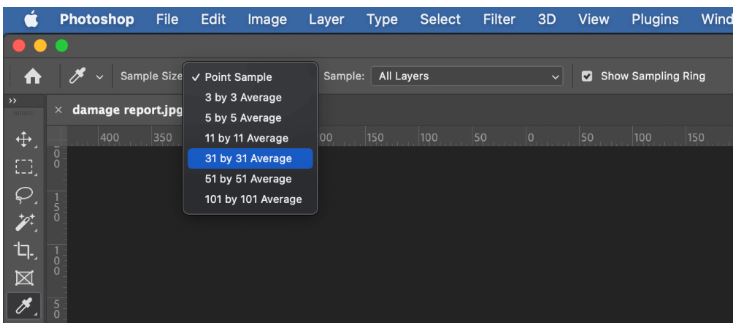
Step 1: First, determine the color you want the text to be filled with. Select the Eyedropper tool from the tool list or press the I shortcut. Now click on the background of the text, and Photoshop will use its color as the foreground color. If unsatisfied with the resulting color, you can change the sample size from above to achieve a more accurate color. If you choose Point Sample, the tool will only use one pixel, while the other options will sample the average color of a larger area.
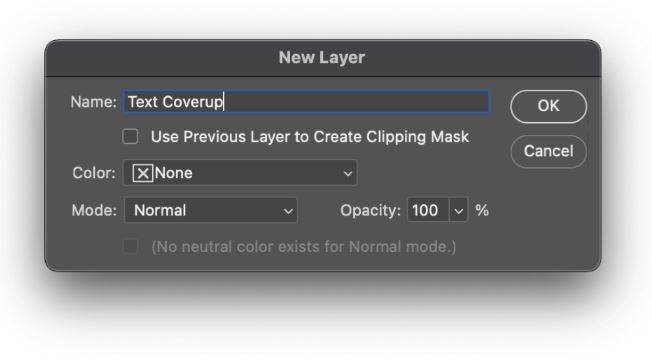
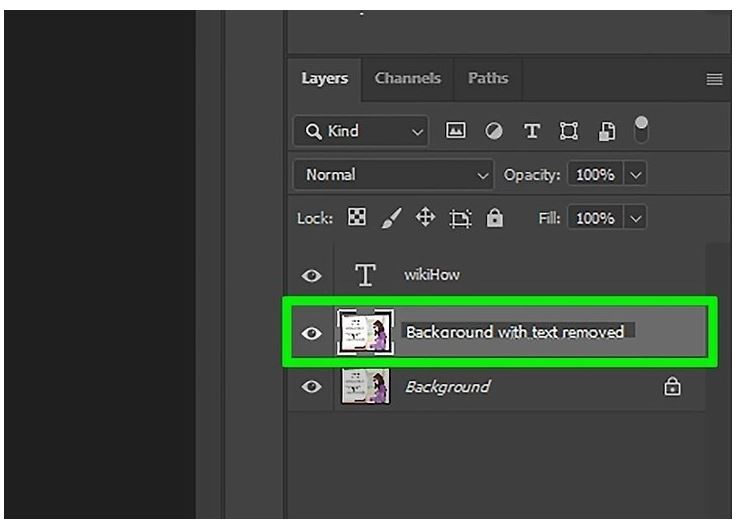
Step 2: At this stage, create an additional layer so that if you change the new Layer, your main Layer will remain intact. To create a layer to store recent changes, click on the New sub-menu from the Layer menu and click on Layer. You can also use the shortcut Option + Shift + N on Mac OS or Ctrl + Shift + N on Windows OS. Or, from the Layers panel, click the Create a new layer button and enter the new Layer’s name from the opened page.
Step 3: Select the new Layer from the Layers panel to start the deletion operation. A simple way to remove text is to use the Brush tool. Activate it by clicking the Brush tool from the list of devices on the left side of Photoshop, or press shortcut B. Then draw with the brush on your writing. If you wanted to use the Rectangular Marquee tool, you would also have to select it from the list (shortcut: M). Then surround the text with it and use Option + Delete on Mac or Alt + Delete on Windows to replace the reader with the background color.
Removing text from photos in Photoshop using the Rasterize function
Step 1: Open Photoshop and click File from the upper right corner. Then a menu will open. You have to click on the Open Option. After that, a page will open, allowing you to select your photo file.
Step 2: When the photo is opened in Photoshop, make a copy of it so that your original File is not changed or corrupted. To do this, go to the layers section and right-click on the photo you want to work with. After right-clicking, a panel will open from which you can select the Copy option. Now a copy of the original image layer is created. The document is written at the beginning of the name of the copied Layer.
Step 3: To remember the copied File better, right-click on it and hit rename. You can put any name you want on the photo. Then click on Save.
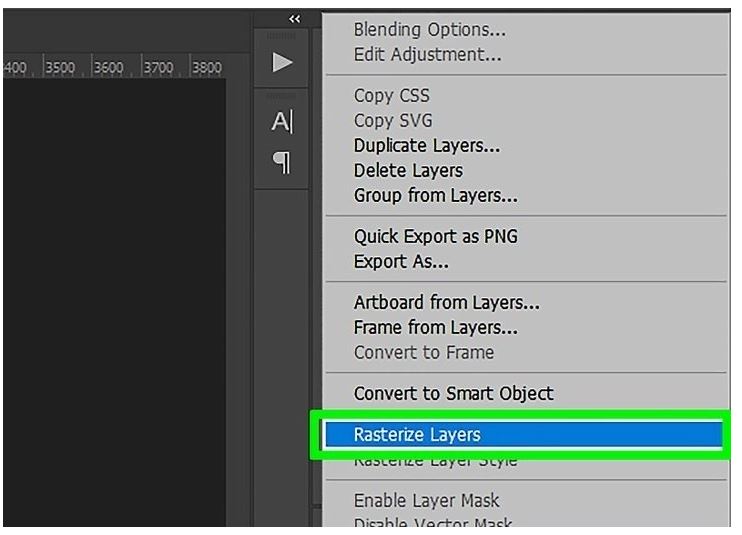
Step 4: You will see two layers in the layers section. Select the copy layer and open the tool panel by right-clicking on it. FSelectthe Rasterize Layer option from the panel o activates your Layer for editing.
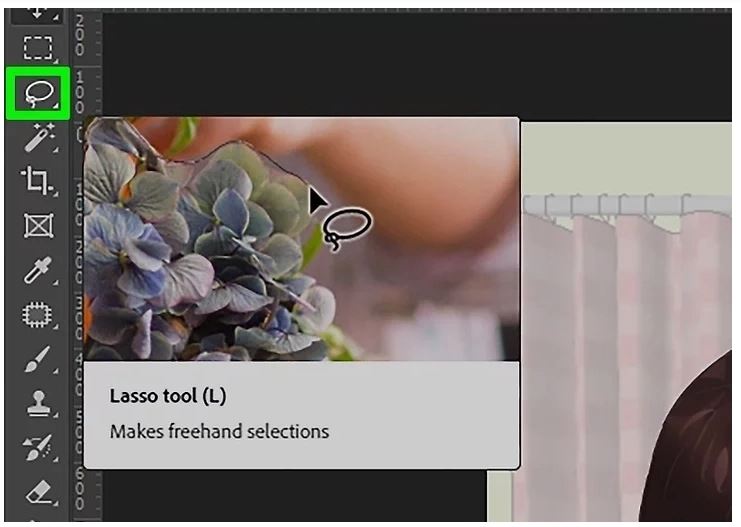
Step 5: It’s time to delete the post. One of the valuable tools for removing text from photos in Photoshop is the Lasso tool, and it’s straightforward to work with. Select Lasso from the list of devices in the left corner of Photoshop and click L to activate the tool. Now, with the mouse, select the text you want to delete. Once you have chosen the text area, click the Delete button to delete it.
Apart from the Lasso tool, you could also activate the Eraser by pressing E. After the eraser tool is started, you will be shown options to reduce and enlarge the device at the top of the screen. There is also an opacity option, which we recommend setting to 95% initially, and you can change it later. Now erase the writing area with Eraser. With the left click of the mouse, you will see that this text will be deleted by moving the mouse.
Step 6: Now that your post has been successfully deleted, save it. From the top left side of Photoshop, click File and Save or use the shortcut Ctrl+S.
Removing text from photos in Photoshop using Content-Aware Fill
In this section, we want to teach the Content-Aware Fill method fundamentally.
Step 1: Once you’ve opened the photo in Photoshop, make a copy of it to avoid the risk of ruining the original image (we taught you how to do this in the first method). The copy shortcut is Ctrl + J on Windows and Command + J on Mac OS. Now, if you look at the layers panel, you will see that the copied Layer has another name, which you can change, as we said before.
Step 2: Now, you need to select the Lasso tool. Moving on the sideline of the text with this tool is necessary.
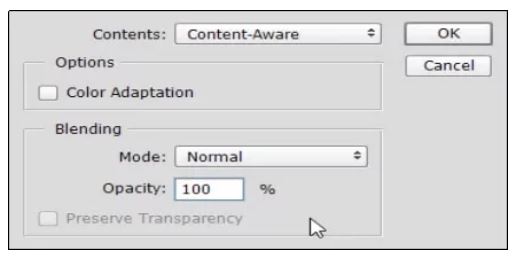
Step 3: After selecting the post, you need to delete it. Select the Fill option from Edit in the top menu or use Shift + F5 shortcut. Select the Content-Aware Fill option from the opened page and click OK. Now the text will be deleted, and its place will be empty so you can fill it.
Step 4: Finally, use the shortcut Ctrl + D to deselect the desired area and save the photo.
Content-Aware Fill has many uses and can improve the quality of your work in Photoshop.
Removing text from photos in Photoshop using Clone Stamp
By using Clone Stamp, you can remove the text more delicately. If your text is placed on a busy and complicated background, removing it becomes a bit more challenging. For this, you need to use the Clone Stamp tool so that when you delete the text, you don’t leave it empty.
Step 1: Create and rename a new layer using the Layer menu.
Step 2: Select the Clone Stamp tool, and from the tool options bar at the top, set the Sample settings to Current & Below.
Step 3: Hold the Alt key and select an area of the image that you think could be a suitable replacement for the text. Ensure your new blank Layer is active in the Layers panel, and then drag the tool over the text you want.
This process can vary depending on the content of your photo. But the steps we took are constant. Using the Clone Stamp tool can be very time-consuming; sometimes, you may not know what to replace the text with. But this tool will provide you with a professional result.
Removing text from photos in Photoshop using the Healing Brush tool
The Healing Brush, like the Clone Stamp, is beneficial for complex images but is much more manageable. To work with it:
Step 1: Select the Healing Brush tool from the Photoshop tool list. Then adjust the brush size to the thickness of the writing.
Step 2: Make a copy of the Layer so that you have the original File available in case you make a mistake (instructed in previous sections).
Step 2: Draw the brush over the text. Do this word by word. The Healing Brush removes the text and replaces it with similar pixels around it.
Removing writing from photos in Photoshop using the Spot Healing Brush tool
The Spot Healing Brush works precisely like the Healing Brush, except it allows you to control the pixels that will be replaced.
Before using the tool, you must Alt + Click on the area you want to sample. When you move the mouse over the text, this example will be replaced immediately. This tool is mainly used when your text is placed on a blank color or patterned background.
Sometimes the alternate pixels may be smeared with text color, which can be fixed with two obrush strokeshe brush.

Remove text from a photo in Paint.
If you think removing text with Photoshop is complicated, you can do it with Microsoft Paint software. Unlike Photoshop, Paint does not have layers; if you add something, it cannot be removed.
Step 1: From the top of the image, click Select and drag the mouse over the area you want to replace the photo. Press Ctrl-C to select the size, and then press Ctrl-V to paste. The copied site will be displayed in the upper left corner of the image.
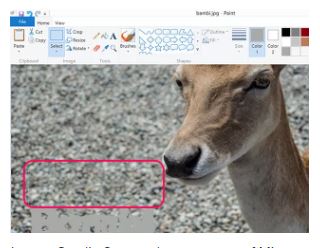
Step 2: Place the copied area on the text. When you click on a location outside the selected area, the site chosen is permanently added to the image, and you cannot pick and move it again. Of course, if you hit the shortcut Ctrl-Z, your copy will be deleted, and you can start the operation from the beginning. You can do this word by word instead of replacing the entire text with increasing accuracy.

Remove text from photos in iMyFone MarkGo
iMyFone MarkGo software is suitable for simple image editing and is much easier than Photoshop. To remove the text from the picture using this software:
Step 1: Open iMyFone MarkGo and open the photo you want to edit.
Step 2: Take the Selection tool and select the area around the text.
Step 3: Now, a window will open for you to drag on the reader.

Step 4: From the right side of the preview option, click the Remove Now button to remove the unwanted text from the image.
Step 5: When satisfied with the results, save the photo.
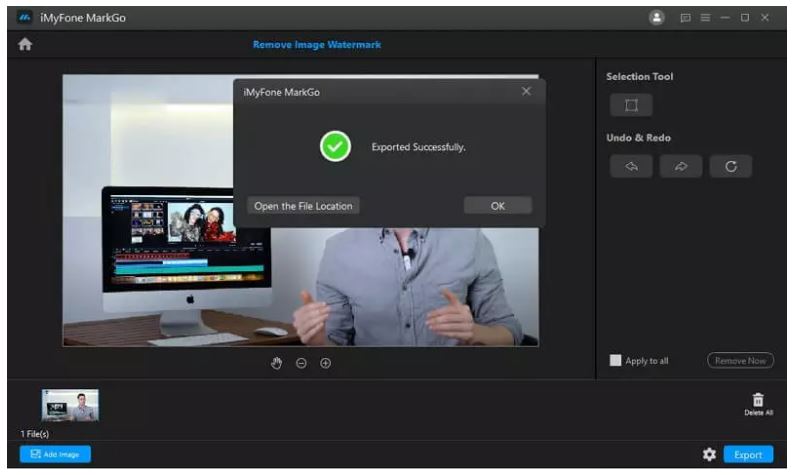
We recommend MyFone MarkGo because it is used for photo and video editing. In addition to the ability to delete text, it offers many other features, such as pre-made templates, filters, and effects, and you can use it as an alternative to Photoshop in a comment.
Conclusion
In this article, we taught several methods to remove text from photos in Photoshop. In addition, although Photoshop is currently the best photo editing program, for those who find Photoshop complicated, we have briefly explained how to remove text in Paint and iMyFone MarkGo. Now if you have a good photo that is ruined by text, don’t worry anymore; Because you can quickly delete the writing on the images using the content mentioned in this tutorial.