


How to become Ethereum Node 2?
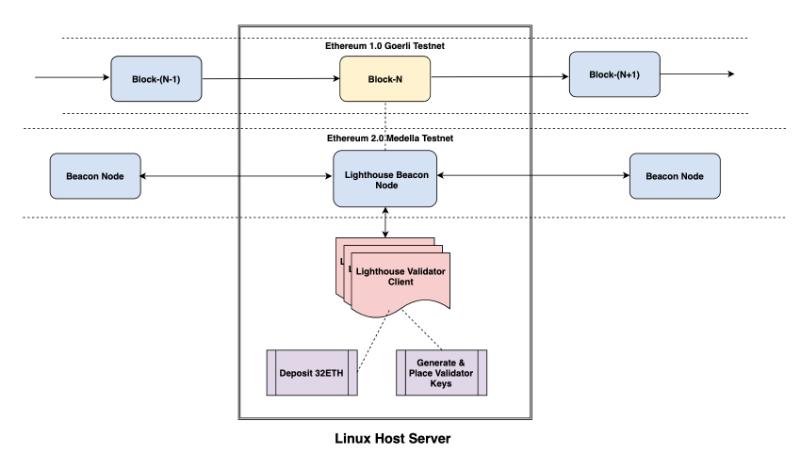
N recent days, due to the high growth of the use of Defi projects, there has been a significant increase in the price of digital currencies. Ethereum is no exception. Ethereum Digital Currency recently launched its Zero Phase with a multi-user two by Medella. Goerli supports this test in Ethereum1. This article will cover the steps needed to become an Ethereum2 node. First, we have to see what the Lighthouse is.
What is a Light House?
Lighthouse is an information security and software engineering company among nine other members of the Ethereum2 development team. It uses Rust programming language and has a strong focus on speed and security. The company has also received Ethereum Foundation, ConsenSys, and Vitalik Butlin funding.
Tips for becoming an Ethereum Node 2
Going through the steps to become an Ethereum2 node is not an easy task. To do this, you need to have a relative and correct knowledge of advanced Linux operating systems such as Firewall, SSH, user accounts, and the configuration of Linux services. You should also know how to be a full-node Ethereum 1.0 and be familiar with the basic concepts of blockchain and Ethereum technology, such as recovery terms, private and public keys, addresses, scam wallets, solidity contracts, and transactions.
Here are the steps to becoming an Ethereum2 node. Going through these steps can be time-consuming.
Necessary steps:
- Please install one of the Ethereum1.0 test nodes in Goerli from the appropriate server and then let it sync with the last block note test.
- Then install and configure the Lighthouse beacon node.
- Complete the deposit agreement.
- Create and activate the Validator keys.
- Set the user’s lighthouse editor.
Prerequisite stage (preparation of Ethereum Node 2)
To do this, you can use a Commodity server in Digital Ocean or Raspberry pi 4. If the device is supported by a public/private subnet with a VPC in AWS, the server settings must be configured according to the following ports. In addition, you need to use a Linux UFW firewall service for these settings.
Then update your system.
sudo apt-get update -y && sudo apt-get upgrade -y
UFW is disabled by default, and you must check the following to enable it:
- Port 22 to connect to SSH
- TCP / UDP 30303 port for interacting Geth node with other peer nodes
- 9000 / TCP and 9000 / UDP ports to license Lighthouse P2P connection with other counterparts to operate on Beacon node
Execute the Ufw commands as follows.
> ufw allow 22/tcp
> ufw allow 30303/tcp
> ufw allow 30303/udp
> ufw allow 9000/tcp
> ufw allow 9000/udp
> ufw enable
> ufw status numbered
The output should look something like the following text.
>ufw status numbered
Status: active
To                                    Action          From
--                                   ------             ----
[ 1] 22/tcp                       ALLOW IN     Anywhere
[ 2] 30303/tcp                ALLOW IN      Anywhere
[ 3] 30303/udp               ALLOW IN      Anywhere
[ 4] 9000/tcp                   ALLOW IN      Anywhere
[ 5] 9000/udp                  ALLOW IN      Anywhere
[ 6] 22/tcp (v6)                ALLOW IN      Anywhere (v6)
[ 7] 30303/tcp (v6)         ALLOW IN      Anywhere (v6)
[ 8] 30303/udp (v6)       ALLOW IN      Anywhere (v6)
[ 9] 9000/tcp (v6)           ALLOW IN      Anywhere (v6)
[10] 9000/udp (v6)        ALLOW IN       Anywhere (v6)
Step 1: Install the GO Ethereum node
> sudo add-apt-repository -y ppa:ethereum/ethereum
> sudo apt-get update
> sudo apt-get install ethereum
Install Go Ethereum.
To become an Ethereum2 node, since different systems are to run on the server and work separately, you must install and configure them as Linux services.
Go Ethereum as a backup service.
- Create a guest account (no-home account). This account could not log in to the server.
- Create a data list for the Georgi chain. This is required to store block information in the Goerli node.
- Create the necessary permissions. The goerli account needs permissions to describe the data list.
- Create a Systemd service file to save the service settings. This is needed later to command Systemd to run the Geth process.
> sudo useradd --no-create-home --shell /bin/false goerli
> sudo mkdir -p /var/lib/goethereum
> sudo chown -R goerli:goerli /var/lib/goethereum
> sudo nano /etc/systemd/system/geth.service
Update Geth service settings using the following code. You can also use the following commands when needed.
[Unit]
Description=Ethereum go client
After=network.target
Wants=network.target[Service]
User=goeth
Group=goeth
Type=simple
Restart=always
RestartSec=5
ExecStart=/usr/bin/geth --goerli --http --datadir /var/lib/goethereum --bootnodes "enode://d67359082562e4a599d0572c5a04909ca6e8650228c98f0a3a6844514f3a1ae0a8b0b6fe635a2e2f0e0e6be9f08d80f1994f4399e154134bc07080f0b0b64e42@68.183.59.172:30303,enode://95f5d03a95e7c5d0eb655b2fe3b5495b86d424b4681a200d402c30f233e1edc1846f2837b0dfe7df691fe007236ed1998d178774c9b8bc049be75a2c21038978@95.217.215.48:30303,enode://79e5d36f90ee0314293f4c1b1a4cd9ea13f1acd3d79b5a506870c70b6dbac6f9652ca86455886be854c9a1cfcc00d82cf0fa5d256bf7c40ae1fae0c21b437c7d@13.66.153.22:37912,enode://a9f7bb623c007d2b28038978dac6ebbe945c74f07cc91820c88cc95633b29468ca4708781fc99346a74ee43024b5e7cbb8b0803a988b57841b757cf975efa333@104.211.30.135:30303,enode://02200a7b5253969458e2addf6838b3f064c9c6b22288e92848a7ac5a367553d8d8c871b1af0603ac6ac2118bc15795b5aefe2d29b4729ae1e61e51a14201c8e9@18.194.247.237:30303,enode://553b679e4f84048f4340de271025fdd047869b39d419352d30cfd48dc97868263c8dc1481337946a41ef2836d2b5afece993012af982d8097de4cc062f50cda1@52.87.240.248:48584,enode://4531d2559d9707406f5132d9e9490b9ab6b1fa62ba9b10486d3f0eb7d8f6643b25f679c28ba4d4e0ac8e218d424aed8bd3a0a4ba9dd7bdec4823047adb8d0145@24.74.186.77:36804,enode://aaf930ed9bd450fe48b2f953da22393d6a0d0fdb2810ed16885d382d67fd89108d5777161c3b7401b922f34d8c416c74770f901147faf79c190de5bbbf0e3cc8@192.241.134.195:30303,enode://00e496ab9153d4dd8b88275352831fd3c75fdc255e57fdf9fe5875164672fb722889b0732f8df9aab3e16e82bef9b979840800e740bca1914252c598378ec52e@24.4.149.245:30304,enode://d26b54f391088fa3868811c643a72f42ea23be850670695c52bdd5ef6421e227c376d476e94e32de09793eec38cacaf69bd6f79f71a34e8662cc9ed0b35e7976@185.228.47.193:30303,enode://15032b1dcc97ebcbb9e060c27b775b81472653d19f932f75d0fd96a2ec1184698c7064401a01b08533783d8039c837a1dce3d69c23ef22289f02bb53a1dd70f7@202.187.155.60:30303,enode://4d03cdfa08658d6737fd18507b54e6653a236d41039d0dd8a3f9d0a3b06dff98c2af903daf99fe4cd2c6bfbb36f47554151336f42b971698c8bccf970f28c98a@51.210.9.77:40404,enode://3d4d8863396c39fa0710504dbe8803b776bef9d7fe3f732967fb8681552fd6d2dbe0c6f4642b45528060f5b168820ae93eb14d260617d29d815ffadc5c7db6f2@95.216.206.118:30303,enode://9a3f770e82a128ea27d1b73ca9819b05cf6f16275b7d9ee6151efe751966c771f7a82425447be97119743680c3bd421f024eccf24066aa46020d061aac5128dc@64.120.90.247:33656,enode://f7d7aa996c18e45efbe9b8a532f9f32bbdef027dc60a6999b6a06b97b3bd933995280b0a1390a4281edc2556ddfc46521814feb0e5839f82010dcaba1afec445@51.77.211.174:30303,enode://bfe4ae8c9638e56dc6c252d5fdf8fd7251b2ad82cbb89c56923c2e6ece2f5f71888d1fa6849a2f6aee901835876d6001bfce8aa29fa27aa4715fc2420596e399@155.93.136.72:56792,enode://10e545ef1ede27c90ef69863d50328f66de1ac806c67cf60d1bb4c72cc644fe11b6597ebd30d9e100d7ccdd05ae6b5d133d93122d81139baab03c2dd9e10c758@95.217.12.192:30303,enode://ca77b80280e607104f3997e92f1e9ea14e009cd51a471960f43c2a5c0f95405e6f669ac15a46db4f3dbdc77411551926dca0da0db32680a21b65cef80273bf5a@150.214.106.123:47524,enode://00b77e6c1f44719d48b305da24965e6c7b8af5ec614e883efb0c80617670585c4a949fe4a3fbacf6454afce7d074ecaac40213a893425522f1e941de71c007ed@155.93.196.78:58992,enode://6781b3fa91a8e5b2a89682f9307d2b66e21a4ae595d1b2dfe2662e5fbf7326f5db7a9acdcc64e8402b31a1e8fbefc6ba13fa0af4015a373a42a4de14fd6a306b@164.90.236.249:30303,enode://1d63c062e215caa90ab8348ab25bc38546d7112bf829d5e9a272e88fab0869bbef206e848acb4290448c6b6e077f312efef6075116a9bbeb0b069a95dbd7f103@86.88.214.39:30303,enode://6b5ee2f457fc091b762f9a058d35f7fc73f1c8116a1853b3db2279eba56dbd990c309084c002476a9cb1b8584ac3ee58e91184376ad22af337088ea357f0ef2e@86.154.249.228:30303,enode://c40e962b9bb3433303ea77a9d785faa4a6c43d67d813f3cbe42006412df64a74aab206c7138b90a74e4152bde99f5f94a310fe673e9c5b5b899c5c61e5c28de5@82.233.188.75:30303"[Install]
WantedBy=default.target
-Goerli is used as a flag to run the Goerli experimental network, -HTTP is used as a flag to represent the endpoint that connects to the Beacon chain, and -boot nodes are used as a flag to connect selected nodes to Geth nodes.
Reload Systemd to make the changes, get the system up and running, and ensure it works properly.
> sudo systemctl daemon-reload
> sudo systemctl start geth
> sudo systemctl status geth
geth.service - Ethereum go client
Loaded: loaded (/etc/systemd/system/geth.service; enabled; vendor preset: enabled)
Aug 13 12:04:00 ubuntu-s-2vcpu-4gb-sgp1-eth geth[852]: INFO [08–13|12:04:00.654] Imported new chain segment blocks=1 txs=0 mgas=0.000 elapsed=”223.343µs” mgasps=0.0
Aug 13 12:04:13 ubuntu-s-2vcpu-4gb-sgp1-eth geth[852]: INFO [08–13|12:04:13.095] Chain reorg detected number=3217563 hash=”d20e45…488182" drop=1 dropfrom=”6882
Aug 13 12:04:13 ubuntu-s-2vcpu-4gb-sgp1-eth geth[852]: INFO [08–13|12:04:13.095] Imported new chain segment blocks=1 txs=3 mgas=0.796 elapsed=13.377ms mgasps=59.
The appearance of this image means the beginning of ninety. It may take a few hours to a few days for the node to sync completely with the Goerli blockchain.
Step 2: Build a Lighthouse
Install accessories.
$ curl --proto '=https' --tlsv1.2 -sSf https://sh.rustup.rs | sh
As you know, Lighthouse is written in the Rust programming language. When Rust starts describing the PATH variable, you must log out and sign in again, or you may encounter a Command not found error.
To get started you need Cargo’s bin directory ($HOME/.cargo/bin) in your PATH environment variable. Next time you log in this will be done automatically.
In this process, you also need (git, GCC, g ++, make, CMake,…).
$ sudo apt install -y git gcc g++ make cmake pkg-config libssl-dev
$ sudo apt update
Construction of the Lighthouse
To become an Ethereum 2 node, you need to create a Lighthouse account after installing the peripherals. At this point, a lighthouse binary is created. This binary can also be used to run Beacon nodes and Validator users. Simulate the main source of the Lighthouse, then use the make option to compile the binary Lighthouse and move it to the bin folder.
> git clone  https://github.com/sigp/lighthouse.git
> cd lighthouse
> make
> sudo cp /$HOME/.cargo/bin/lighthouse /usr/local/bin
Step 3: Beacon node settings
Note that you have run the Beacon node as a service, and if your system restarts, this process will start automatically.
Implementing Bacon Node as an Ethereum Node 2 backup service
- Make a guest account in Lighthousebeacon.
- Create a data list to store node information with the Lighthouse beacon node.
- The necessary permissions. The Lighthousebeacon account needs these permissions to describe the index.
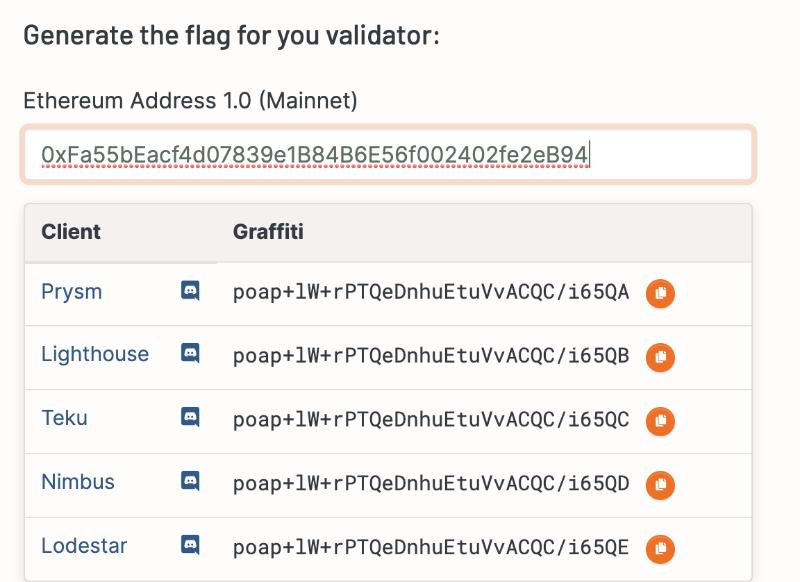
- Create a new Ethereum 1 address in your Metamsk wallet and copy that address using the orange lighthouse icon on the left.
- Get the POAP (Proof of Attendance Protocol) badge by visiting the address below. Placing it in Block Explorer is a testament to your participation in the pilot phase.
Create a Systemd file service to save the service settings. Later, you will use the settings file to send the command to run the Lighthousebeacon process to Systemd.
> sudo useradd --no-create-home --shell /bin/false lighthousebeacon
> sudo mkdir -p /var/lib/lighthouse/beacon-node
> sudo chown -R lighthousebeacon:lighthousebeacon /var/lib/lighthouse/beacon-node
> sudo nano /etc/systemd/system/lighthousebeacon.service
Update the Lighthiussebeacon service settings using the following code.
[Unit]
Description=Lighthouse Beacon Node
After=network.target
Wants=network.target[Service]
User=lighthousebeacon
Group=lighthousebeacon
Type=simple
Restart=always
RestartSec=5
ExecStart=/usr/local/bin/lighthouse beacon_node --datadir /var/lib/lighthouse/beacon-node --testnet medalla --http --eth1-endpoint http://127.0.0.1:8545 --graffiti <abcdefg12345saf>[Install]
WantedBy=default.target
Reload Systemd to make the changes, get the system up and running, and ensure it works properly.
> sudo systemctl daemon-reload
> sudo systemctl start lighthousebeacon
> sudo journalctl -f -u lighthousebeacon.service Aug 12 08:09:50 ubuntu-s-2vcpu-4gb-sgp1-eth lighthouse[7237]: Aug 12 08:09:50.000 INFO Syncing                                 est_time: 40 mins, speed: 5.33 slots/sec, distance: 12820 slots (1 days 18 hrs), peers: 51, service: slot_notifier
Aug 12 08:10:02 ubuntu-s-2vcpu-4gb-sgp1-eth lighthouse[7237]: Aug 12 08:10:02.001 INFO Syncing                                 est_time: 39 mins, speed: 5.33 slots/sec, distance: 12693 slots (1 days 18 hrs), peers: 51, service: slot_notifier
Aug 12 08:10:14 ubuntu-s-2vcpu-4gb-sgp1-eth lighthouse[7237]: Aug 12 08:10:14.001 INFO Syncing                                 est_time: 31 mins, speed: 6.67 slots/sec, distance: 12630 slots (1 days 18 hrs), peers: 53, service: slot_notifier
Aug 12 08:10:26 ubuntu-s-2vcpu-4gb-sgp1-eth lighthouse[7237]: Aug 12 08:10:26.001 INFO Syncing                                 est_time: 31 mins, speed: 6.67 slots/sec, distance: 12567 slots (1 days 17 hrs), peers: 52, service: slot_notifier
Let the node bacon sync with the latest status. ‘est_time’ is displayed by ETA. Appearing in the image below means a complete ninety bacon sink.
> sudo journalctl -f -u lighthousebeacon.service
Aug 12 10:28:20 ubuntu-s-2vcpu-4gb-sgp1-eth lighthouse[7237]: Aug 12 10:28:20.893 INFO New block received hash: 0x7d84…95d2, slot: 56841, service: router
Aug 12 10:28:26 ubuntu-s-2vcpu-4gb-sgp1-eth lighthouse[7237]: Aug 12 10:28:26.000 INFO Synced slot: 56841, block: 0x7d84…95d2, epoch: 1776, finalized_epoch: 1774, finalized_root: 0x9bf1…f0db, peers: 55, service: slot_notifier
Aug 12 10:28:33 ubuntu-s-2vcpu-4gb-sgp1-eth lighthouse[7237]: Aug 12 10:28:33.846 INFO New block received hash: 0xcb1f…05bc, slot: 56842, service: router
Aug 12 10:28:38 ubuntu-s-2vcpu-4gb-sgp1-eth lighthouse[7237]: Aug 12 10:28:38.000 INFO Synced slot: 56842, block: 0xcb1f…05bc, epoch: 1776, finalized_epoch: 1774, finalized_root: 0x9bf1…f0db, peers: 52, service: slot_notifier
Step 4: Determine the Validator’s stake in Medella.
Get Goerli Staking Ethereum.
- using the Goerli, Submit your 32 ETH request
- If you have multiple Ethereum 2 nodulators, you can apply for each.
- Once Goerli Ethereum appears in your Metamsk wallet, you can move on to the next step.
Sticker Goerli ETH
To install the ‘eth2deposit’ script and run it according to the instructions given, follow these steps:
> cd ~
> curl -LO https://github.com/ethereum/eth2.0-deposit-cli/releases/download/v0.2.1/eth2deposit-cli-v0.2.1-linux-amd64.tar.gz
eth2deposit-cli-v0.2.1-linux-amd64.tar.gz 100%[========================================================================================>] 14.56M 5.47MB/s in 2.7s
2020-08-12 07:19:25 (5.47 MB/s) - 'eth2deposit-cli-v0.2.1-linux-amd64.tar.gz' saved [15271039/15271039]
-rw-r--r-- 1 root root 15M Jul 28 07:10 eth2deposit-cli-v0.2.1-linux-amd64.tar.gz> tar -xzf eth2deposit-cli-v0.2.1-linux-amd64.tar.gz
> cd eth2deposit-cli-de03fe3-linux-amd64
-rwxr-xr-x 1 goerli lighthousebeacon 15M Jul 28 07:00 deposit> ./deposit --num_validators 1 --chain medallaPlease choose your mnemonic language (italian, korean, spanish, chinese_traditional, chinese_simplified, english, czech) [english]: <Enter>
Type the password that secures your validator keystore(s): <Enter the password>
Repeat for confirmation: <Enter the password>This is your seed phrase. Write it down and store it safely, it is the ONLY way to retrieve your deposit.
<Enter your mnemonics>Press any key when you have written down your mnemonic.Creating your keys.
Saving your keystore(s).
Creating your deposit(s).
Verifying your keystore(s).
Verifying your deposit(s).Success!
Your keys can be found at: /root/eth2deposit-cli-de03fe3-linux-amd64/validator_keys➜ validator_keys l
total 16K
drwxr-xr-x 2 root root 4.0K Aug 12 07:25 .
drwxrwxr-x 3 goerli lighthousebeacon 4.0K Aug 12 07:25 ..
-rw-r--r-- 1 root root 647 Aug 12 07:25 deposit_data-1597217105.json
-rw-r--r-- 1 root root 710 Aug 12 07:25 keystore-m_12381_3600_0_0_0-1597217104.json> sudo chown -R root:root /var/lib/lighthouse/validator
> lighthouse account validator import - directory ~/eth2deposit-cli-de03fe3-linux-amd64/validator_keys - validator-dir /var/lib/lighthouse/validator
Successfully moved keystore.
Successfully updated validator_definitions.yml.
Successfully imported 1 validators.
You can track sticking transactions Goerli net test. Since then, anyone who has been with Ethereum 1 knows that solidity contracts created by MedellaBeaconContractor require the submission of 32 Goerli ETHs before becoming a validator in the Beacon blockchain. These 32 Ethereum are used for the sticking process and are probably no longer removable.