


3 Ways to Rotate the Movie in Windows 7 to 10
After being transferred to your computer, a video file that looks right on your mobile phone may turn into something else. The video image may be displayed upside down or sideways. You definitely do not want to watch a video like this. This article will explain how to rotate a video in Windows 10 or older Windows. The three methods mentioned in this article are the simplest methods available. Be sure of this.
It may seem that you can easily fix this problem without the need for video editing software. Unfortunately, you can not rotate a video directly into the media player. There are other methods you can use. Follow the following to learn about them.
Method 1: With the help of your Windows Photos program (Windows 10 only)
The program for viewing images is installed by default on Windows 10. The steps are described below:
First, open your Windows menu (click the Windows icon at the bottom left) and search for Video Editor. A default application will be displayed for you; open it.
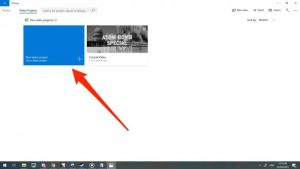
Start by clicking on “New video project” at the top left, or you can click on “New video” at the top right of the page and then from the list. When displayed, select the phrase “Start new video project.”
Then, in the blank area of the new project, you can drag the video you want to rotate into the library project or click the “+ Add” button, then select “From this PC” and find the video you want to rotate.
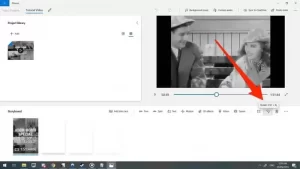
Then move the video from the library project section to the timeline section at the bottom. This should show a preview window of the video you are editing on the right side of the application.
Press Ctrl + R together to rotate the video 90 degrees clockwise. Or you can see the “Rotate” button at the bottom of the program window and click on it.
Finally, select the phrase “Finish video” from the top right of the software, then you must select the quality level rating between more or less and save the video in the destination folder.
Method 2: Use VCL Media Player (on all Windows)
VCL Media Player is software that organizes and organizes your audio and video files in a specific order. This software also helps to play media files. It is free to use, and you can use it to rotate your desired video. Here’s how it works:
You must first download it. (Download link) and then install (of course, most users have already installed it on their system because it is a very popular program)
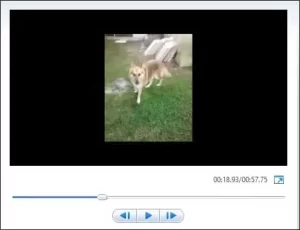
Then launch VLC Player and drag the video you want to rotate into the software, or select it in the Media toolbar and then click Open file to find and select the video from your computer. (See the image at the beginning of the article)
Then, select “Tools” from the top toolbar and select “Effects and Filters” from the drop-down menu that appears. This menu should appear by pressing Ctrl + E by default.
In the window that opens, go to the Video Effect tab and click on Geometry in the tab below. You will probably need to click on a few small arrows to reach this option.
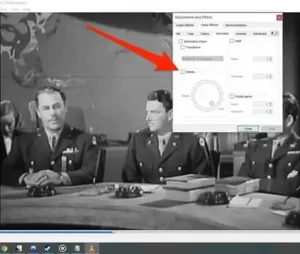
Now, to rotate the video, you have to check the checkbox to rotate the video 360 degrees. Turn the wheel to correct the video at the desired angle. Do not forget to click Save before tapping close.
Method 3: Use the default Windows software called Windows Movie Maker (all windows)
This program is also installed on all Windows by default, and if you click on the bottom left icon (Windows icon) and search for the phrase windows movie maker, it will be found. But if you do not have it, download it here.
Windows Movie Maker is probably the easiest option if you want to rotate your videos or edit them a bit.
We have already saved the video we want to rotate on the desktop. We need to drag the file into the Movie Maker window to import it into the software.
If you are unsure of the direction in which the video should be rotated, you can play the video for a few seconds to see in which direction the video should be rotated. As you can see, we have to rotate the video below 90 degrees to the left.

In the Home bar, in the Editing section, you can find the two buttons “Rotate to Left” and “Rotate to Right.”

We went ahead for a few seconds and then clicked on “Rotate Left.” As you can see, our video is now in the right direction
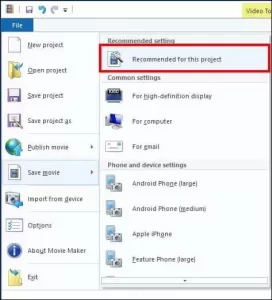
Of course, the work is not over yet. We need to save our video. The easiest way is to click on the “File” menu and select “Save Movie.” There are many settings to choose from. In this case, we simplify our work and select the “Recommended for this project” option.
If you want, you can save the new video as a new file or delete the old version. However, we do not recommend that you do so; Unless you delete a copy of the old version. You do not want to overwrite the original file unless you are convinced that the new video is as good as or better than the previous video. Otherwise, you may clear a valuable memory that you will never be able to recover.
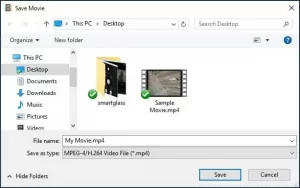
We save this video titled “My Movie.mp4” on the desktop with this explanation. You can choose any name for it and save it wherever you want.
Your new video file will be processed and saved in your selected location. You can now watch it in your default video player at the right angle.
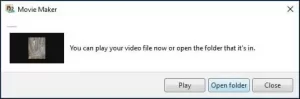
If you are not satisfied with the result, you can go back to Movie Maker and save it with different settings.