


3 Best Ways to Disable Automatic Update on Windows 8, 10 and 11 update (without program and with program)
3 Best Ways to Disable Automatic Update on Windows 8, 10, and 11 updates (without program and with the program)
In this article, first, we will explain the method of disabling the update in Windows 8 and 10, then in Windows 11 without any software. For this reason, at the end of the article, we introduce the third method, which can be implemented in Windows 10 and 11 and all Windows. Simple software that will not only do this but also other applications.
Getting used to one operating system and changing it to another may not be easy for many people. For example, you can see an example of this in Windows 11. You may not be ready yet and still want to work with the interface and features of Windows 10. Youthat’sme to the right you’ve that’s what you want.
The beauty of Microsoft is that it does not force anyone to receive system updates. That is, if your system automatically updates, you can stop it. The following article focuses on methods that prevent your system from updating Windows 10. These methods will stop the update and allow you to enjoy Windows 10 as long as you want.
First part: Disable Windows Update Services in Windows 10
Most of the time, Windows updates automatically, but there is a chance that you don’t want Windows 10 to don’te. For this, you need to stop the computer update system. This can be done in 4 steps:
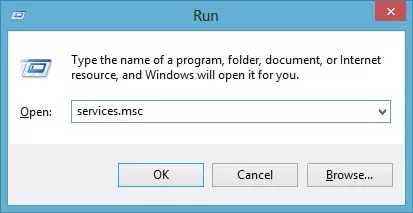
Step 1: Open the “Run” window
At first, you” wi”l be prompted to press Windows+R. This will launch the “Run” window and, which he “irst step will bring you closer to disabling the Windows Update service.
Step 2: Open the Services Window
Once the Run window opens, the next step is to open the “Services Window.” This i” done by typing”serv ces. msc” and then p”essinusing” enter” enter.
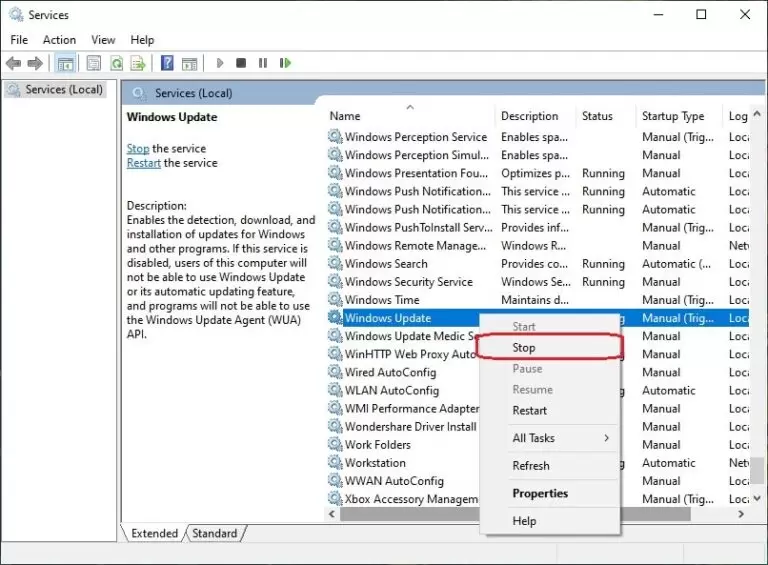
Step 3: Acc” ss Wi “dows Update
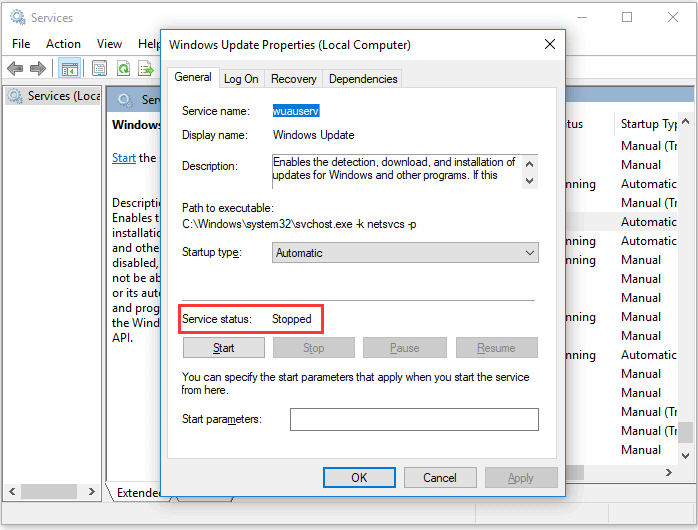
At this point, a new window will appear, showing a list of different services. Among those services, find and select “Windows Update.” Once you” see seerigh, “right and tap the Stop button.
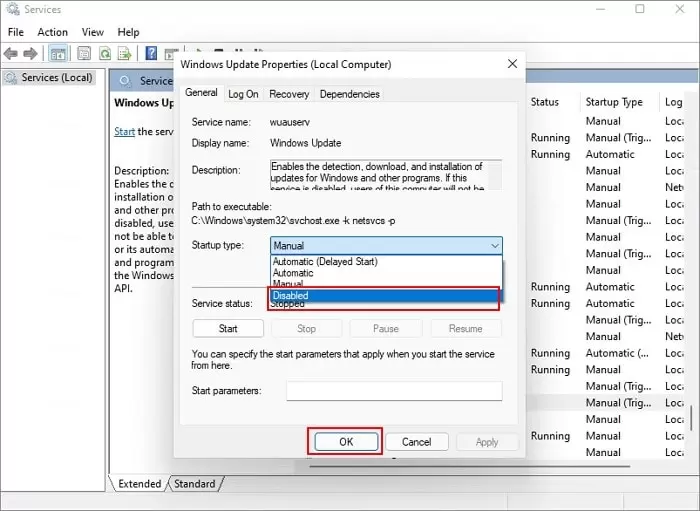
Step 4: Change the settings
After stopping “Windows Update”, do “le “lick on it. A “new “Windows Update PropePropertiesg will open. From th”t page, you should now change the ‘Startup Type’ in the ‘Ge’erGeneral.
O’en the d’op-down’menu and select “Disabled.” This will dis”ble Wind”ws Update Services.
Part 2: Close the Windows 11 update with the Group Policy editor
If this method is the best, ifdon’t want to disable thedon’tte services from the Run window, the disable update services, you can use Group Policy Editor. If you don’t know how to work done donation the steps below:
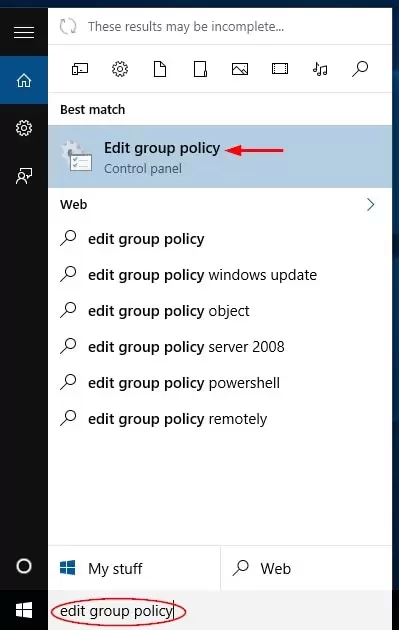
Step 1: Run Group Policy Editor
By searching for “Group Policy Editor”,” this will appear in” the search bar. When the search is finished, tap on it.
Step 2: Run Windows Update
After the editor opens, go to “Computer Configuration.” “Fr.” there, find and c”ick on “Administrative Template” Aftr it opens, go to “he “Windows Components” sect” on and finally tap” on the e “Windows Update” option.
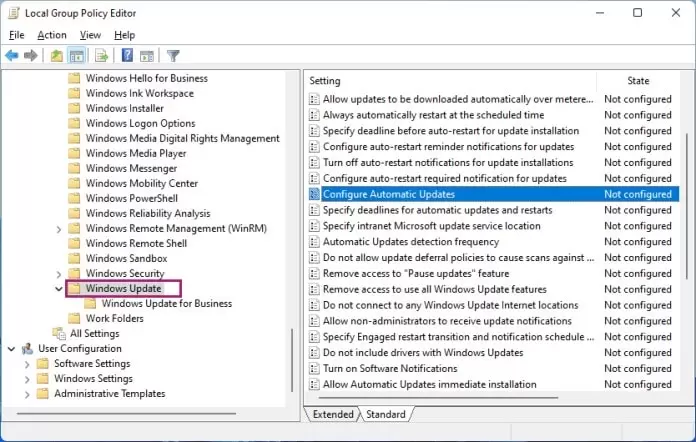
“Step 3: Config” re automatic updates
After opening the “Windows Update” page, an “isan will appear.” In. the “hat list, look for “Configure Automatic Upda,”e.” Do.” le click on Config” re Automatic Update, and a new page will be displayed. You’ll be asked to disablyou’llswitch on that page and then le auto-update.
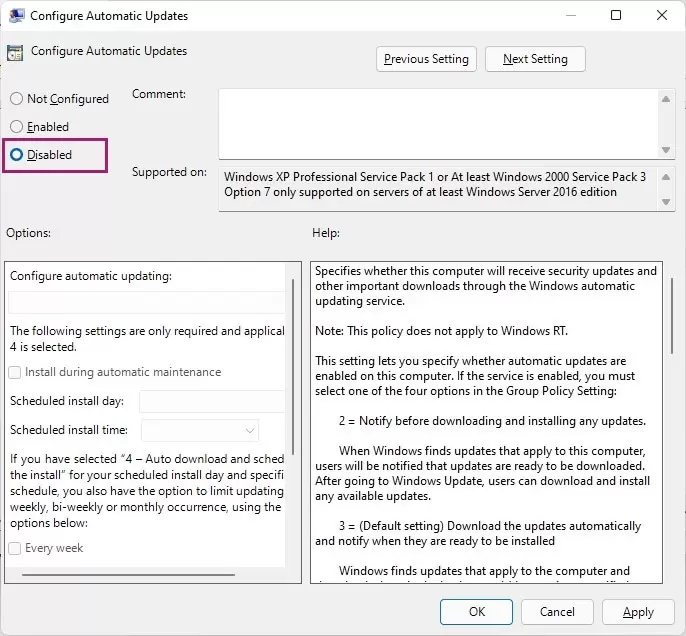
Step 4: Restart the system to apply the changes
After you disable Automatic Updates, click the “Apply” button in the low”r rig”t corner. After doing this, restart your computer to apply all your changes.
A simple and permanent method for all Windows: disable Windows 11 update with the help of an application (EaseUS)
If you want an easy way to stop Windows 11 updates, you can run the third-party software EaseUS Clean Genius. Using this tool, you can permanently disable Windows 11 automatic updates without wasting time. Run this tool and follow the instructions below.
With this versatile tool, you can disable or enable Windows Update, restore hard drives, and remove or enable write protection…
Step 1: Download EaseUS CleanGenius for free and install it on your computer.
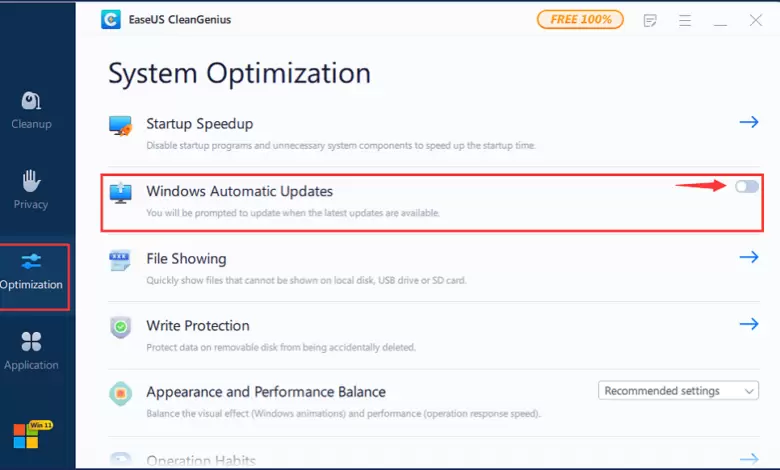
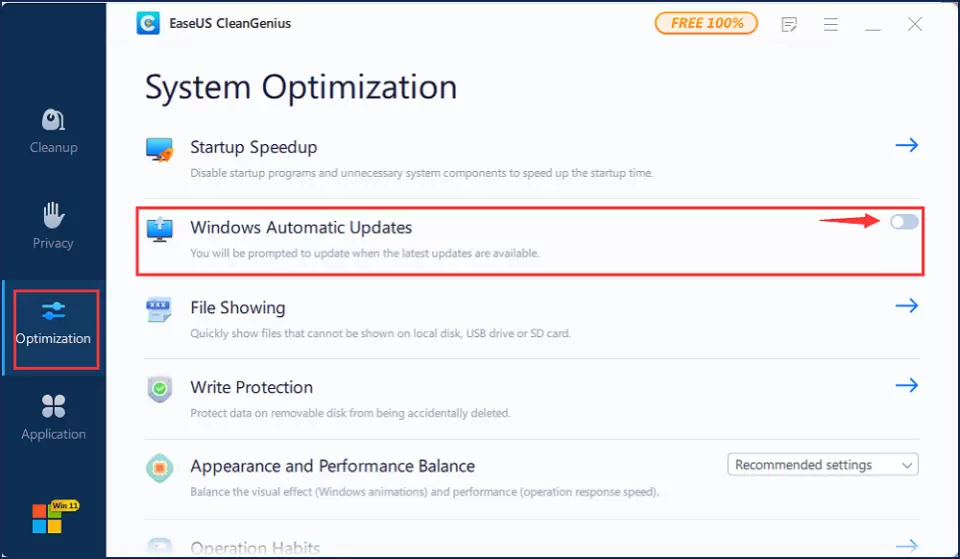
Step 2: Run EaseUS CleanGenius and go to “Optimization.”
The third set,”: stepa is a tool, “utomaautomaticallycts the status of the Windows Update service. If Windows Update is running, click the switch to stop the service.
Step 4: To check if the service is automatically disabled, go to the start menu, type Services, right-click on Services, and select Run as administrator.
Step 5: In the list of services, find and right-click Windows Update>Properties. In the Service status section, you can see whether the service is stopped.
I have frequently asked questions about closing Windows Update.
1- How can I stop the Windows update in progress?
There are three ways to stop Windows Update:
Stop automatic maintenance mode.
Stop the update in Services.
Stop Windows Update.
2- How can I prevent Windows from downloading?
These steps are straightforward for a beginner to follow. Our recommendation is to use the software mentioned in the last method. But it is enough in Windows itself:
Press Window+R to open the Run window.
Open the Services window by typing Services.
Find and select the “Windows Update” option f” on the e “Servic”s” list, then click the k “click e “S” op” button.
3- Why do” Win”ows force me to update to Windows 11?
Windows users are forced to install Windows 11 updates because Microsoft wants to use this method to promote Windows 11.
4- How long does it take to update Windows 11?
Between 10 and 20 minutes. On different devices, Windows 11 is installed at other times. For example, updating the latest SSD only takes about 10 minutes.
Conclusion
Keeping your system updated and enjoying the latest Windows features is usually better. But Windows updates may sometimes be useless. Be careful what you download and install on your computer. If you want to disable the automatic update, try the solutions above.