Monitor settings in Windows 10 and 11 and How to Calibrate Your Screen?
Sometimes you are watching a movie or editing a photo, but you notice that the colors on your screen do not look very pleasant. Some monitors are naturally too bright, while others have more saturated colors. Calibrating the display helps to adjust the colors to meet the standard and makes everything look better. This article will explain how to calibrate your Windows 10 monitor to ensure you have the correct light and color settings. Stay with us.
How to calibrate the monitor in Windows 10 and 11
To calibrate your monitor in Windows, go to Settings > Display > Calibrate display color. Then follow a series of steps to adjust your gamma, brightness, contrast, and colors. You can also use online tools to calibrate your monitor.
Note: Before setting up the monitor, ensure it has been on for at least 30 minutes. This ensures the monitor is warmed up and displays its normal brightness and colors.
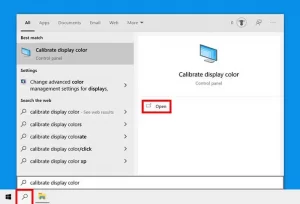
1- Click on the magnifying glass icon in the lower-left corner of your screen. This will bring up the search bar.
2- Type “Calibrate display color” in the Windows search bar.

3- Next, click on Open. Then a new window will appear with this message: “Welcome to Display Color Calibration.”
Note: If you have multiple monitors, drag the window to the screen you want to calibrate.
4- Then click on Next to start the calibration process. You must also click Next between each of the following steps.
Note: At this stage, set your monitor to the factory settings because otherwise, the best result will not be obtained. To reset the monitor to factory conditions, use the front, side, or back buttons. If your monitor allows you to adjust the gamma, you should set it to 2.2, the closest value.
5- Then, use the slider to adjust the gamma. To do this, move the slider so that the middle points of the image are less visible. This will change both the brightness and color of your screen.
Note: If you can’t make the center circles disappear completely, don’t worry. Try to get as many numbers as possible on the top and bottom bars. With higher-quality monitors, you can see six numbers per bar, while lower-quality monitors can only display four numbers.
Note: If you can’t adjust the slider, you may have to change the gamma settings using your monitor’s control buttons. While doing this, you should keep the display settings window open and the gamma correction image test.
6- Next, adjust the brightness. To do this, use the control buttons on your monitor until you can see the shirt and suit in the image, but not so much that the X stands out from the background. You should still be able to see the “X,” but the wall behind it should not be pale.
Note: Your screen will look different depending on the angle you are looking at. For best results, you need to step back and look at your monitor from a distance.
7- Then, adjust the contrast. For this, use the buttons on your monitor. Manipulate the contrast where you can see the wrinkles and buttons on the man’s shirt in the picture. The background of the image should not be bright white.
8- Then, adjust the colors. To do this, use the sliders at the bottom of the window until all the bars are neutral gray. If this is difficult for you, you can also download an image of the color bars and use that image as a benchmark to know when your pigments will deplete.
9- In the next step, click on previous and current calibration to see if you like your changes. Doing so will not change your calibration. You can change the settings by clicking on the arrow in the upper left corner of the window.
10- If you are satisfied with the new calibration, click Finish. If not, click Cancel. Or you can start from the beginning. You can repeat the steps for best results, this time in reverse. This could be because each step affects the next, so changing the order of the steps will help you fine-tune your calibration.
Note: You can check the box “Start ClearType Tuner…” to adjust the resolution of the text on your screen. Next, you will be asked to do a quick test to calibrate the text on the screen.
Two free online sites to test and adjust monitors
After the calibration is done, there are tests you can do online to make sure your monitor is showing you the best color quality.
The Lagom LCD Monitor Test Pages single-page version shows you a series of tests for monitor calibration on a web page. Just go to this website and take the tests yourself. If you want more extensive instructions, you can access the full version of the test.
W4zt Screen Color Test This website (which you need to turn on to use VPN) offers color gradients for comparison, some grayscale boxes, and a test to check the gamma of your screen. It’s faster than Lagom, and this site is great if speed is your priority.
Photo Friday is a free photo-sharing website that offers a free calibration tool. This test is shorter and simpler than Lagom and W4zt, but you can use it to see if your screen has the right brightness and contrast.