Do you want to update WordPress but don’t know where to start? Most beginners fear that updating might break their website.
This fear is understandable. However, it is important to use the latest version of WordPress for the best website security and performance.
In this beginner’s guide, we’ll show you how to safely update WordPress like a pro without breaking your website.
Updating your WordPress website is a regular maintenance task. We’ve created an easy-to-follow article that you can use as a reference guide.
Why should you always update WordPress?
Leading WordPress security research shows that most WordPress websites that get hacked have outdated WordPress core, plugins, or themes.
WordPress is actively maintained by developers from around the world. These developers find and fix bugs, add new features, and monitor security vulnerabilities regularly. These changes are then published in the new version of WordPress.
If it is not a major update, WordPress can automatically update itself to a newer version. For original versions, unless you’re on managed WordPress hosting, you’ll need to manually initiate the update yourself.
You should update to make sure your website has the latest security patches, the newest features, and the best speed and performance.
That being said, let’s take a look at how to safely update WordPress to the latest version.
Things to do before updating WordPress
The most important thing to do before upgrading WordPress is to create a full backup of WordPress.
Even if you’ve set up an automatic WordPress backup plugin like Duplicator, you still need to create a new backup and store it securely in a remote location like your computer or cloud storage like Google Drive.
A full WordPress backup includes everything:
- Your WordPress database
- All your uploaded images and media
- Your WordPress plugins and themes
- Your WordPress configuration files
- WordPress core files
This step is very important because it allows you to restore WordPress from a backup if something goes wrong.
Once you’ve created a full backup and saved it remotely, you can then move on to the next step.
How to update WordPress to the latest version safely
There are two easy ways to upgrade your WordPress site to the latest version. One is automatic and the other is manual. We will show you both of them.
Method 1: Update WordPress using the internal system (1 click)
This method is simpler and recommended for all users.
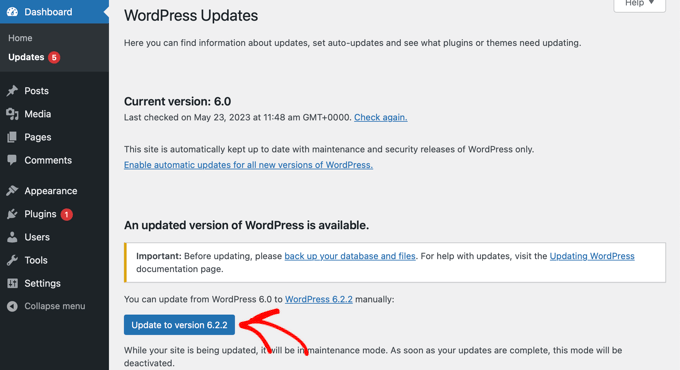
First, enter the administration section of your WordPress website and go to the Dashboard » Updates page.
You will see a notification that a new version of WordPress is available. Now you just need to click on the button “Update to version X.X.X” to start the upgrade.

WordPress will now download and install the latest version of the software for you.
You will see the update progress on your screen. During the upgrade, WordPress will put your site in maintenance mode.
Your site will still be visible to users, but you won’t be able to install plugins or themes while the update is in progress.
Once the update is complete, you will be redirected to the WordPress Welcome page. Depending on each version, you may see a page that explains what’s new in WordPress and features you should try.
This. You have successfully upgraded WordPress to the latest version.
Method 2: Manually update WordPress using FTP
This method requires using FTP to manually upload WordPress files. If the first method doesn’t work, you can use this one.
First, you need to download the latest version of WordPress. Go to the WordPress download page and click the “Download” button.
Your browser will now download WordPress in a zip file. After downloading, you need to extract the zip file.
Inside you will see a WordPress folder. This folder contains all the WordPress files you need to update.
Next, you need to open your FTP client and connect to your website. Once connected, navigate to the WordPress folder you just extracted from the zip file in the Local Files column.
In the Remote Files column, navigate to the root folder of your website. This folder can be public_html or the domain name of your website. Inside this folder, you will see your WordPress files and folders.
You need to select all the files inside the wordpress folder on your computer and then right click to select “Upload”.
Your FTP client will now start uploading WordPress files from your computer to your website.
However, your website already has older versions of files with the same name. You will be asked what you want to do with those files. You should select “Overwrite” and check the box next to “Always use this action”.
This ensures that all WordPress files on your website are replaced with newer versions.
After the upload is complete, you should go to the admin section of your WordPress site. This step is necessary because sometimes a newer version of WordPress may also require updating your WordPress database.
In this case, you may see a page where a database update is required. Click the “Update WordPress Database” button to continue.
This. You have successfully updated your WordPress website.
Things to do after updating WordPress
Once you’ve upgraded WordPress on your website, you need to make sure everything is working as expected. Simply visit your website in a new browser window and check the settings in the WordPress admin area.
Another set of WordPress tutorials has been completed. We hope that this tutorial will be useful for you to learn and understand how to update WordPress safely;