


What Is ROM Monitor And Why Should A Network Expert Know Exactly About It?
ROMMON ROM Monitor Is The Application, Or More Precisely, The Firmware That Manages The Initialization Process Of Cisco Hardware Equipment And Allows The Cisco IOS XE Operating System To Run And Boot The Device.
ROM Monitor, If the router fails to read the firmware from the ROM during startup, it automatically enters the ROMMON environment. Sometimes users have to enter the ROMMON environment manually due to forgetting the password or clearing some system settings. Simply put, Ramon acts like the BIOS of mainstream computers, performing some initial checks to make sure the system equipment is in good condition, then goes to the hard disk boot sector and reads the system boot files from that section. Transfers to main memory.
The only difference is that if the PC operating system crashes, the boot process remains unfinished, but here the user enters the Ramon environment. This is why Cisco equipment is at the forefront of home and business, and you will rarely find a large organization that has not used Cisco equipment in the infrastructure.
What is iOS XE?
Before introducing ROMMON and how to use it, let us briefly explain iOS XE. Cisco originally used the CatOS operating system on its equipment, which is later replaced with iOS, and today uses the iOS operating system in most of its systems and equipment. iOS is a Linux operating system that uses a distributed software architecture. iOS supported important applications such as multitasking well, but as technology advanced, Cisco expanded its capabilities and added more precise management and routing mechanisms that eventually led to iOS XR.
Used on some of the company’s products. Cisco IOS is a monolithic kernel operating system that runs directly on the hardware. At the same time, IOS XE combines a Linux kernel and an integrated application (IOSd) running on this kernel. While IOS XE (IOSd) and IOS have similar code, IOS XR is completely different in the base code.
What is a ROM Monitor?
ROM Monitor software is known as various ROMMON, boot software, boot image, or boot helper. ROMMON indeed comes with routers that use Cisco IOS XE integrated kernel software, but ROMMON is software separate from Cisco IOS XE. During normal startup, ROMMON initializes the router and then monitors the process of transferring Cisco IOS XE software to main memory to avoid any particular problems. Additionally, when you connect a terminal to a router, the connection is in ROMMON mode, and a ROMMON command-line interface is displayed.
Users or network administrators use the ROMMON environment for a variety of reasons, including:
- Specify the config-register value to be used for the next boot.
- Run (boot) a valid version of IOS XE software.
- Do not run NVRAM settings.
When Cisco IOS XE software is fully booted, ROMMON will no longer be enabled because the router or switch will fully operate.
Environmental variables and the configuration registration process
The environmental variables and the registration process are the ROMMON and Cisco IO XE connection bridge settings. ROMMON environment variables specify the location of Cisco IOS XE software and how the router’s operating system loads. After Ramon initializes the router, it uses environmental variables to find and load Cisco IOS XE software. Settings logging is a software setup process that controls how the router is set up and run.
One of the main uses of the configuration process is to check whether the router is running in ROMMON mode or Administration EXEC mode. The configuration registration process can be done in ROMMON or Administration EXEC mode.
Access network management mode and Ramon
Access to Ramon is almost identical to the PC BIOS, so it should not be considered an additional option for Cisco IOS XE software. Ramon software and Cisco IOS XE software are two separate programs that both run on the router. At certain times, the router runs one of these programs but does not run them simultaneously.
One thing that can sometimes confuse network administrators when using Ramon and Cisco IOS XE software is the IP configuration of the Ethernet management interface. Most users prefer the Ethernet management interface of Cisco IOS XE software to configure routers. The Cisco IOS XE software does not run when the router is in Ramon mode, and access to the Ethernet management interface is impossible.
A practical example to better understand Ramon’s performance
One of the most important problems for network administrators is forgetting the passwords of Cisco routers and switches. Sometimes network administrators leave their jobs without notice, and the new person in charge of the position does not know the passwords.
In this case, you need to know how to recover Cisco router passwords and switches. Because the passwords of routers and switches are rarely changed, they are quickly forgotten and, in the long run, cause serious problems for network administrators.
To solve this problem, Cisco has provided a solution to recover the password. To recover passwords set on Cisco routers or switches, you must first prepare the following essentials:
Requirements for password recovery
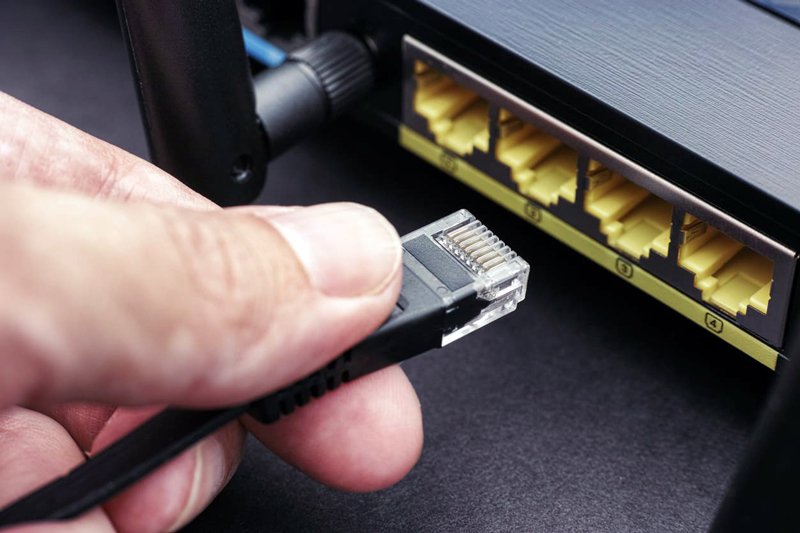
Password recovery is not possible remotely, and you must have physical access to the device. In addition, it requires a Cisco console cable. Most devices come with this cable, a cable with an RJ45 socket that connects to the console port of the Cisco device and the other end to the serial port of the computer. To recover the password, the computer must connect to a router or switch.
If the computer or laptop you are using does not have a serial port, you must use a serial to USB converter to solve the problem. Next, you need to prepare the required software. Software like putty and Secure CRT is designed to connect to Cisco device consoles. The first option is free and compact, while the second option is commercial, but it offers many functionalities in return.
In this article, we use Putty software, which is free. First, download and install the Putty software. Then run it. You should now see the port number and required information in the serial section (Figure 1).
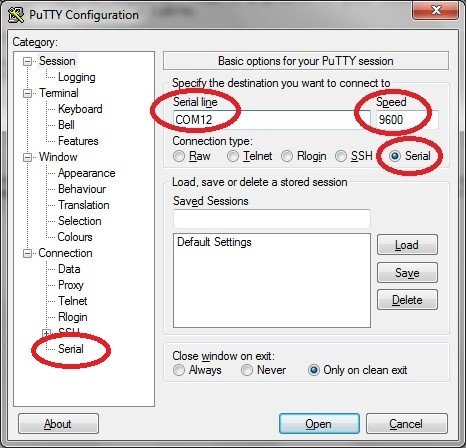
figure 1
If the cable is connected directly to the system serial port, COM! Select, if connected by the converter, you have to go to Device Manager and find the connection port and enter it in the Serial line field of the software (Figure 2). If you are using other software, you may have to set other fields as follows:
9600 baud rate
No Parity
8 data bits
1 stop bit
No flow control
After setting the above fields, click on the Open option to connect to the console.
Device password recovery
As mentioned, the middleware of routers and switches is located on the flash drive, which runs when the device is turned on and booted, and then the settings are loaded from the NVRam into the device’s main memory. The above process is specified by code number 0x2102 in the device configuration. To view this issue in detail, you can use the Show version command. The recovery process is as follows:
-
After connecting the computer to the device and running the Putty software, turn on the device. In the first 60 seconds of turning on the device, press the Break button on the keyboard to prevent the device from booting.
-
Press this button to enter the ROMMON environment. Now enter the config 0x2142 command. The above command prevents the router from reading the configuration settings stored on the NVRam at boot time.
-
Then enter the reset command to boot the router. In this case, the router does not execute any of the set values at startup and enters the initial configuration stage. Type the word no to skip the above step and enter the user interface.
-
Now enter the enable command to access the global environment.
-
Run the copy startup-config command running-config to transfer settings from NVRam to cache. Note that if you enter the copy running-config startup-config command, all configurations made on the router will clear.
-
Enter the show running-config command to see the configurations done.
-
Now enter the configure terminal command to enter the config environment.
-
In the next step, enter the Enable secret command and enter the desired password.
-
Enter the Config-register 0x2102 command to restore the device boot settings to their original state.
-
Press the end key or Ctrl-z to return to the global environment.
-
By running the Copy running-config startup-config command, the settings are saved in NVRAM.
-
Finally, enter the Reload command or press the power router button to reset the device.
How to load iOS on a switch?
Sometimes the operating system (IOS) crashes on a switch, and (as a last resort) you have to reset everything. Given that Cisco switches and routers enter ROMMON mode in such situations, you do not have much maneuvering power. However, there is a way to transfer iOS directly to the computer (via console cable). There is a special technology here called Xmodem.
In this case, the transfer rate depends on the value specified in the baud field. For example, if you set the transfer rate to 9600, it will take about 3 hours for the transfer to take place. Of course, the baud rate can be increased to 57,600 to speed up the transfer process with a little trial and error. You can set the baud rate in ROMMON using the BAUD <value> command as follows.
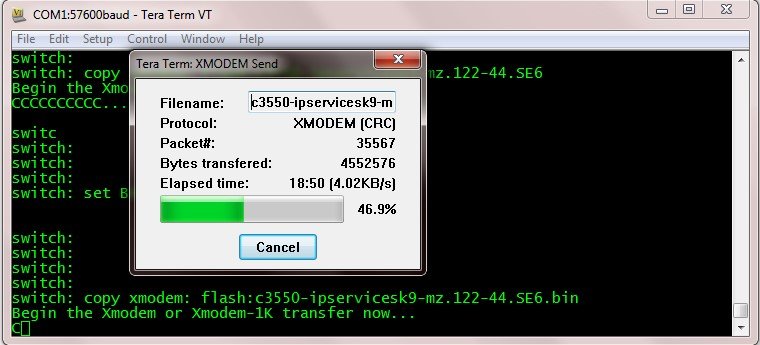
Figure 3
switch: set BAUD 57600
You need to use software such as Putty or TeraTerm for the transfer process to be done accurately. For example, when installing TeraTerm, you need to go to Setup and Serial Port and then set the baud rate field to a value consistent with ROMMON. Once you are done, you are ready to start the file transfer process. The command used for this purpose is as follows:
switch: copy xmodem: flash: c3550-ipservicesk9-mz.122-44.SE6.bin
When you press the Enter key, you will see the following phrase:
Begin the Xmodem or Xmodem-1K transfer now…
C
In this step, you must select the file location from the terminal program.
To do this, go to File-> Transfer -> Xmodem -> Send and select the file you want to transfer. The transition has started, and you will see a window similar to Figure 3.
When the process is complete, you should see the message to return to ROMMON as follows:
Begin the Xmodem or Xmodem-1K transfer now…
C ……………………………………………………………………
File “modem:” successfully copied to “flash: c3550-ipservicesk9-mz.122-44.SE6.bin”
Now boot the device via ROMMON using the following command:
s witch: boot flash: c3550-ipservicesk9-mz.122-44.SE6.bin
The above command tries to use the specified iOS to boot the device.
If the transfer is done correctly, then the boot process will start.
Loading “flash: c3550-ipservicesk9-mz.122-44.SE6.bin”…
###################
###############################################
File “flash: c3550-ipservicesk9-mz.122-44.SE6.bin” uncompressed and installed, entry point: 0 × 3000
The switch now executes the POST command and is ready to serve as before.
– System Configuration Dialog –
Would you like to enter the initial configuration dialog? [yes /
no]: no